one more. I have to say, the fuel tee from ebay is certainly a nice piece and worth the price, IMO!! you should get one if you're rebuilding. http://www.ebay.com/itm/271656171800?_trksid=p2057872.m2749.l2649&ssPageName=STRK%3AMEBIDX%3AIT
-
Enjoy XS650.com? Consider making a donation to help support the site.
XS650.com receives a small share of sales from some links on this page, but direct donations have a much greater impact on keeping this site going.
You are using an out of date browser. It may not display this or other websites correctly.
You should upgrade or use an alternative browser.
You should upgrade or use an alternative browser.
1980 Rootbeer Bobber
- Thread starter wannabridin
- Start date
-
- Tags
- build
That's funny! last summer I emailed that guy back and forth a few times and gave him a full set of dimensions for the XS650 tees, he was making tees for other bikes, but I never heard back from him!
I saw your thread on that, and it spurred me to try to find them. ebay to the rescue!! you should message him and ask if he would mind sending you a set for free!!
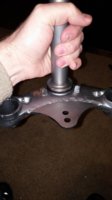
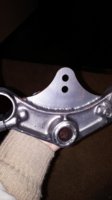
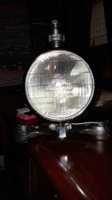
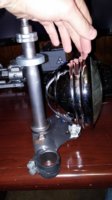
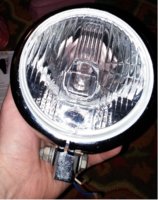
Here's the proposed headlight and triple tree with Hugh's light bracket. Having trouble finding a replacement headlamp for the housing, need a really low-profile H4 conversion 5.75" bulb to replace the 4467 sealed unit (35/50W, weak!!). If i can't find anything, then i'll have to get something else unfortunately. The headlight is SO rad, BUMMER!!!
Attachments
Ok, good news. I think I found a H4 conversion housing that will work. Holy Moley the guy (can't recall his name!) at RallyLights.com (Susquehanna Motorsports) is awesome and helped me narrow down some housings that would work. He said I shouldn't have to deal with my 30W light, as it's unsafe. I didn't want to cut into my super sweet housing, so he found one that should work, with some modification. Have to get a BA9s led for the high beam indicator. no pics of that, but figured I'd document it here.
Oh, and also considering making the seat an air sprung seat using a Goodyear bag (the same one TC bro's uses without their logo) and some custom mounts. Don't know for sure if I'll go that route, but it could be pretty neat (and comfortable). Any thoughts on running shocks AND the air seat??
Oh, and also considering making the seat an air sprung seat using a Goodyear bag (the same one TC bro's uses without their logo) and some custom mounts. Don't know for sure if I'll go that route, but it could be pretty neat (and comfortable). Any thoughts on running shocks AND the air seat??
Found a powdercoater that charges $150 for frame and swingarm. That's a really good deal, imo. Likely going to take it there instead of trying to find someone to blast everything then my brush paint it with farm & implement paint. He won't charge much extra to do my triples, bars and a few other tid bits, and might even give me a cash discount. Pretty good deal if you ask me. Granted that price is only for the "regular" colors, but I think gloss black would look Nice on the frame. Anyone think I should go with a different shade of black??
Names Extreme Powder Coating in Grand Prairie. Some locals might benefit from his prices too.
Names Extreme Powder Coating in Grand Prairie. Some locals might benefit from his prices too.
So headlight won't work without modification. I'm thinking if i have a small adapter ring made from a high-weight plastic (Delrin, HDPE, etc.), I should be good. I just need to take up some space as the headlight I modified is very close. Fingers crossed we have some scrap material at work, haha!
I'd REALLY like to just get something complete, even it's as simple as my headlight. I have a lot of components that are close, but not quite. Also thinking I need to order my tires now so that I have the proper sizes when I start mocking things up. Also can't decide if I want to spend the cash on powdercoating the wheels or not. I'd have to remove the adapters from the rear wheel, but that shouldn't be too difficult. I couldn't coat those as the bearings are already installed, but i think spray bombs should be fine. But it eats into the buget, and I jsut had to drop more than I wanted to get a new crank...
yet again, another update with no pictures. Sorry to anyone that's hoping to see them. Soon (hopefully) I can start updating with more pictures. Time is not a luxury right now.
Take heart from near 40 years of this . The last 10% makes up 90% of the time effort and dedication to craft .
~kop
~kop
haha, yes, i understand that all too well. in time!! i sure wish the weather was more dry, then i could try to finish up my truck...
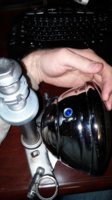
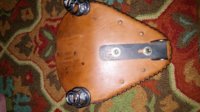
I had a teflon ring made up for the headlight to act as a spacer. It seems to have worked very well. It's noticeable, but not very much, especially against the chrome bucket and glass lens. Also threw a blue LED in there for the High beam indicator, and can't decide if I want to keep it or not. It's SUPER bright. I need to test it in the day and night time to see if it's too bright or not. If so, I might throw a resistor in line.
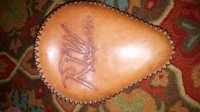
Also picked up my old springer seat. I had this custom tooled years and years ago for another motorcycle I own that has changed styles. It says "RTW" for "Ryan Timothy Wolk" who was a very close friend that passed away in a motorcycle wreck 10 years ago. Under, it says "Numquam Subpono" which means "Never Forgotten" in Latin.
Also picked up my old springer seat. I had this custom tooled years and years ago for another motorcycle I own that has changed styles. It says "RTW" for "Ryan Timothy Wolk" who was a very close friend that passed away in a motorcycle wreck 10 years ago. Under, it says "Numquam Subpono" which means "Never Forgotten" in Latin.
Attachments
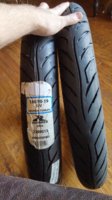
UPS dropped these off yesterday. Put the final coat of clear on the wheels today too, so just need to wait a few days before I can mount them!!
Also ordered some dynabeads. I'm planning on mounting everything myself using zip ties. Saves me a few bucks.
Also ordered some dynabeads. I'm planning on mounting everything myself using zip ties. Saves me a few bucks.
Attachments
OK wannab', you got me.
HTF does one mount tires (or even dynabeads) using zip ties?
HTF does one mount tires (or even dynabeads) using zip ties?
dynabeads will just pour in before setting the bead.
I'll never understand this . Why not just balance the wheel ?
~kop
~kop
my local shops want almost $20 to mount and balance. i got dyna beads for less than half of that. Everyone I've talked to that has ran them, loved them. plus I don't want external weights on the wheels.
But there's a lot of people that share your views on this. Hell, I used to change motorcycle tires almost daily back in college when i worked at a bmw/triumph dealer.
But there's a lot of people that share your views on this. Hell, I used to change motorcycle tires almost daily back in college when i worked at a bmw/triumph dealer.
https://www.youtube.com/watch?v=tI0...at someone could learn a new trick at my age?
Yeah well . I'm not everyone .=wannabridin;403316] Everyone I've talked to that has ran them, loved them.
Don't let that stop you . Estimate with stick on weight in the usual manner then remove and place slightly less weight "inside" the rim secured with quality tape . No visible weight , no problem .=wannabridin;403316]plus I don't want external weights on the wheels.
Not exactly , in fact , not nearly . I've not ever been accused of being conventional or orthodox . I will admit to conservative leanings but not without an appreciation for new technology , tools , talent and practices .=wannabridin;403316]But there's a lot of people that share your views on this.
~kop
so kop, how do you put on the weights with the tire loosely sitting on the wheel? The problem I used to run into was that the tires are slightly unbalanced too, so it's difficult to mount weights to the inside. Unless I'm missing something... What's your trick?
3M vinyl 766 hazzard tape over the spoke nipples . Assemble the tire and tube on the wheel and check balance . If the balance is out in left field then mark the initial spot by drawing a crayon line through the tire and rim , break the tire down and rotate the tire 90 degrees , then 180 degrees . Assemble the tire and tube on the rim with the least out of balance . Using stick on weights (lightly applied) balance the wheel . Mark the tire and wheel again so it goes back on the same way and remove the tube and tire .
Move the temporary weight from the rim and place it inside the rim solidly . Because it will be a bit further toward the outside edge use slightly less weight . This takes some practice to get right . Use 3M 893 Industrial Strapping Tape - 1⁄2" to cover and secure the weight overlaping at the weight . Reinstall the tube in the same orientation it came out and install the the tire to the marks previously made .
Look , this takes time . If you are one of those that turns a tire R&R into an all day deal then this isn't for you . I don't do this often for other than my own custom equipment so if I do it for a live job it's with the understanding that it will be perfect when done and costs as long as it takes to get it right . I can often get it right with just one extra breakdown and reassembly . Even given detailed instructions an experienced mechanic and tire jockey with a spin balancer may not get it in three tries .
So do you want it right ? Spin balance and use whatever weight wherever .
So do you want it right AND invisible ? Take the time to hide the weight .
So do you want it cheap ? Go somewhere else .
~kop