1981 XS Headlight Safety Relay

Britman

XS650 Addict
Messages
232
Reaction score
677
Points
93
Location
Fredericksburg Va.
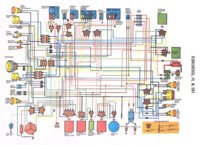
I spent the afternoon wiring in a new blade fuse box. Half of the old glass fuse holders were broken. The reserve lighting unit is disconnected and on the workbench and blue/blk and blue/yellow wire connected. The turn signal canceler unit is keeping it company and with a newly installed automotive two pin flasher produces signals that work great. I also have a horn, tail light, brake light, and a starter that spins like new, rare for XS I gleam. There however is no headlight, neutral switch, or dash lights. The bike is nowhere near being able to be started and I am testing with a outside jump battery. What I find confusing from reading threads here and trying to make heads or tails out of the wiring diagram is the headlight safety relay. I presume my headlight should not come on unless the motor is running and relay is triggered with power from the alternator. (Should this affect the dash and neutral light also, or is there another issue?) Can the HSR be bypassed and I would truly like to install a real damn headlight switch. What can I say, I am old as dirt and like things simple. Any suggestions or hints from those here who understand these relay layden systems and have knowledge on how to simplify would be greatly appreciated.
 
Dash lights should come on when the ignition is turned on. Blue wire feeds the power and they're grounded of course.
Neutral light should come on with the key switched on also. Pale blue power feed for that one iirc.

I'll add that you might find the thread "Some wiring diagrams" and search out for a '78, maybe the '79 schematic too. They were set up with a headlight switch.
 
Last edited:
I'd start by looking at ground connections in the headlight bucket. Yes the HSR can also be removed but it's quite reliable and is a nice "charging system is working proxy" though many have opted for a voltmeter of some sort. The HSR is a self latching relay. once activated it stays on unless the key is cycled to off. In a reasonably healthy system a decent stab at the kick starter or starter button is enough to activate and latch the HSR.
 
I, like you, preferred to have a "real" headlight switch. I ran with a $9 Amazon special for a while, but got tired of looking at it. I ended up eBay'ing a 78' unit (or maybe I bought it from FredInToon, I can't remember) and transplanting the guts into my controls by dremelling a small opening. The threaded hole is already there.

My compromise was that I did add a green "is your headlight on?" LED recessed into the top of the headlight to keep myself honest.

The big "double duty" copper relay was burned up and is gone from my bike. I used a small standard 12V automotive relay in it's place to cut the starter of when the alternator puts out enough juice. Surprisingly easy to wire up.
 
According to the wiring diagram for your '81 model, the dash lights don't come on with the key, they are controlled by the safety relay along with the headlight. Both will come on only after the bike is started (or relay tripped). The safety relay is actually a double unit. It contains 2 relays, one for the starter and one for the lights. I wouldn't mess with the starter one as I think it should be retained.

For the headlight relay portion, the R/Y wire is power in from the headlight fuse. The L/B wire is that same power out to the RLU once the relay is tripped. It also branches off to the dash lights. You can test them and the headlight without the bike running if you like by jumping the R/Y to the L/B.

The neutral light is on a different fused circuit, the brown wired "Signal" one. The safety relay should have no effect on it. The light in the dash is fed constant (switched) power on a brown wire. The light blue wire runs from the bulb to the neutral switch. The switch makes (in neutral) or breaks (in gear) the ground connection for the circuit and that turns the light on and off. First, you'll need to make sure the bulb is good, then check for 12 volts on the brown wire to the bulb when the key is on, and last, test the neutral switch to make sure it's functioning. I would also test the light blue wire for continuity between the bulb and the switch.

I plan similar "simplification" mods on the late model I'm working on. That includes an earlier model throttle housing with the headlight on-off switch. The trick to wiring this in will be to get the fused headlight power feed up into the headlight where the "new" switch can be connected to it, then get power out from that switch back to the battery box area to tie into the L/B wire, all without having to run extra wires. It can be done by utilizing existing wires now unused due to elimination of various "safety" features. I'll outline the process for you if an older stock on-off switch is the route you plan to take.
 
Great information one and all, in particular 5twins. Hopefully I will get back to the garage in the next day or two and start eliminating the "Gremlins". (I am semi-retired, how in the hell do you guys still doing a full 40+ find the time for anything?) The bike has been sitting for years in an open shed and I am sure there could very well be some ground issues. A guaranteed TCI unit arrived in the mail today, so checking for fire will also be on the short list. In reference to a headlight switch, I have no problem with a standard on/off Auto Zone model tastefully mounted. (Trust me, the "Old Girl" is not that pretty, she is one swine that is going to require a great deal of lipstick.) I hoping to get it up and running, clean and neat, and pass it on to a new owner who can take it to the next level as far as Bobber, Cafe, or Stock. Hopefully I will make a buck or two in the process, and the buck or two is probably literal in reference to the profit margin. The compression is great and the "Good Bones" factor is there. The fun for me, I am sure like most of you on this site, it hearing it fire back up and coming out of hibernation. As always I truly appreciate the input from those of you who take the time to pass on your expertise and knowledge. I always try to use the search feature as much as possible, but sometimes you just have to get specific and call of those who have been there and done that, to get a clear picture. Thanks again all...............
DSC03364.JPG
 
What I find confusing from reading threads here and trying to make heads or tails out of the wiring diagram is the headlight safety relay.
Here's the best picture for it. It is shown in the everything off state. Note the relay on the left is normally closed and the one on the right is normally open. The yellow trace comes from the generator and is about 6v. When the generator starts turning (initially from starter motor or a good kick) SR opens and disconnects the starter motor from power. The path continues through that diode and energizes the LR relay causing it to close, turning the headlight on. Once the headlight is on, there is power through that resistor which keeps LR energized even if the engine stops (as long as the key is still on) The direction of the diode means the 12v can't get back to the yellow wire

lighting relay.jpg
 
Spent some time in the garage this afternoon with a test light ant two Coors Lights, that is my limit when it comes to wiring. Someone has sure been in the headlight bucket ahead of me. The bike has aftermarket signal filament front turn signals, I presume the bike came with front running lights in the stock signals since there were two hot wires with connectors just hanging free. I have upper dash lights, (of course every bulb is blown), but no neutral or high beam. Found the problem, the upper dash lights are wired to the low beam green wire, but the hot half of the connector containing the brown neutral wire and yellow high beam is nowhere to be found. There are splices and crimp connectors abounding. This is going to be fun. In reference to the Headlight Safety Relay, it does work if you run a jumper to the blu/blk and blu/yel connection from the former RLU, it will trigger the headlight. I am worried though, when the HSR is connected, the bike's starter spins the motor pretty quick, but it does not trip the relay. I am hoping there is not an issue with the alternator throwing juice. Oh well, I love a good challenge......
 
Wait you call yourself Britman and you're drinking Coors light? That's the problem right there, this time of year you need beer with some flavor! Love to see a pic of the "Bucket of Blood"
 
Wait you call yourself Britman and you're drinking Coors light? That's the problem right there, this time of year you need beer with some flavor! Love to see a pic of the "Bucket of Blood"

Gary,
Coors Light is brewed by the Gods and sent down to earth for us mere mortals to enjoy. Here are a couple of shots, "Bucket of Blood" sums it up quite nicely. I think the expired stink bugs actually add to a bit of character to whole scenario. Heading out this afternoon to locate some dash light bulbs. I think I might pull the carbs next and let the wiring rest for awhile until I decide if I want to eliminate the HSR or keep it if is functional. I also could spend the afternoon removing all of the aluminum paint the PO or someone has sprayed the entire motor with. This one is going to keep me out of trouble for quite awhile but I am enjoying the ride......

DSC03368.JPG
DSC03370.JPG
DSC03369.JPG
DSC03372.JPG
 
Nice big clear pics!
I'd be thrilled to open a headlight to such pretty wiring, seriously that's not half bad. Dead bugs are a nice touch! There should be a second 4 way ground connector in there, those two hanging blacks (grounds) need to be plugged in, that could be your "dead bulb" issue.
XS650 never had front running lights, darn it.
 
Yes, that doesn't look too bad at all. These all need a "sorting" inside the bucket though. There are 3 holes in the back of the bucket for the wires to go through. For some reason, Yamaha over-stuffs the top one. I start by disconnecting everything and pulling it out of the bucket. Then I'll pull the turn signals out and take the bucket right off. This makes it easier to clean and/or repair all the wires, and refurb the inside of the bucket (clean, paint). Paint on the inside of the bucket is more for protection than looks, so I just brush paint it, using a lighter color so the wiring is easier to see. The headlight ears are also straightened if need be (and most do).

When reassembling things, the various wiring harnesses are fed back into the headlight one at a time and routed as well as possible. I take this opportunity to reroute some of the ones from that over-crowded upper hole in through the lower holes. In particular, the harnesses from the 2 switch assemblies get moved to the lower holes.

I see from your pics that your main harness is suffering from a common malady, sag. The 2 main harnesses running into the headlight on either side of the steering neck sag down over time and tend to pull out of the bucket. There's a simple "fix" for that, a harness "sling", and Yamaha thoughtfully provided the holes in the frame to route it through. On the gusset plates just behind the steering neck, you'll find a small hole on each side just in front of the gas tank puck holders. You'll need two 8" cable ties. Stick one through both holes from the left side, the other from the right side. That will give you a male and female end of each tie on each side. Loop them around the harness and connect them together. Progressively snug them up until you lift the 2 harnesses up to and just under the tank puck holders .....

QsA2ljz.jpg


AKNpZnn.jpg


hyud0gY.jpg


When I originally did this, the cable ties only lasted a few years before the sharp edged holes in the frame cut through them. I have since stuck little rubber grommets in the holes which cured that problem. Consider this my "harness sling v2.0", lol.
 
Looked high and low and damned if I can find the second four way connector for the tach side. With some grounding here and there and temporary spicing, I got dash lights and a high beam indicator light, Still working on the brown and light blue for the neutral bulb. Pulled the carbs, damned if they don't look pretty good, even after sitting for years. Also drained the oil, of course repair is needed on the sump filter and the drain plug on that was frozen solid, biggest breaker bar I had wouldn't budge it. Going to spend some time doing a parts to order list, make some gaskets, and use some of the helpful tips provided to move further ahead. ( I am pulling the the bucket to do the clean up and will use the sag removal method provided.) As always not enough time in the day, but overall I am happy with the results. Have a great week everyone....
 
Need some advice from the TDI experts. Before going much further with making her pretty I wanted to make sure I had spark with the stock system. The original coil tested fine on the primary buy somewhat weak in the secondary so I ordered a new one within spec which arrived today. A TCI box from a long time member here arrived also, it came off of a running bike so is guaranteed. Hooked everything up and of course no spark, so out came the voltmeter. Testing from the sending unit showed 760 ohms on both orange and grey to black. Tested the new coil, perfect on both primary and secondary. Checked all grounds, and even ran a new frame to motor wire. I am getting volts to both coil wires which has me somewhat stumped, the red/white is reading 11.75 and I am getting about 9.60 on the orange. Ok Gentlemen, what am I missing, or should I just bite the bullet and give Mikes my hard earned money for an EI system. I am done for the day, except for picking the tools up, that with take until midnight. Any help would be greatly appreciated as usual......

George
 
The R/W and Orange is probably about right. The first is from the switch and the other the tci. If they were not close the coil would be energized when things were at rest. Probably what's going on is a bad connection somewhere, if the wiring is stock. First thing I'd do is make sure every wire from the pickup coil is making it all the way back to the tci. Through the first crimp, then through the connector then through the second crimp. Also you can look at the pickup with a volt meter as you turn the crank by hand. Could be wrong rotor or bad magnet.
81XS650_WIRING_(fixed).jpg
 
Got it, pretty blue spark on both plugs. Of course I have wires going in every direction and have a ton of clean up to do with good old 3M 33 and shrink. Bad connection somewhere in the old harness connections. I had cleaned them all with contact cleaner and applied electrical grease, but still no luck. I had a TC Brothers 6 pin chopper harness left over from the last project so I hooked it up temporarily as a final shot, and that cured the problem. With this setup I had to bypass the relays, so that decision was made for me. I am going to wire in the headlight and taillight on a toggle and go on with life. I did find the connector was cut off of the old regulator and it was tied in with every bullet and spade connector known to man, fortunately I had an extra one of those also, so the final result should be a little neater. I have the carbs on the workbench currently and installing kits this afternoon, just need a little break from looking at wires............
 
Has anyone else but me ever hit the point during one of these rebuilds when you just wonder, will I ever get to the end? Carbs are done, plugs were still in the pilot jets, damn interesting what the needles were set at after drilling them out. I ended using mostly original parts with just a darn good cleaning. Started a basic frame clean up, (motor still in), decided to go ahead and replace the chain and sprockets, apparently the PO wasn't big into chain or any type of maintenance for that matter. I did replace the shocks with an extra early model set I had left on the parts shelf. I love the way they put reflectors on every known to man on these early 80's models. Engine detail, valve adjustment, wiring, and a paint job still on the agenda along with a good twenty other things to scratch off the list as time marches on. Tired but still having a blast......

DSC03381.JPG
DSC03373.JPG
DSC03375.JPG
DSC03376.JPG
 
Since I have two projects in the garage at the same time I am trying to get one out the door to replenish the checking account somewhat and free up some room. I found that a Chrysler Duplicolor rattle can was pretty darn close to the original Yamaha blue (Deep Sapphire Blue Met) of course I am color blind but it looks close enough to make me happy. Final buffing and wet sanding should really tell the tail. I found an extra leftover 275/19 front tire from a Honda Scrambler project in the shed and being the type not to waste anything, in other words cheap, I mounted it up. I kind of like the look with the chopped front fender gone, a look the Fonze would appreciate. I do have a couple of questions for the experts though. Both bikes are titled as 1980 year models with matching numbers and both are specials. I have a side hinged seat on one, the other is rear locking mount. One has plastic side covers, the other one has metal covers, everything else looks pretty much identical. Are these mid year changes or should I double check my serial numbers. By the way, they both fire up immediately with great compression. Unfortunately, even with the carbs refurbished on bike number one, the damn fuel tee leaks like a sieve. A aftermarket replacement is one its way.....
DSC03401.JPG
DSC03400.JPG
DSC03398.JPG
 
One of your titles is incorrect. You have an '80 (metal side covers, hinged seat) and an '81 (plastic side covers, lift-off seat, oil sight glass).
 
Back
Top