1983 XS 650 Special Build

lakeview

XS650 Guru
Top Contributor
XS650.com Supporter
XS650.com Supporter
Messages
1,975
Reaction score
5,836
Points
513
Location
S-W Ontario
SAM_7216.JPG
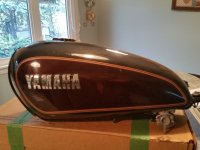
Pictured is the start of my 1983 Special build. Frame and engine matching numbers 5V5- 0306xx, build date October 1982. Bought this in Parry Sound about six years ago as part of a two bike abandoned project. Came with several boxes purporting to be all of them and the motors packed in crates. Other than seeming complete and not seized, know nothing about the motor. (The other is a hinged seat Special which had been thoroughly detabbed, stripped and clear coated - project for later or sold as a bobber in a box.)
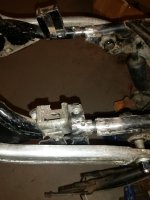
The 83 came as seen with all the electrics including the TCI box, side stand switch has been removed, tapered bearings in steering head, swing arm bushings sloppy, and a drum mag rear wheel. A couple years ago, I bought a really nice factory paint 83 tank, black with maroon side scallops, picked up a new OEM seat and along with the usual detritus of a reformed indiscrimate hoarder, I have more than enough stuff to put this together.
SAM_7221.JPG SAM_7222.JPG
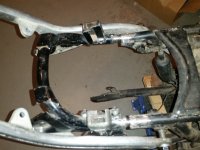
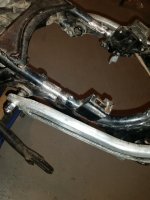
So you see my first problem. Some time in the past, someone got busy with a grinder and no plan and cut off the loop. Since it is going back all stock, the loop has to be welded back on. However, the cut off loop did not come with the other stuff, so back to the shed and out with a couple prospects. I have the heavy alloy handle so once I get some reinforcing slugs machined - inside diameter of frame is just over 18mm, the slugs I could find are 3/4 inch so I have to do some grinding to get them to fit - I will be able to dry fit this before welding so that the seat can go on and off without a wrestling match.
I will be buying a new harness so will get all the electrics off the frame then go find someone to machine my frame reinforcements.
 
Last edited:
This is the tank that launched a project! In my view, a really classy colour that will go with the black fenders.
20181125_153256.jpg
Unfortunately, the wheels it came with are not the multi-spoke most pics show, but the mags like the other Specials.
 

Attachments

  • 20181125_153114.jpg
    20181125_153114.jpg
    120.8 KB · Views: 193
Last edited:
What reinforcements are you planning?
At the very bottom of the first picture, two pieces of 3/4 round stock about 2 inches long will be used as internal slugs to give strength to the frame repair. Since the cuts were outboard of the shock mounts, the repairs will only carry the fender mounts, indicator lights and seat mounts. I read someplace that slugs for a hard tail should be about 2 inches long so the same in my application should be more than enough.
Didn't know where to buy them, but I stopped by a fab shop on Friday with the cut off loop in my hand, the fellow walked to his cut off saw, said how much do ya need, cut two 2 inch chunks and charged me $5.00.
 
I see the dealer stamp on that brochure is from Leamington which is maybe 30 minutes down the road from me!
Leamington, the Sun Parlour of Canada, now hosts hundreds of acres of greenhouses along with many hundreds of wind turbines producing electricity that often goes to waste as the wind does not necessarily blow when the load is greatest.
 
Last edited:
Big shout out to Thames Machine and Tool which skimmed a couple mm's off the slugs this morning. They are a nice tight fit so I can assemble the repair to make sure the seat will mount and dismount before welding.20181127_132123.jpg
 
Here is the test fit. Since the hoop I have is not the hoop that was cut off, the inch or so of slug on each side of the gaps provides flexibility to put things back to stock. The alloy handle was a big assist in the fitting.
Finally, the test with the seat coming on and off without sticking was 100%.
Time to make it permanent!
 

Attachments

  • 20181128_133211.jpg
    20181128_133211.jpg
    134.6 KB · Views: 205
  • 20181128_133225.jpg
    20181128_133225.jpg
    136.8 KB · Views: 228
  • 20181128_133248.jpg
    20181128_133248.jpg
    147.4 KB · Views: 288
  • 20181128_133718.jpg
    20181128_133718.jpg
    152.7 KB · Views: 223
$30.00 of hobby oxygen later, I have a loop back on the frame. The welds sure looked different from what I imagined the end result would be, but with some coarse file work and some filler down the road, it will do the job. The Mapp gas Bernzomatic torch did not have quite the BTU's to get the 2 inch long slugs to the heat I would have liked, but I trust in capillary action.20181128_181108.jpg
 
Last edited:
Is this an example of the elusive left side "beauty plate"?
 

Attachments

  • 20181129_145646.jpg
    2 MB · Views: 203
Yes, but I don't think it's any more "elusive" than the right side one is, lol. Personally, I'd leave the darn things off but they're needed to help hold that lower 2nd side cover on.
 
Well I don't have the second cover, so I guess I will leave it off.
 
Yes, but I don't think it's any more "elusive" than the right side one is, lol. Personally, I'd leave the darn things off but they're needed to help hold that lower 2nd side cover on.

I never got the lower covers with my 84 but I don’t remember any attachment points on that plate. I ground off the attachment points on the frame only. I left the side plates on as they tend to clean up the sides.
 
Back
Top