22's 1980 xs650 build thread

Twenty2

XS650 Addict
Messages
165
Reaction score
158
Points
43
Location
Hamilton
Hi all ,
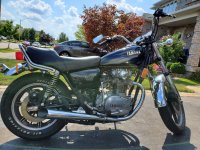
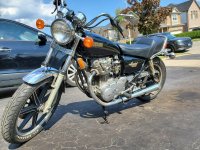
I've been following the forum since the summer when I bought a 1980 xs650 with 18,000km or 11,000 miles. The bike looked to be in great shape and had hardly traded hands. Once I realized how original it seemed to be my plans quickly changed from a decent sized list of cosmetic modifications that I wanted to make to a very small list. Anyways, I've had the bike since August but haven't had a lot of time to ride it yet and even less time to work on it. Through reading the forum I know a lot of the typical maintenance that I need to do before riding it so im hoping that most of my questions aren't overly redundant and are instead, specific to my situation.

The bike started and ran fine when I brought it home, however, after sitting for a month or so it started to have some starting issues, but I'm not really worried about those at the moment. Last night I finally had a chance to dive into some of the work I wanted to do.

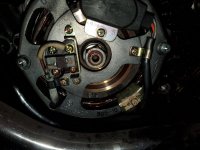
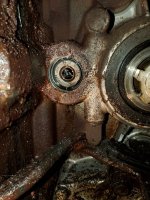
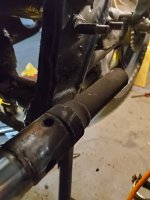
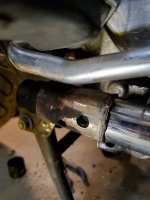
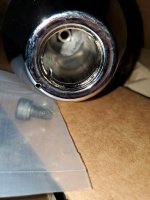
I tested the coil and everything looked good there, I was getting correct readings on the primaries and secondaries. I would have liked to put some new plug wires on but of course with the stock coil I can't, so I cleaned up the end of the wires, fitted them with some new NGK non-resistor caps and put some BPR7ES plugs in. My next job was to tackle the oil leak coming from the left side, my plan was to replace the short pushrod with a long one and replace the seal and bushing with new ones. But first with the cover off I tested the rotor and it read 5.2ohms between the rings, however, there were some scratches on the slip rings, is this okay? I also swapped the brushes, inside brush to outside and outside brush to inside as one was wearing much faster than the other, I'll replace these when I can but even the short one still had some life left. Back to the oil leak though, the pushrod had a lot of play so hopefully this is a big reason for the oil leak. I was able to hook onto the back of the seal and wreck it enough where I was able to grab a hold of it with some pliers and yank it out, it didn't come easy. My next step was to remove the bushing, this is where I got stuck as I couldn't get it out, I didn't notice a slit in it so my guess is that it's stock and I won't be able to bend it. Is using the drill bit method my only option? I tried to hook onto the back of it and pull it out but the lip was small and it wouldn't budge, I think its definitely worn out though as I was able to get the bearing out with the bushing still in place.

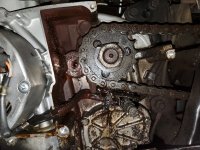
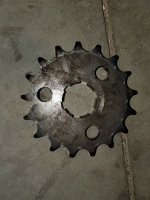
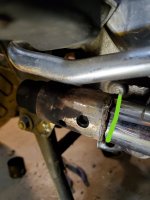
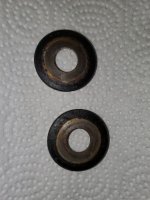
I also noticed the sprocket nut was very loose as I took it off with my fingers, I understand this is also common and a likely leak site. I've attached a photo of the sprocket, any thoughts on its condition? I'll eventually replace it with a new chain and rear sprocket but I'm hoping it's okay for now.

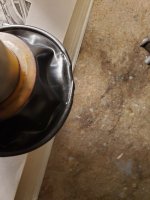
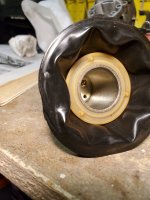
Anyways thats where I got to last night, I've attached some photos, im actually wondering if the left side cover had ever been taken off, is there anywhere inside the left hand cover that I need to be careful of when cleaning with mineral spirits? The gasket seemed original and was in bad condition, from what I gather some mineral spirits and a gentle scraping is my best option there.

Lots to do but I'm glad I finally started, it'll likely be a slow process for me based on the amount of time I'll have but here's hoping it's ready to go come spring.
 

Attachments

  • 20200823_151100.jpg
    20200823_151100.jpg
    317.2 KB · Views: 354
  • 20200823_151131.jpg
    20200823_151131.jpg
    337.2 KB · Views: 348
  • 20210126_204031.jpg
    20210126_204031.jpg
    288.5 KB · Views: 338
  • 20210126_204532.jpg
    20210126_204532.jpg
    182.2 KB · Views: 340
  • 20210126_215100.jpg
    20210126_215100.jpg
    238.1 KB · Views: 351
  • 20210126_215558.jpg
    20210126_215558.jpg
    310 KB · Views: 389
You've got a pretty nice bike to work with there. It doesn't look all trashed out like many we see around here, lol. The stock pushrod bushing was split. I've removed them both ways, by drilling and by collapsing them in by the split. I find the collapsing method easier and less messy (no drill shavings to worry about). Your front sprocket doesn't look terribly worn but I can see a little wear on it. Flip it over so you can utilize the unworn sides of the teeth. That should get you through to chain and rear sprocket replacement time. If the sprocket nut is loose, it leaks big time.
 
Hey Twenty2; Good looking special there you'll have a beauty with some
2Fwp-content%2Fuploads%2F2013%2F04%2FElbow-Grease2.png

Major oil leaks tend to leave a trail of clean aluminum in a /\ down from the source so yours was very likely that loose sprocket. Sprocket should be good to go for at least a few thousand more miles. The bearing will always pass though the bushing cuz it's the same OD as the shaft. But sounds like your bushing needs to come out now. Yeah a drill kinda trying to jam and hook it so it can be pulled free. or a tap can used as a puller. Nothing will get hurt by mineral spirits. But want to avoid dirt/solvent getting into sprocket bearing seal area, clutch bearing, and slip ring areas. I normally unscrew disassemble and clean the clutch ball ramp, heavily grease with black molly grease, reinstall. Prolly no need to clean the slip rings There's actually some science that a layer of carbon on rings helps improve electrical performance. Order new brushes, they do wear and the wear line is really "on the line" of no longer working.
 
You've got a pretty nice bike to work with there. It doesn't look all trashed out like many we see around here, lol. The stock pushrod bushing was split. I've removed them both ways, by drilling and by collapsing them in by the split. I find the collapsing method easier and less messy (no drill shavings to worry about). Your front sprocket doesn't look terribly worn but I can see a little wear on it. Flip it over so you can utilize the unworn sides of the teeth. That should get you through to chain and rear sprocket replacement time. If the sprocket nut is loose, it leaks big time.

Thanks 5twins, i'll try again to find the split and collapse it on itself, I also have a 3/8 thread tap that I might try using. Glad to hear the sprocket is decent, as long as the chain is good to go I'll keep it as is for the season.

Hey Twenty2; Good looking special there you'll have a beauty with some
2Fwp-content%2Fuploads%2F2013%2F04%2FElbow-Grease2.png

Major oil leaks tend to leave a trail of clean aluminum in a /\ down from the source so yours was very likely that loose sprocket. Sprocket should be good to go for at least a few thousand more miles. The bearing will always pass though the bushing cuz it's the same OD as the shaft. But sounds like your bushing needs to come out now. Yeah a drill kinda trying to jam and hook it so it can be pulled free. or a tap can used as a puller. Nothing will get hurt by mineral spirits. But want to avoid dirt/solvent getting into sprocket bearing seal area, clutch bearing, and slip ring areas. I normally unscrew disassemble and clean the clutch ball ramp, heavily grease with black molly grease, reinstall. Prolly no need to clean the slip rings There's actually some science that a layer of carbon on rings helps improve electrical performance. Order new brushes, they do wear and the wear line is really "on the line" of no longer working.

Thanks gggGary, I think a lot of that grease is in order but thats definitely the plan. I haven’t looked too much into clutch adjustment or the clutch ball ramp but ill add that to my to do list while I'm inside the LH cover.

I'm ordering a few new things including the long push rod and bushes and need to spend a bit more for free shipping, after reading through the forum it sounds like I should replace the swingarm bushings with bronze ones and install new tapered steering head bearings. Any recommendation on what I should do first? I'll likely do both eventually but don't want to purchase both today.
 
I had an issue with the long pushrod from Mike's. The ends wore badly in a few thousand miles. Apparently they didn't get hardened. For that reason, I can't recommend it. I suggest watching eBay for a N.O.S. original. You can usually find them for about the same cost as that shit repop.

iUDEG9e.jpg
 
So I've made some decent progress which has largely included taking parts off to give it a proper cleaning. I ripped out the corroded battery box, chain guard and some other parts in that area as thats where most the oil, grease, dirt and rust has obviously collected. I also cleaned inside the left had cover, installed a new clutch pushrod seal and bushing and also exchanged the short push rod for a long one, unfortunately it was tough to find a NOS on ebay in Canada so I went with 650direct for now but will keep my eye out for an original. Once I clean the clutch ball ramp but then I'll take some before and after shots.

I'm also going to install the commando mufflers and was hoping to use my current headpipes (see photos), I took off the old mufflers and I have a few questions:
1. Is it possible to tell if my headpipes are original?
2. Why is the inside pipe on one of the headpipes longer than the other one?
3. Based on how these look, what do I need to do to slip on the new 1.5" ID mufflers?

I don't have a lot of experience with exhaust/mufflers so any tips would be appreciated.
 

Attachments

  • 20210313_212532.jpg
    20210313_212532.jpg
    125.3 KB · Views: 213
  • 20210313_212523.jpg
    20210313_212523.jpg
    133.2 KB · Views: 216
Headers look very much original only factory pipes are double wall and I'm not aware of any aftermarket with that distinctive "special" sweep bend. The pipes were welded to the muffs at the factory so someone had to cut them "somewhere".
 
Yes, you're going to need to cut those pipes again, make them a bit shorter and even up the ends. That stock headpipe is double walled with an air space between the two pipes. There are also vent holes in the outer pipe to allow moisture to escape from between the two pipes. You can't clamp your aftermarket muffler to the outer pipe or exhaust gases are going to leak and sputter out the vent holes. You need to use an adapter. See post #19 here .....

http://www.xs650.com/threads/after-market-exhaust.276/
 
Okay thanks, should I cut through both inside and outside pipes as close to all that crusty stuff as possible? I've marked the line I would cut in the photo below. There's not a lot of room there to cut because the mounting bracket is right there as well but I think there could be just enough room.

I really didn't want to buy new headers but would it be reccomended? Will the commandos with my stock headers be just as good? It doesn't look like 650direct carries the mikes 1.5" headers and im not willing to pay Mikes to ship it to Canada. Is there any other common 1.5" headers that I could maybe find in Canada easier?

Anyways just looking for some advice on what my best course of action should be. I have two options, find new headers because it's definitely worth it or use the adapter with my stock headers as that will be just as good as new headers (or close to as good and maybe get new headers down the road)?
Thanks.
 

Attachments

  • 20210313_212523.jpg
    20210313_212523.jpg
    133.4 KB · Views: 187
You can cut a hair farther back, right next to the weld. I'm not sure you can get the good Commando mufflers either. You may only be able to get those EMGO copies in Canada.
 
You can cut a hair farther back, right next to the weld. I'm not sure you can get the good Commando mufflers either. You may only be able to get those EMGO copies in Canada.

Apparently they aren't EMGO's according to the person I talked to but I'll see when I get them I guess. If they are the good commandos, will running them with the stock headers be fine?
 
They should be fine. Where are you getting the mufflers from? Are they 1.5" inlet size or 1 3/4" that requires reducer sleeves to fit?
 
They should be fine. Where are you getting the mufflers from? Are they 1.5" inlet size or 1 3/4" that requires reducer sleeves to fit?

Perfect, thanks, that makes things easier. They are the 07-0065 from 650direct in Canada, and apparently have the 1.5" ID, they also have 1.75" ID commandos but I ordered the 1.5" ones.
 
Funny, I don't see them on their web site. Yes, hopefully you'll get the 1.5" inlet ones and they will be the old style with the removable baffle bolt.
 
I was able to get back to the bike a bit today, I took the carbs off to give them a cleaning and for the most part they look real good, my only concern is that when I do the diaphragm test, where you cover the curved hole, one slide falls very slowly, about 12 seconds, the other slide falls much quicker, probably 4 seconds. When I look at the diaphragm and shine a light through it everything looks good so im not sure what the issue is, I did notice a small imperfection along the edge though, I tried to take a picture of it which you can see below, could this be my issue? It still seems to seat well in the groove. Either way is there anything else I should test before looking for a new diaphragm? Any thoughts would he appreciated. Thanks.
 

Attachments

  • 20210320_100043.jpg
    20210320_100043.jpg
    134.5 KB · Views: 174
  • 20210320_100011.jpg
    20210320_100011.jpg
    156.2 KB · Views: 173
Couple things to try - switch it to the other carb and see if it falls fast there too. This would eliminate the choke plunger as a possible issue. It needs to be installed and sealing for the drop test to work right. You could also try smearing some rubber friendly grease around the lip, might help it seal in the groove better.
 
I think it worked, I switched it and it dropped much slower, I counted 12 seconds or so, I then tried the proper slide for that side and it was even slower then before, about 17 seconds (previously it was 12). I'm thinking that I didn't have the choke all the way in when I did the test the first time, once I get the carbs back together I'll test again before looking to replace. What would an acceptable difference in drop speed be? Would 12 seconds on one side and 17 seconds on the other side be okay?

If there does happen to be something wrong with the choke plunger would I replace the plunger and dust seal or just the dust seal? It looks decent, is there a way to tell if it's faulty?

Also, I had a chance to look at the commando muffler, it's definitely a 1.5" inlet and includes the baffle bolt, I've added a picture of it.
 

Attachments

  • 20210320_221635.jpg
    20210320_221635.jpg
    153.4 KB · Views: 176
The dust seal really doesn't have anything to do with how the choke plunger seals. It's just a dust seal on the outside. Usually, both slides drop about the same. Honestly, I never timed them until people started mentioning it here. The set I just assembled dropped very slow, taking nearly twice as long as yours (about 30 seconds). But I seal everything up good. I put that rubber friendly red rubber grease on the rubber tip of the choke plunger and all the way around the lip on the diaphragm.

You could try pushing in on the choke plunger as you're doing the drop test, see if it slows the drop. That would tell you if it's sealing correctly and on it's own. You could also open the choke while doing the drop test. That should make the slide drop real quick. That would tell you it was sealing OK before you opened it.
 
I've had a bit of time to make some more progress over the past couple weeks, I've put the carb cleanup on hold for a bit and decided to get back to the elbow grease, I've taken most of the back end off to give it a good cleaning, swingarm and fender are off. The swingarm actually came off fairly easily, a few hits with just a rubber mallet and it was loose. I wasn't going to worry about the bushings but since I have it off I figure I might as well put some new bronze ones in. The old plastic bushings are tougher to get out than I was expecting, there doesn't seem to be as big of a lip to punch them out from the inside as I thought there would be, i'll try cutting them out with a hacksaw blade as I've read that is my best bet? My shaft bolt looks fine and so does my pivot tube so I'll reuse those after cleaning off the rusty grease. My main question is about the grease seals, should these be replaced? Mine look okay but they don't cost much so im thinking I should just put new ones in? Also, I've read that I should replace the grease zerks, should I?

Anyways it's a slow process for me due to other commitments but I'm making progress on cleaning the 40yr old grime off which definitely feels good.
 

Attachments

  • 20210405_120056.jpg
    20210405_120056.jpg
    170.7 KB · Views: 156
  • 20210405_120047.jpg
    20210405_120047.jpg
    161 KB · Views: 161
Back
Top