22's 1980 xs650 build thread

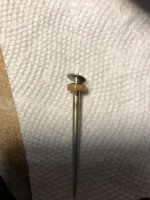
What kind of floats do you have, brass or plastic? The setting spec differs for each, and your 23.5mm setting is pretty far off from both, lol. Stock, a 1980 carb set would come with brass floats, but someone could have swapped plastic ones in. The setting spec for the brass floats is 27.3mm ± .5mm, and for the plastic floats, it's 22mm ± 1mm. Depending on which type of float you have, your 23.5mm setting will make the fuel level too high (brass float) or too low (plastic float). The float level being off can make the bike run rich (too high) or lean (too low). I'd say it's best you revisit the floats and set them correctly. No sense trying to re-jet and tune the carbs with the float levels messed up like that.

Is your bike a Canadian bike with the Canadian carbs? I ask because if it is, it should have an adjustable needle and may be jetted slightly different than the U.S. models. Here in the States, our BS34s came with a fixed (non-adjustable) needle, 132.5 mains, and 135 air jets. Yours may have 130 mains and 130 air jets. You'll need to check that. The re-jetting changes needed will probably be the same as far as number of size change, just the size may differ depending on what you've got to start. For just the mufflers, one up on the mains would probably be good. Once you add pod filters, two up on the mains would probably be good, along with a step up one on the pilots.

I also play around with the pilot air jet size, reducing it 2 if I don't change the pilot, only one if I do. You may not need to do anything with yours if it already has a 130 in it.

I have the black plastic ones, so I'll aim for 22mm. My bike is Canadian and I would have guessed the carbs are bone stock but I definitely can't say for sure, though, I do know the floats do have the sleeve for a better fit on the pin, either way I'll adjust the tang accordingly.

The bike came with 132.5 mains and 135 air jets and I'm really not sure if my needle is adjustable or fixed, I'm assuming it would be obvious if it was adjustable so my guess is that it is fixed, the only thing I didn't take apart when cleaning the carbs was the needle from the slide, maybe I need to do that to know if it is fixed?

It sounds like with just the muffler change I'll up the mains to 135 and leave the rest as is, if it needs another change I'll look at upping the pilots one size and/or reducing the air jet.

This is the first set of carbs I've torn into so the help is much appreciated!
 
Yes, the e-clip and adjustment slots on the needle are covered by the retaining plate so it would have to come out for you to determine whether or not it was adjustable. There were minor differences between the U.S. and Canadian bikes so it's sometimes difficult to pin things down. For instance, your carb set looks like an '81 set due to the plastic floats and the drain screws on the lower sides of the float bowls. The '80 carbs had brass floats and drain bolts on the bottom of the float bowls just like on the BS38s. But, maybe the Canadian bikes got these carb changes a year ahead of the U.S. bikes. The sleeve in the float pivot is a stock thing so yours sound like they're original parts. Many aftermarket floats don't have it and their function can suffer. They're a sloppy fit and can hang up.

Also, the choke rod shouldn't have a bend in it, somebody did that to it. The 3 detents are for off (choke closed), half choke, and full choke.

Took a look last night and it looks like they are adjustable.... so now the obvious question is do I leave it as is or adjust it?

I cleaned the carbs thoroughly but somehow when I took them apart again tonight I noticed dried up fuel flakes under the float valve seat and I know I cleaned that spot with cleaner and air so no idea what happened there. After removing the seat I couldn't get it back in, seems like the oring has stretched out and is no longer a tight fit, I was able to tap it in but it damaged the oring. Is this a part that is safe to order from 650direct? I'd probably replace the seat and the float valve.

Also, I ordered some mikuni jets from my local dealer and the tag says mikuni jets but they don't have the mikuni symbol on them, so im guessing they aren't genuine, thoughts on non genuine mikuni jets? I'm guessing it's hit and miss? Anyone familiar with this brand?
 

Attachments

  • IMG_07381.jpg
    IMG_07381.jpg
    169.9 KB · Views: 109
  • 20210707_233625.jpg
    20210707_233625.jpg
    144.4 KB · Views: 115
Yes, that looks like the adjustable Canadian needle. It would be a 5IX11 and is most likely set in it's middle, #3 (from the top) slot. Many times when you increase the main jet size, the bleed-over from the larger mains into the midrange makes it too rich. You correct that by leaning the needle a step (raise the clip which lowers the needle). You may get away with going up one on the mains but going up two may require this. But, only running and riding the bike is going to tell you for sure. For now, you can just leave it where it is.

Yes, repop jets can be hit and miss. I'd try to eventually track down some genuine Mikuni ones. In the States here, many of us get them from Niche Cycle .....

http://www.nichecycle.com/ncs/categories/carburetor/mikuni-parts-by-category/jettting-tuning.html

Your BS34s use the large round style for the main and the small round style for the air jet .....

M98LIeO.png


The pilots are the BS30/96 type .....

Uoaj1xt.jpg


You can just replace the o-ring on your float needle seat if you like. The size is 1.5mm x 7mm. If replacing the whole assembly, again, genuine Mikuni or Yamaha ones are best.
 
and the tag says mikuni jets but they don't have the mikuni symbol on them
Just to clarify, is the symbol missing from the jets or just the package?
 
Just to clarify, is the symbol missing from the jets or just the package?

Missing from the actual jet, I wasn't sure if they stopped stamping the jet or if these were just not genuine, sounds like the jet should still have the symbol, which these don't.
 
Yes, they should still have the symbol .....

pln7zwN.jpg


iqgtOaY.jpg


U21ykuP.jpg


Even the pilot jets and needles will have it .....

hFDNXRM.jpg


5Pb9lAT.jpg
 
Those mufflers look to be free flowing.................the PO looks to have upped the jetting to compensate for them.

If you buy new mufflers and they aren't as free flowing then going up on the jets you have now, will go against normal procedure.

Canadian and Oceania; BS34's have the adjustable needle 5IX11, (slightly different profile), and needle jet, 336YO, (18 holes, 4 lines, 2x5 and 2x4), made for a richer running bike hence the smaller Main and air Jet sizes from factory, 130 mains and 130 air jet.

US; BS34's 5HS12 Jet needle and YO needlejet, (14 holes, 4 lines, 2x4 and 2x3)

Terrible pic, the holes can be seen, just, so i marked them
Photo130 shpn vertically text 4 crop copyright.jpg


I went through this years ago when i bought my 80SG here in Aus. Reading about the BS34's and MikesXS had just started to sell the canadian needle and 336YO. All the information i was reading was US based and i applied it to my bike and didn't realize Aussie bikes had a different carb set up to the US.............Even the Aussie club site didn't distinguish the difference.
 
Last edited:
Yes, you're going to need to cut those pipes again, make them a bit shorter and even up the ends. That stock headpipe is double walled with an air space between the two pipes. There are also vent holes in the outer pipe to allow moisture to escape from between the two pipes. You can't clamp your aftermarket muffler to the outer pipe or exhaust gases are going to leak and sputter out the vent holes. You need to use an adapter. See post #19 here .....

http://www.xs650.com/threads/after-market-exhaust.276/

I went to mock up the exhaust last night with these adapters and was hoping that I could squeeze the 1.5" inlet on my muffler around the 1.5" adapter, however I quickly realized that this wasn't going to happen, not easily anyways. So the way I see it is that I have two options, 1. I can stretch out the fins on the end of the muffle to go around the 1.5" adapter and clamp it down or 2. I can buy a new adapter that will more easily fit inside the muffler, possibly a 1 3/8 x 1 3/8 adapter. Does anyone have any recommendations? My instinct is to bend the fins on the end of the muffler just enough to fit around the 1.5" adapter and clamp it down as i'm guessing it will be the tighter fit of the two options. Thoughts?
 
Thanks 5twins, i'll try again to find the split and collapse it on itself, I also have a 3/8 thread tap that I might try using. Glad to hear the sprocket is decent, as long as the chain is good to go I'll keep it as is for the season.


Thanks gggGary, I think a lot of that grease is in order but thats definitely the plan. I haven’t looked too much into clutch adjustment or the clutch ball ramp but ill add that to my to do list while I'm inside the LH cover.

I'm ordering a few new things including the long push rod and bushes and need to spend a bit more for free shipping, after reading through the forum it sounds like I should replace the swingarm bushings with bronze ones and install new tapered steering head bearings. Any recommendation on what I should do first? I'll likely do both eventually but don't want to purchase both today.
If you ever want to ride it I'd get it running and do just that. Your gonna work yourself into a corner trying to "fix what isn't broken" in a sense and it will lay in the corner of your garage for as long as you or your wife can stand it and you will sale it for way less than you paid for it, not to mention the parts you've already bought and time invested, because the attempted repairs you are doing could be the very thing that sidelines the motorcycle for the rest of its exsistance...quit worrying about what everyone is saying on here and get it running with good brakes. Wear a helmet and go for a ride come home and pat yourself on the back and have a beer...
 
Okay, so after some more searching on here I found the mod that uses a 1.5" OD piece of exhaust pipe to fit inside the muffler and inside of the adapter. Perfect, now I'm trying to hang the mufflers, the commandos I have include a few pieces which you can see in the photo attached, along with those pieces I have the stock muffler bracket, though one has a crack which I hope can be repaired. Can someone please help me with putting this together? I'm sure I could figure something out but any help or tips would be very much appreciated. I've read a bunch of threads on this but nothing that was clear to my application but I'll keep looking. Also, I'm not worried about the passenger pegs, I can ditch those.
 

Attachments

  • IMG_07451.jpg
    IMG_07451.jpg
    165.1 KB · Views: 109
Okay, so after some more searching on here I found the mod that uses a 1.5" OD piece of exhaust pipe to fit inside the muffler and inside of the adapter. Perfect, now I'm trying to hang the mufflers, the commandos I have include a few pieces which you can see in the photo attached, along with those pieces I have the stock muffler bracket, though one has a crack which I hope can be repaired. Can someone please help me with putting this together? I'm sure I could figure something out but any help or tips would be very much appreciated. I've read a bunch of threads on this but nothing that was clear to my application but I'll keep looking. Also, I'm not worried about the passenger pegs, I can ditch those.

Ahhh 5twins, I just found a post from you basically explaining what I need to do, I'll give it a whirl.
 
Okay, I'm still stuck, I get that the threaded bar goes in the track on the muffler but the holes don't line up with the stock muffler brackets which I thought I read that they would? How are people mounting these with the stock special muffler bracket? I also have the chrome bracket that came with the mufflers which I wanted to use as a spacer so the bolts wouldn't dig into the muffler. Any help would be great!
 
Aftermarket exhausts rarely line up with original brackets. When we hung the Commandos on my buddy's Special, we used the original muffler hanger brackets but even moving them back to the passenger peg mounts, they still missed the sliding track on the muffler completely. We used the chrome bracket that came with the mufflers to span between them and the hanger .....

1OPlWf8.jpg


OJqIb1u.jpg


BLoNpqo.jpg
 
For sure but I'm wondering where the bolts go, looking closer at your pic it looks like you have 2 bolts holding the chrome bar to the original bracket then 1 bolt holding the chrome bar to the tapped bar in the muffler track? The single bolt attached to the tapped bar is what concerned me, it would be nice to have 2 but if 1 has worked for you I can do that. My muffler track actually lines up with the stock bracket when on the passenger pegs because I'm using the stock headers which I've cut shorter, so I was hoping I wouldn't need the chrome bar at all and instead attach the tapped bar in the muffler track directly to the stock bracket but the holes don't line up so maybe I should force the track further back like your pictures show.
 
Although you don't see them in the pic, there are 2 bolts into the bar in the track. So, a total of 4 bolts were used, 2 into the track and 2 into the hanger bracket. We also added a piece of plate as a spacer between the track and the chrome strap. This spaces the muffler away from the stock hanger bracket a little bit more and that provides more space for the bolt heads on the bolts going into the hanger bracket.

You could always just make a new tapped bar with the holes spaced to fit your stock hanger bracket.
 
Okay, that makes sense and confirms my thoughts on 2 bolts and yeah maybe I'll just tap a 4th hole into the provided steel bar and attach to the stock hangar. Thanks for the help I think I know what I need to do now.
 
Okay, I figured the exhaust out, I was able to use the chrome hanger bracket and just make one of the holes a tad bigger to reach the 2nd bolt. So really very little modification at all aside from a slightly stretched hole to reach the bolt.

I've also cleaned up both side covers, the RH I did in place and the LH I did off the bike, my technique was definitely better for the RH cover which I did 2nd. I repacked the clutch worm gear and everything seems to be working nicely.

Next up will be getting back to installing the mufflers and putting the carbs back on.
 

Attachments

  • IMG_07481.jpg
    IMG_07481.jpg
    183.8 KB · Views: 91
  • IMG_07531.jpg
    IMG_07531.jpg
    136.1 KB · Views: 91
  • 20210326_200828.jpg
    20210326_200828.jpg
    123.2 KB · Views: 98
  • 20210326_200838.jpg
    20210326_200838.jpg
    180.2 KB · Views: 99
  • 20210515_100537.jpg
    20210515_100537.jpg
    255.7 KB · Views: 101
  • IMG_07731.jpg
    IMG_07731.jpg
    138.9 KB · Views: 97
Yes, initially cleaning the covers up usually requires a bit of work, some sanding to remove the corrosion, but then a rub down with Mothers or some other aluminum polish (I like Blue Magic) a couple times a season will keep them looking good. One suggestion I'll make is that you change out the 2 little screws holding the round alternator cover on. Yamaha cheaped out here and used screws that are too short. They don't reach all the way through and use all the threads available .....

hX8JSxN.jpg


With the stock screws, if you look on the inside, you can see they are too short, not reaching all the way through .....

LgTsIRe.jpg


A bit longer screw works much better .....

nPVUWJ7.jpg


I've changed mine to button head Allens .....

coE3RkJ.jpg
 
Back
Top