650 Rear Drum Brake Plates

would give it a quick road test as is to see how well the brake works now, then "fix" it and road test again. Back to back tests, so to speak.
Good Plan. Road test is soon. My fuel tank situation (and a dog) is preventing further testing today :thumbsdown:
-RT
 

Attachments

  • 20190324_111523.jpg
    20190324_111523.jpg
    241.5 KB · Views: 163
2m, I wus thinking of turning a mandrel out of a bolt or such to clean up the pivot on the aftermarket shoes. Machine it to match the pivot pin on the brake plate, cut some angled slots with the cut off wheel in the dremel so it will act as a cutter. Figured I can chuck the mandrel /cutter in the lathe, clamp a shoe to the tool post and feed it in. See any holes in that plan?

Interesting. I was thinking 15mm (or 19/32") chucking reamers. Grind a 12mm dia notch in the middle. If the flutes are long enuff, then there'll be cutters at that smaller 12mm. Otherwise, could separately cut the positioning nub offhand, like I did on my drill press with the 1/2" burr.

This 15mm cutting would put cutting forces across the whole pivot arc, requiring a precise, rock-solid, and sturdy fixture. I can't tell you precisely where to cut, except to try to maintain arc centers, which would be minimal material removal.

The downside? The shoes will settle deeper at the anchor post, you'll end up with a smaller total shoe diameter, as though the shoes are worn down. Plus, initial shoe contact and wear-in will occur largely at the cam area, possibly never reaching the side near the anchor post. Reduced shoe contact area, reduced shoe life.

Long ago, I was contemplating the opposite, some way to expand the shoes at the anchor post, to get full usage.

... I am a lot more concerned about front brake performance compared to rear...

Absolutely agree with your rant. Paramount is good overall braking performance. This whole rear brake thing is of interest to me because:

- The reports of poor braking performance.

- It could one of the "final frontiers" in our XS explorations. Everybody's gettin' involved.

- My personal braking policy has been one of conservation. Long ago, inquiring about XS1 front brake shoes, then getting those blank stares at the Yamaha parts counter, I decided to adopt a conservative riding policy. Using the (more available) rear brakes almost exclusively. Not a problem out here in remoteland with my sedate riding style. The fronts get used as needed, but not wastefully. Since then, I've been able to acquire 2 new sets of front shoes, and have relaxed my "rear preference" policy.

- We have "no front brake" members in here, and I'd like to arm them with good info on rear brake performance...
 
I just checked the brake rods on my later machines and they are M6 x 1.0, so that Virago wing nut should fit. The early brake rods must be different?

So, it seems another obscure factoid has come to light, lol.

Well, THAT's interesting.
Maybe more to come.

Is there enough meat to drill and tap for M8-1.00

Sure looks like it.
I'll need to change my lathe chuck over to the 4-jaw, for grip strength for tapping...
 
Just to confirm, your XS1 brake rod is an 8mm diameter? The '74 and later ones are only 6mm. I confirmed it by measuring and fitting a standard M6 nut on the rod.
 
Just to confirm, your XS1 brake rod is an 8mm diameter?

OMG, No, it isn't!

Just double-checked, it's a M7x1.0 swaged thread on a 6.5mm shaft!

XS1B-BrakeNut02.jpg


The revised parts list shows this adjuster nut p/n as 90179-07031-00,
The '07' indicating a 7mm part!

Thanx for the nudge to double-check.
The weirdness continues.
Edited post #55 to correct this.

Any XS2 members want to measure theirs?
 
Last edited:
Long as you are peering down a rabbit hole, a dual leading shoe conversion wouldn't be impossible here. (for a man of 2M's skills) I suspect that you have already considered, and noodled out some details towards doing one.
 
Hmm...pull the pivot pin, should be enough meat in the boss to open the bore up a bit. Press fit a sleeve (shouldered on the outside to match height of existing cam boss), scrounge up the necessary bits and pieces...BINGO! Yep, sounds like that's right in 2M's wheelhouse.
 
Long ago someone on here had a collection of misc rear wheels, one had a dual leading shoe brake. I bought it, SOB shipped me the wrong wheel, tossed it on the scrap pile... grrr.
 
I am NO 2many
I'm a rude, crude, lazy dude.
Started with a beat up 5/8" x 3" bolt, turned it to match the pivot shaft on the brake plate.
There are 3 cutting edges spaced around it..
Guess I'll let the pics do the talking.

DSCN3896.JPG DSCN3893.JPG

DSCN3888.JPG DSCN3886.JPG
DSCN3894.JPG DSCN3895.JPG

Turns out (heh, heh, heh) with this simple crude cutter material removal is kinda self limiting, the rough stick out parts were quickly removed, once a fair amount of the surface starts to fit the shaft, cutting pretty much stops. Think this should be a nice improvement over the "out of the box" fit.
Not sure how soon I'll get these on a running bike and remove for a shoe wear check but I'll letcha know when it happens.
 

Attachments

  • DSCN3887.JPG
    DSCN3887.JPG
    630.3 KB · Views: 187
Last edited:
...I'm a rude, crude, lazy dude...

Hey, nice job on that impromptu cutter. I like the "self-limiting" feature, just knocks down the offending high spots.

...Think this should be a nice improvement over the "out of the box" fit...

Look like you're resting the shoe on the compound's flat top? That should keep your cutting square. When fitting those shoes, see if they rock on the anchor post, and the opposite pads set squarely on the cam.

My original SOK-206 shoes had a diameter just a hair over 179mm. After just trimming the indexing nubs only, they're a bit smaller.
XS650-BrakeShoeDims04.jpg
 
Drilled and tapped the Virago adjuster to M7x1.0. The original adjuster is steel. This adjuster is chrome plated pot-metal (Zymak). The tiny pieces of casting flash allowed the 3-jaw to hold it without slipping.
ViragoBrakeNut03.jpg

And, a little bling, in a sea of patina.
ViragoBrakeNut04.jpg

A hattip to 5twins for this Virago adjuster idea...
 
I'll do some measuring.

2M how far have you gotten your full floating design?
description of a drum brake system.jpg

I suspect "we" could chop off the pivot post, accommodate a threaded adjuster and access port "there" and create some limiting stops on the cam end to keep the shoes centered in the drum. Thank goodness we don't need a parking brake. :laughing:
 
Last edited:
Drilled and tapped the Virago adjuster to M7x1.0. The original adjuster is steel. This adjuster is chrome plated pot-metal (Zymak). The tiny pieces of casting flash allowed the 3-jaw to hold it without slipping.
View attachment 137745

And, a little bling, in a sea of patina.
View attachment 137746

A hattip to 5twins for this Virago adjuster idea...
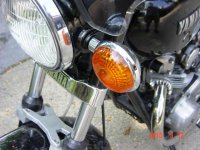
Viragos offer some other nice plug-and-play items for our 650's - aluminum handlebar clamps (easily polished) and signal light lenses and trim rings that swap directly for OEM 650 parts.
 

Attachments

  • Virago clamps_1.jpg
    Virago clamps_1.jpg
    42 KB · Views: 184
  • Viragolens_1.JPG
    Viragolens_1.JPG
    51.6 KB · Views: 182
...2M how far have you gotten your full floating design?

Oh, man, gggGary. You're on fire this week.

Full floating?
Deep sixed.

Pulled my rear wheel to have a look at things.

Measured the cam bore offset on this '71 brake plate.
XS1B-RearPlate03.jpg

It's a bit less than the other '73 brake plate, 0.42mm (0.016") below center.

The Vesrah shoes are bedding-in, working better now.
I'm seeing the beginnings of full sweep contact across the shoes.
XS1B-Vesrah-BeddingIn01.jpg XS1B-Vesrah-BeddingIn02.jpg
 
Last edited:
Brake shoe arcing with a drill press, XY table, and sanding drum.

Start with a block of wood, 20mm 447 wristpin, axle spacer, 5" of 3/8" allthread, 3/8" fender washers and nuts.
BrakeShoeArcing01.jpg

A sanding drum.
BrakeShoeArcing01a.jpg

1/4" allthread, washers, nuts, and such for pre-loading and holding the brake lever.
BrakeShoeArcing01b.jpg

A scalable/printable arc wheel, to establish brake lever angles.
BrakeShoeArcing01c.jpg BrakeShoeArcing01cc.jpg

And a pointer that attaches to the brake lever.
BrakeShoeArcing01d.jpg

As assembled on the brake backing plate.
BrakeShoeArcing01e.jpg
 
Last edited:
The 20mm 447 wristpin is chamfered on the ends. Not absolutely necessary, but I wanted a larger, squared-off, seating surface. Grind its facing on the lathe.
BrakeShoeArcing02.jpg
 
Last edited:
Back
Top