650 Rear Drum Brake Plates

Gary, I did not flip the shim. I rotated it. The recess was facing in the same direction throughout my whole ordeal. Granted, I originally installed the shim different than the stock orientation. The shim also works as a cam to trigger the switch for the brake wear warning on my model. Without that warning switch I would expect the shim to still work either way. It only works one way, and I scoped out every part in relation to every other part and I cannot see why it won't work both ways. Heck fire, it's only a spacer on my bike now!!!

Somewhere, someone, hey, more than one person, has deleted their wear switch and had a dragging brake like I did.
 
The eccentric shaped shim has to go in the correct orientation. If it is installed 180’ wrong, it will interfere with the brake drum. Likely pushing the whole shoe out of position. I can’t see it even working backwards. It does not assemble well if backwards but does assemble in that wrong orientation.
 

Attachments

  • 41FB9AB7-F49A-4C49-8E2D-9F5B5AA5FBCE.jpeg
    41FB9AB7-F49A-4C49-8E2D-9F5B5AA5FBCE.jpeg
    138.2 KB · Views: 246
  • 7D9C531D-300A-414F-AC9B-19D4B258F5AA.jpeg
    7D9C531D-300A-414F-AC9B-19D4B258F5AA.jpeg
    122.5 KB · Views: 277
  • B37AA3A6-3134-4F07-8B5A-5D16B5B74F4B.jpeg
    B37AA3A6-3134-4F07-8B5A-5D16B5B74F4B.jpeg
    122.9 KB · Views: 240
;)
True, but it still has its eccentric shape and must be oriented correctly to not interfere with the drum;)

It sure interferes with something, wish I could figure it out to tell people why. When I was assembling the brake I realized that I had a 50/50 chance of getting it in there right. It had all been in pieces for a while and I wasn't quite sure how it was when I took it apart. Nothing was really obvious when I realized the brake was dragging, so I changed the only thing that I wasn't sure of. Oh, the wavy washer slowed me down until I checked at Partzilla.

I am very glad now that I assembled it wrong again, the third time assembling it, to verify that the problem was that one part. I would be a mess right now not knowing what the true cause was.

Anyways, I'm past that, no more replies necessary.

Thanks for reading, Scott
 
Last edited:
By "wavy" washer, do you mean part #46 in the drawing you linked to? If so, that may be part of the problem. The drawing is wrong, showing that washer in the wrong place. See post #8 in this thread for details.
 
And the results?

In every test with the cam installed backwards, the shoes displayed eccentric arc circles (not centered about the axle), and dissimilar spread values, of about +/- 0.2mm.

With the cam installed correctly, those shoes stayed within 0.05mm of expected positions, concentric with the axle center, and symetrical expansion spreads.

A properly installed brake cam should have the dimple inboard, toward the axle.
View attachment 136945
Mine is backwards as well..no wonder I have to put my full weight on the brake pedal to get them to work...Looks like we need to get in there and take a good look at what i really need before ordering any parts..remove the cam and do the service as per this thread...No wonder my brakes have always felt like wood...Do you all think i should have the brake drum honed? If so I would have to take it to a machine shop...
 
All I've ever done with my drums is clean them. I never had one turned. I used to wire wheel and/or lightly sand them clean but now I bead blast them. It does a wonderful job .....

full


full


It's also great for knocking the glaze off used brake shoes (and pads) .....

full
 
Well dang..a very credible source says that from 1975 on the cam is symmetrical and therefore does not matter which way the dimple is oriented..My bike is 1980..so on my bike it matters not...but something is not right here..I should not have to stand on the brake pedal...Thats currently what i have to do..
 
S that's why I was pm'd from Georgia recently. :rolleyes: There's more to it. read this thread some more.
 
On it's best day the rear drum is not spectacular. Better than many recent sport bikes. (they tend to have weak rear brake by design)
 
The brake cam is not symmetrical but the difference is so small, you can't see it with the naked eye. 2M proved it with his exhaustive research here. Install it wrong and you're basically braking with mostly one shoe. I don't know who your "credible" source is but he's wrong about this. Nobody really knew anything about this until 2M did his experimenting and research last year.

Like Gary said, the rear drum on these isn't spectacular, but if you want it to perform as well as it can, install the cam so it's properly oriented (dimple towards the axle).
With the advice from this forum I flipped the cam around on my brake earlier this summer and it made a world of difference. With the cam in the wrong position, even with it adjusted right up, full pedal pressure barely slowed the bike down. Now it works as I would expect a drum brake to perform.
 
Hey everyone! I wanted to resurrect this thread and say that this is all great info! I’m restoring an early 1977 650d and it seems to have a newer rear drum that has the rubber inspection plug and sticker. Here’s my dilemma - the wiring harness has the wire for the lining/wear sensor hookup in the rear and it also has two extra wires for a diode that I don’t have in the middle of the frame by the coils. Can I leave all three of these wires disconnected and still have the bike function properly (start, lights, etc). I’m not worried about a brake failure light being on as my pilot tree and gauges don’t even have that light. Any help you can lend on this subject wound be greatly appreciated :)
 
yup that circuit affects nothing else, just lit the light.
From tech / electrical / some wiring diagrams
77_XS650D.PNG

I think the diode just allowed the lamp to light during starting so you knew it wasn't burned out.
 
Last edited:
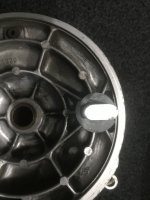
Now I'll discuss the component parts. This mainly consists of the camshaft and it's spacer or spacers. The main goal here is to mount the brake shoes spaced out equally on both ends so they sit parallel to the plate .....

MSutxg1.jpg


On the '70-'73 plate, this was accomplished mainly with the casting but in '74 that changed. The casting height on the inside of the plate on the camshaft end was reduced by about 6mm, most likely to provide room for that electric switch. Along with that, it was extended outward by the same amount on the outside. Basically, the length or depth of the pivot hole through the plate remained the same, it was just shifted farther out .....

qnjxUk4.jpg


It7GOT4.jpg


1z3wD9o.jpg


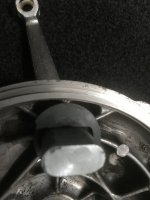
But, to keep the shoes mounted square to the plate, the camshaft had to be spaced back in to make up for the 6mm of missing casting. So, a new longer camshaft was needed. The spacer used on it also needed to be rather special. It had to lock onto the camshaft so it would rotate with it and also need a beveled or ramped area on it's bottom to progressively work and activate that electric switch.

So, here's the 3 styles of camshaft Yamaha used. The short one on the left will only work in the early "256" plate. The two newer longer ones will only work in the '74 and later plates .....

hWi5STC.jpg


Now obviously, that funky spacer Yamaha needed for the electric switch models was difficult and expensive to make. Once they eliminated the switch, they didn't need that anymore. They switched to 2 thick flat washers. Again, this required a camshaft re-design, but Yamaha got their money out of this one. They continued to use it on a multitude of models pretty much right up to the present day. The early camshaft used just one thin shim washer (1/2mm thick) as it's spacing was achieved with the casting .....

jskirgT.jpg


P0VT0P4.jpg
Hey 5twins,
This thread has been super informative. Regarding the cam shaft shoe - can you confirm the part number for the early model 73mm shoe? I'm coming up with 168-25351-00. Just want to be sure before I make my purchase...
 
Yes, that's the number my parts books list as well.
 
Back
Top