'71 xs1b conversion to cafe

Thread the hub nut back on, stop about 1/2 - 1 turn from seated.
Gently and squarely tap on the hub nut while gently levering the backside of the basket.

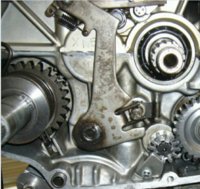
Something else to consider, welding your shifter shaft to the shift arm. Our older shifters are press swaged together, later are welded. Mine slipped loose, and I welded it. Look at pics of later shifters to see the welding. Your shifter:

Your trick worked, thanks Steve.

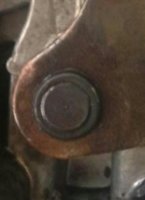
Here's how it looks at this point; what the heck could have caused that grind mark? (yellow arrow). Nothing matches up to it. Nothing on the backside of the clutch basket appears scratched or damaged.

starlever.jpg

Excuse my mechanical ignorance, I'm not sure I follow re: welding shifter shaft to shift arm?
 
That grinding was probably caused by a broken basket Damper spring. Lookup the forum's tech:clutch thread for info on proper washer reassembly. The seating depth of the clutch basket should put its gear and the primary gear at 100% engagement, equal heights. You may not find evidence on your basket, since it may have been replaced. There's also a chance that metal filings ruined the crank's right side ball bearing.

Another pic of your shiftshaft and shifter union. It's swaged, not welded...
 

Attachments

  • 71 Shifter2.jpg
    71 Shifter2.jpg
    108.5 KB · Views: 254
Got it.. good thought on the basket being replaced. I'm going to remove the shifter shaft, and that should be it before splitting the case?

Ok to leave the star/shift drum stopper in while I split the case?
 
If you're planning a complete teardown, and/or case cleaning, teardown all that shifter/starwheel stuff now. It'll be easier now versus later...

Copy, and yes, a complete teardown. The crankshaft has to come out anyway- excess rod play and elongation of the pin end.

Shifter is out. Removing starwheel assembly now.
 
Happy to report that I reached a milestone: splitting the cases. Fortunately no major issues, and only one nasty surprise inside.

First, I drilled holes in my workbench and flipped the cases:

holes.jpg

Off came the sump filter.. gory and all.

sump.jpg

Cases split without too much trouble. I used two 2 x 4's stacked atop one another and slipped a flatbar inbetween and wedged the cases just enough to slip wood shims in and started hammering them in all around.

Came off without issue:

topview.jpg

Not without a surprise:

surprise.jpg

It was pretty wedged in there, and I hate to think for how long.

Closer view of the gears, they look to be in good shape, no chipped tooth, no discoloration, or marks- dogs don't look rounded. Haven't had a chance to look at the forks; will do that once I get the crankshaft sent off.

gears.jpg

Turned 180 degrees:

180.jpg
 
Ok, found a pic of a later model shifter. Notice the weld ring around the shaft fitment to the arm.
I welded mine the same way...
 

Attachments

  • ShifterWelded.jpg
    ShifterWelded.jpg
    117.4 KB · Views: 250
Now I get it, thanks.. will make a note to have that shifter welded.

And yes that is a screwdriver shank!:doh:
 
So now that everything is apart, I'm thinking about what steps to take for the reassembly.

Some things/questions I have been thinking about:


1) My plan is to pressure wash the case, and have them vapor-blasted and then washed out plenty, to make sure there are no errant beads left behind. Sensible?

2) Should I replace bearings on the shafts, or at least repack them with new grease?

3) I will need to send out the crankshaft to get it fixed properly. Any recommendations?

4) Is it a good idea to remove all the cylinder studs to make it easier to mask off the cylinder ports/gasket contact surfaces? Also for general handling?
 
1) My plan is to pressure wash the case, and have them vapor-blasted and then washed out plenty, to make sure there are no errant beads left behind. Sensible?

Sounds ok to me, but I've no experience with that.

2) Should I replace bearings on the shafts, or at least repack them with new grease?

A grey area here. Like asking if someone needs new shoes.

Valley girl: Yes, if worn more than twice.
Ol' rancher: Not unless yer toes are a-showin'.

The proper method is to inspect and measure *everything*, replace anything that doesn't pass spec. For an idea of what to look for, you can web search for 'bearing failure', and study the pics. Then again, a 'grand mal' replacement of all bearings could be done.

3) I will need to send out the crankshaft to get it fixed properly. Any recommendations?

Hugh does our cranks. Also Fallicon.

4) Is it a good idea to remove all the cylinder studs to make it easier to mask off the cylinder ports/gasket contact surfaces? Also for general handling?

Another grey area. Like moving your house to make it easier to park the car. Not recommended for the novice...
 
All sensible points, Steve. Thanks for your input.

At the very least, I ought to replace the oil seals, shouldn't I?

As far as mic'ing and measuring- I don't have the proper instruments, and as this is most likely the only teardown I'll do, I'm not sure this justifies the purchase of additional expensive tools, so I suppose it might be prudent to just have a shop do that.

Should I just pop out the transmission and shifting mechanism and just bring it to a shop?
 
...At the very least, I ought to replace the oil seals, shouldn't I?

You know, now that I think of it, I don't think we have a published list of consumables, the "must replace" components of an overhaul, for both "top-only" and "complete" overhauls. It was a standard list in the Honda shops back then, haven't seen one for the Yamahas. Just off the top of my head, and drawing on 40-45 year old memories, it's something like this:

Must-Replace consumables for complete overhaul:
- Piston rings.
- Cam chain.
- All gaskets, o-rings, seals, and crush washers.
- Exceptions: Valve guide o-rings, if guides not removed.
- All fluids and lubricants, all filters.
- All consumable ignition components: Sparkplugs, points, and condensers.
- All carbon brushes.

Similar list if carb overhaul is performed.

... As far as mic'ing and measuring- I don't have the proper instruments, and as this is most likely the only teardown I'll do, I'm not sure this justifies the purchase of additional expensive tools, so I suppose it might be prudent to just have a shop do that.

Should I just pop out the transmission and shifting mechanism and just bring it to a shop?

If it's a reputable shop with extensive XS650 experience, leave that stuff in place, bring the case.

If not, could be risky, you might want to order a: "Hole in my head"...
 
Last edited:
Had today off so I took out the crankshaft, transmission, and the forks. It was a huge pain in the ass to get out the cotter pins. I finally resorted to using shears to cut off the cotter pin heads on two of the forks because I didn't want to exert too much force. But those cut off cotter pins came in use as I bent one of them and used it to fish out the cam follower pins. Had a moment of panic when I couldn't locate the last cam follower roller, but found it jammed in the hole of the last fork I extracted. The middle fork was rusted on pretty good so I had to tap it out.

forks.jpg

Fork ears look worn down.

worn.jpg

A closer look at the 4th gear shift fork, both sides:

fork1L.jpgfork1R.jpg

I decided to leave the side plate (star) on when extracting the shift cam, I didn't want to mess around with the alignment.

star.jpg

So now everything is out of the upper case and it's ready to be powerwashed, but only one thing is stopping me, the shift cam bearing:

Ibearing.jpg

There's nothing wrong with it, it works smooth so I don't want to extract it (and destroy it in the process). Problem is I want to also powerwash the interior of the case, as well as have it vapor-blasted. I've been thinking about ways of sealing this bearing port to prevent water from getting in- maybe soak a wad of paper towel in WD40 and stuff it in there and tape it over?

But power-washing will probably rip that tape right off. Any ideas?
 
...So now everything is out of the upper case and it's ready to be powerwashed, but only one thing is stopping me, the shift cam bearing:

There's nothing wrong with it, it works smooth so I don't want to extract it (and destroy it in the process). Problem is I want to also powerwash the interior of the case, as well as have it vapor-blasted. I've been thinking about ways of sealing this bearing port to prevent water from getting in- maybe soak a wad of paper towel in WD40 and stuff it in there and tape it over?

But power-washing will probably rip that tape right off. Any ideas?

Try an expanding "rubber nut".

Rubber-Nut-500x500.jpg
 
That rubber nut is a good idea; hold it in place with a clamp while I powerwash.

Thanks for the links, Steve. In an attempt to understand how the transmission works, I came across this simple video:

 
That rubber nut is a good idea; hold it in place with a clamp while I powerwash....

Don't need a clamp if you select the right size.
Run the screw in, tighten it, and the rubber will expand to hold it in there.
Kinda like those drum sanding arbors used with Dremels.


Nice video. A search of "constant mesh transmission" will find more, like this:

 
Back
Top