72' Bobber Build

thelowlife

XS650 Addict
Messages
353
Reaction score
31
Points
28
Location
Sudbury, Ontario
So heres my build thread of sorts. Bought a what I was told from the P.O. a 76 XS650. Came with a spare engine a few extras, and a few more issues. I wasn't happy with the way the guy did stuff, his welds were terrible, wiring etc.

The day I got it. I got it early this summer like Juneish. I was working 7 days a week 14+ hours a day on night shift. So after work one day I took a 3 hour drive to get the bike and 3 hours back. Dropped the bike off at my parents shop and then back to work.

IMG_0199-1.jpg


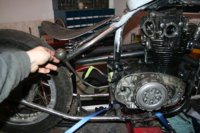
I knew getting the bike would require some work. I was attracted to the xs650 platform because of the availablility of parts and support and its looks obviously. I got it running and notice right away that the start bendix gear was shot. After getting it running and going for a little ride some changes were needed. If you can see the maltese cross West Coast Chopper foot pegs didn't even allow you to put your feet under the shifter peg. The guy liked to cut corners and his favourite spacer was 4059 3/8 washers to space the fender, the pegs and you name it.

I started tearing into it right away there was some obvious things that struck me.. but after digging I saw a lot more that wasn't right.

Self tapers to hold the tank to the frame
2011-07-09_20-53-22_972_null.jpg


Shotty wiring
2011-07-09_20-53-09_503_null.jpg


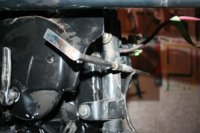
Barebones this is were I saw the shitty welding. I started getting into the engine and the clutch needed a little work.
2011-07-09_20-52-50_444.jpg


Painted the front wheel, just after this picture I dropped the wheel and broke the hub
2011-07-09_20-52-29_228.jpg


I took off the old hardtrail and start with some new axel plates, bending my own tubing. At this point I was going on the P.O. word that everything was indeed a 76'. I sshould have known better... turns out its a 72 which.
2011-09-04_22-57-19_1231-1.jpg


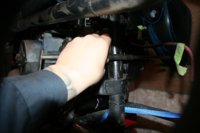
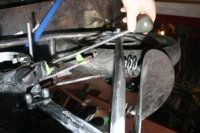
This is how it sits currently. I found some issues within the engine so I'm waiting for my seals, cleaning carbs, and general mock up. I had some problems with the head so lucky that second engine I got came in use and I've been able to swap parts over.
2011-11-26_23-51-06_236.jpg


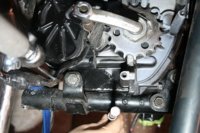
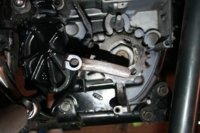
I'm working on my pegs and shift mounts. Shift lever is really bent and won't work it contacts the case. I risk just snapping it in half if I try to straight it out anymore so I'm looking at other options. A YZ lever is fairly 'thick' so I will be able to counter sink the mounting hardware for the shifter. I think I'm going to go with a peg mount from Monstercraftsman or Pandemonium to keep it nice and tight I don't like the look of the modified stock mounts. My knurled pegs are male so I need the female adapter obviously so I have to take that in account, again clean up the mounting hardware.

2011-11-26_23-51-19_477.jpg


2011-11-26_23-51-31_884.jpg
 
Gotta love PO's :banghead:
I stayed clear of PO engineering by getting lucky and finding a nice un-molested rider. I honestly stumbled upon the XS scene. I was just looking for an inexpensive older import bike to chop, found an XS on ebay for a steal, and loved how similar the engine looked to some British bikes.

Looks like yours has found a good home where she'll be done up correctly. Great start, and kudos for fabbing up your own tail. Keep us posted!
 
Planning on frisco mounting this sportster tank. I'm not 100% sold on it yet though.. may go the route of an Alien tank opinions?

2011-09-16_20-25-36_244_null.jpg


2011-09-04_22-58-20_751.jpg


2011-09-04_22-57-50_196.jpg


Made a new headlight mount out of some angle iron

2011-10-15_22-39-25_878.jpg


I couldn't find a decent way to install the PVC valve that I got from xs650direct.com. So I built my own little way of doing it.

2011-09-23_21-40-54_408.jpg


I removed the 'Y' that was there from the factory then put the valve right in there. Just have to mount the little filter on the bottom side. Looks stock when its all together so I'm happy with that.

2011-09-23_23-00-39_402.jpg
 
Hopefully im not stepping all over your build thread here, if so my apologies.
The breather box mod you did looks great, the part in the photo's looks like a reed valve set up offered from mikesxs is it not?
Can you supply me with some more detailed information on how you cut off the dual outlet tower to install this part?
I have a 77 with same double outlet breather, and want to eliminate some of the clutter between the carbs by going to a single tube setup and your mod dose just that.
 
Heres a few more pictures of that reed valve install. Sorry for the shitty pictures my phone is terrible as of late.

Cut off the Y on the original set up

2011-09-23_21-41-39_799.jpg


Took all the guts out just to make sure everything would clear fine

2011-09-23_21-43-09_100.jpg


2011-09-23_21-42-52_245.jpg


Take the brasse bracket off the Mikes Reed valve with the two screws then reinstall the screws

2011-09-23_21-41-54_917.jpg


On the stock Y there is a small piece of aluminium that I cut off the Y and then installed it on the reed valve so that it fits better

2011-09-23_21-41-16_370.jpg


Final install

2011-09-23_23-00-08_503.jpg
 
Cool!! Good thinking and great modification I really like the way it cleaned up all the unnecessary hose's coming from that afterthought of a crankcase breather.
 
Nice progress.:thumbsup:
Especially with what you had to start with.
Great mod on the breather box too.

If you're on the fence about the tank mount, I am adding some old pics about how I did mine.
Personally I like how a friscoed tank adds height especially after the bike is lowered from stock height. Just weld on some tube on top of the backbone and put a bolt throught it. If you dont like it, you can just grind it off.

Keep at it and keep the updates coming.:)
tankmount.jpg

tankmount2.jpg
 
Yeah that was an option but if you notice the front of my tank is smooth.. no original mounting tabs like you have. My current tank has a single tab welded in the center of the tunnel like the rear. Although I do have 3 other tanks that I can mount like you have.

My issue with the way the tank sits on the backbone.

tank-mounting.jpg


The black line shows the angle that the tank sits at.. the red line shows the angle at which the back bone sits. I plan to have a electrical box with the coils so the coils won't be an issue were the tank sits.

Maybe its just me, it bugs be quite a bit. The front of the tank sits lower on the backbone then the back is possible of sitting down.

I think I'm just looking for critique.. Does the angle the tank sit at just kill the lines of everything?

Does it look goofy?

I was considering an alien tank because the way it sits lower on the backbone.
 
I see what your saying.
Personally I like the red line better and I had the same problem. I dont really notice it now because the bike sits so low that when you stand next to it, or a few feet away, you're looking at it from an angle above the tank.
Looks totally different when you have it on a table than when you have it on the ground.
Also, I would go with an alien tank all day long.
My reason is because of where the fuel cap is located. You cant use the full capacity of the tank because you cant fill the top part past the fuel cap. You have to be real careful filling it or it all spills down the tank too.
Also, you lose alot of the gas the sits on the bottom half since the petcock is in the middle.
Filling up so often gets real old after a while.
 
I think either of the lines the tank follows will look sick, if your concerned about getting the most our of your gas, San Francisco the tank put two exterior bungs at the end, seal up the middle one and last but not least put an extended bung on the gas filler.
 
Well being broke its sometimes hard to make any good progress on my bike. So I decided to find some stuff sitting around the shop to start making a suicide shifter. With a suicide shifter no one will ask to ride my bike because they would be to scared. So it works out perfectly.

I trimmed down my stock shift lever, rounded the corner a bit. I have to get some 1/4 Heim Joints to complete the linkage but I'm mocking everything up.I have this smaller tube that fit 3/8 round rod through on the backbone. It fits tight so the rod will roll in it. I'll weld this to the backbone.


Welded up a sort of lever on the rod that I will have to cut short because of placement of everything. I have to drill and then eventually add the heim joint to complete the linkage. The 1/4 Heim Joints that I need are $7 each but $12 for shipping from ebay. Its a little retarded for shipping on something that small so I have to try and source them from somewhere else.

Made a little lever to see how everything would work. Should be ok but I'm thinking of using 1/2 rod for the lever itself, just so that its a little girthier looking.


For fun a shot I snapped as I was mounting my tank
 

Attachments

  • suicide shift5.jpg
    suicide shift5.jpg
    86.7 KB · Views: 318
  • suicide shift4.jpg
    suicide shift4.jpg
    67.1 KB · Views: 170
  • suicide shift3.jpg
    suicide shift3.jpg
    54.9 KB · Views: 170
  • suicide shift2.jpg
    suicide shift2.jpg
    60 KB · Views: 177
  • suicide shift1.jpg
    suicide shift1.jpg
    41.7 KB · Views: 196
  • suicide shift.jpg
    suicide shift.jpg
    33.8 KB · Views: 173
  • suicide shift6.jpg
    suicide shift6.jpg
    35.8 KB · Views: 164
  • bike2.jpg
    bike2.jpg
    71.5 KB · Views: 222
Been awhile since I posted anything but I was in the shop till about 3am last night cleaning up the engine and getting it reday for final assembly.

Decided to go flat black with the motor with a few polished accents.. the oil cooler and other small things. Polish the fins a little bit. Pretty excited to have something come together and completely buttoned up.

motor1.jpg


motor2.jpg
 
Am I seeing this correctly? You're doing a jockey shift on the throttle/clutch side?
 
This has been forever to update..

Having some ignition issues and a new Pamco is on its way.

Was working on having a TOKICO caliper mounted up, the bracket was pretty huge with the original size rotor. The white paint marker was a attempt at slimming it down and looking better.

2013-01-12_22-06-01_4_zps58598cac.jpg


From what I can dig up using larger XS1100 front rotor would give me larger radius rotor allowing the bracket to be smaller and the caliper to sit better. Ended up just getting a new early caliper.

For my front brake line I'd like a one piece line but with the early calipers there was the small metal brake line. Anyone make a full one piece line without the use of that small metal one?

For my peg I ordered Monstercraftman peg mounts and love it.. great and simple mount. Here she sits as of now. I have to space and make the lower fender mount as well. The motor is just for a quick mock up, the completed motor (awaiting Pamco) sitting on the bench. Dropped the suicide clutch idea in favour of completing this thing quicker.

2013-01-26_22-31-59_80_zpsb20d0677.jpg
 
Got my box from the Fedex guy an hour ago. The guys from xs650direct.com tossed in a shirt too! Can't speak enough how those guys handle their business super fast shipping and easy peasy ordering.

Friday I'll be doing a bench test and hopefully have some videos of the motor running.
 

Attachments

  • 2013-01-29_14-46-51_807.jpg
    2013-01-29_14-46-51_807.jpg
    171.6 KB · Views: 127
Hey

Nice work on the build can I ask you how you polished the fins on the motor I really like that look.

With Regards,

James
 
Pretty simple,

I spray the entire motor the colour you want then use a block of wood wrap your sand paper around and go at the fins.. start at 400 grit and go up from there. The higher in grit you go the more polished it will look I stopped at 800. Then use your favourite polishing compound for the real shine.
 
Got the new Pamco installed and tested.. spark was MUCH better. Bike fired up after a few times turning it over.

I was too excited to get a video and time it properly so that will have to way till next time.

I'm going back and forth on my fender. I like it then I don't. I like the fender to follow the curve of the tire and tight. I don't want to buy a new fender either..
 
Back
Top