82 xs650 chop. First bike/build

TimBeard

XS650 Enthusiast
Messages
32
Reaction score
0
Points
6
Location
Massachusetts
Alright, after lurking this website for a few months I figured I'd decide to contribute my build and learning process to all you fellow builders. This is my first bike I've ever ridden and worked on. Don't have any motorcycle knowledge or previous experience. Stoked that I came across this site because it has been super informative.

Ok,so about a year ago I picked up a bare bones, already hard tailed 82 xs650 chop. The money was right and it seemed to be a good bike to get in over my head with so I would learn everything I needed. No speedo, no turn signals, no reserve, no fenders. Got the thing registered and didn't inspect it knowing it wouldn't pass safety regulations. Rode it a few times and had to put it into hybernation for the winter. Here is a picture of what it looked like the day I bought it

D3D40E91-81B3-4ACE-A65E-8F62BF477788_zpsenjsklyw.jpg


5B925C9D-BBE5-4DD9-A773-B06D32B4FC01_zps5myvr6pa.jpg


It needed a lot of little adjustments and a quick carb clean/tune and it was decent. Used a pair of tin snips and cut myself a temporary rear fender. The tires that were on it were dry rotted so I replaced the front 19" with a fresh rubber and the rear 16" with a shinko dual white wall. I narrowed the tc bros lane splitter bars with a pipe cutter and brought them in a bit. I also replaced the massive mirror with a more subtle clamp on one I scored on eBay for short money. Gave it a new set of plugs and wires and that led me to this phase of the bike.

2112F1CE-0B7C-4DC9-B0D7-EEF58B7C6FDE_zpsdyusswbp.jpg


005F37EB-E82F-4BE6-B7DE-C254FDF9360C_zpsxyi7ivrt.jpg
 
Over last winter I decided not knowing when you are about to run out of gas was a pain in the ass so I decided I wanted to run a fuel sight on my tank and the Orange didn't tickle my fancy so I figured a color change was in order as well. I picked up a fuel sight kit from speed dealer customs which came with everything needed.

07DD8C-00D0-40E0-9E96-844A8079A88B.png_zpsfoucnovh.jpg


Had a local friend weld in the bungs for me (I don't know how to weld) free of charge. Did a killer job after I finally decided where I wanted them. Sent the tank off to a family friend who does body work to blend the welds and other flaws and give it a fresh coat of gloss black. Couldn't decide on a color or paint scheme and also I'm building this on a budget as well as building this in my low ceiling basement. Long story short I got the tank back and had to seal the inside. Rookie move, I should have sealed it before paint but I didn't know prior to. I went with redkote and plugged up the holes. Coated the inside and then drained it. Hooked up my fuel sight kit and this is what I had sitting in front of me.

48974462-4767-4CEC-93C7-1E27C3F8F990_zpszsijkwp8.jpg
 
After some killer summer riding and a good battle between on of my carbs flooding, I decided the bars weren't my style so I searched for a new look. Came across some chrome biltwell keystone 7/8" bars. As soon as I got them I decided to narrow them with a hacksaw due to lack of tools. I tried using the pipe cutter like I did with my first set of bars but the wheel shattered and I had to use what was around me. Took 2" of either side and was pleased.

Pipe cutter proof from first bars...

FAD431-7824-4854-81EE-D4514984E4F9.png_zpseb21bvzt.jpg


The keystones...

DF2D5A89-6C1C-4C3D-AA3A-04410F465749_zpsdhrusf86.jpg


66D5C90F-EA0C-4B5F-A4BF-F89ECA8F1A14_zpsoq1yklce.jpg
 
Welcome to the site TimBeard.
And kudos on the work you've done.
How did/do you like the RedKote liner?
 
Welcome to the site TimBeard.
And kudos on the work you've done.
How did/do you like the RedKote liner?
Thank you. The red kote was a simple one step process compared to the por15 3 step application. It held up an hasn't failed yet. Haven't had a clogged petcock nor have I seen any residue in my fuel sight. Highly recommend it.
 
Picked up a cut off wheel for cheap money and decided to put it to the test. Wanted to put a little more of a rear fender in the bike so I can set myself up with a sissy bar and relocate my axle mounted tail light/plate due to the weld on the bracket snapping off over the summer. The bike came with a front fender but I never used it so I figured it could make a decent rear fender. I cut the mounting tabs off of both sides and layed it on my rear tire. I think it will do.

3D1E3F57-F630-4348-BA24-33F750CBF9D5_zpsrwkjesyy.jpg


Mock up

10D02E3B-6797-4B50-B5E1-991591CA5B97_zpsb45prkns.jpg
 
Next on the list was dropping my seat. I stepped down from the 3" springs that came with the bike to some black lowbrow 2" springs. Wanted the seat to flow a little more with the backbone without havin to have a fixed seat. Undecided if I like them but I'm glad it looks lower.

FE9AA6A3-101A-4089-9065-BE2A3DA64EC8_zpsxo8ut9uu.jpg


F72F2D2F-7209-4E22-8E9D-6830BD0F3512_zpsqxmdxlex.jpg
 
One thing I couldn't stand about the bike when I got it was the wiring. There are wires zip tied to every part of this bike everywhere you look. I have been ordering a few pieces here and there to set myself up to wire the majority into one central location under my seat. I picked up a new ignition and a 4 fuse mini block. For now I'm going to keep my battery and somehow mount it to my frame. I had a battery/electrical box already mounted under my seat but my chain would slap it due to how the previous owner set it up. I think it was an eye sore anyway so I have no problem getting rid of it. Also I feel that mounting the battery lower will fill up some empty space begin the motor for a better look.

I was looking around for ideas on this site and came across someone who had used an electrical box for their wiring and decided I'd try and swing that. Picked one up at the depot and put it in the frame for a mock up.

6FF466B3-BBDB-4A4E-9B39-89B483EA4E6D_zpsvx8bmub4.jpg
 
I like what you've done with the bike, and props for just jumping in with no experience or tools.

I can have someone explain to me in depth how to do something, but I won't learn till I'm doing it with my own two hands. It has both its advantages and disadvantages haha. Learning to weld is a skill I like to learn sometime soon
 
Awesome. I'm in the same boat as far as jumping right into it. My 81 is coming next week. Got to do some more research but I like what your doing. Great job!
 
All the electrical components arrived in the mail so figure this is the next step. Clean up some of the hack job wiring from the previous owner. I'm relocating the ignition, adding a fuse block with 4 fuses, and putting my headlight on a toggle. I managed to fit it in the electrical box so we are good to go. I'm stil running a battery and I have to figure out a new tail light later in the build. This will be my first time wiring a motorcycle so bear with me. Ha.

Want to give credit to "coastsidexs650" for the electrical box idea Here's what mine looks like.

4460C6AF-F966-40BE-90CC-ED980CB7FDF6_zpszhovtrtt.jpg
 
www.amckayltd.com/carbguide.pdf will help with the carbs, another thing to help the carbs is to remove those XS pods and chuck them very far away. Those pleated element filters cause more tuning issues than you need. A straight round foam filter works better.
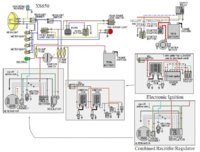
And on the wiring I like this diagram. Works for all years with stock parts and adding non stock parts is easy. Just swap boxes to match what you have.
Leo
 

Attachments

  • 314w9s3.jpg
    314w9s3.jpg
    135.4 KB · Views: 255
Thanks xsLeo, out of curiosity, what's the reasoning behind the xs pods as far as why they create tuning issues. I've had my eye on a set of round black foam uni pods
 
New front brake line came in. Got rid of the stock 2 part brake line with junction and replacing it with a single straight line. Found a listing on ebay for $35 and you pick your own length, color, and fittings (angles too). I went with a 34" end to end with two alternating position 15 degree banjo fittings. Fit perfect and you can't beat the price.

360B977F-E1C1-4D9B-B2E2-726DA149DC40_zps6y2c5q4p.jpg
 
Back
Top