An Adventure in Firsts: '83 XS650 Heritage Special Build/Rebuild

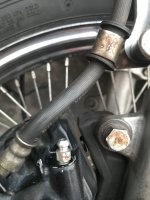
(1) It's a good possibility the nipple is pitted from corrosion and breaking it loose to bleed broke all the corrosion loose. You can get a new bleeder nipple at about any parts store.... 6mm I think... someone double check me on that. It'll get a bit messy replacing it, so have plenty of rags on hand.

....with fanning the clutch through the freeplay and then backing it off about a 1/4 turn
Try less... just a hair to 1/8 turn backing off. Then take the rest out at the perch. You'll know when you've gone too far, the clutch will start slipping. Just back the perch off a hair if it does.
 
Last edited:
Here's what one looks like out of a nasty caliper. Yes, it's 6mm and just a tad under an inch long (24mm-ish).
Here, turn your transporter on, I'll "beam" this one right over. :sneaky:

PXL_20210307_014747399.jpg


PXL_20210307_014836527.jpg
 
Another thought Marie... it's possible all you're seeing is fluid that "wicked" it's way up the threads after bleeding, in which case it's just residual. No worse than it is, keep wiping it down and see if it eventually goes away?
 
With the bleeder in that far and if it turns freely, I doubt it is cross threaded. For cleanup after bleeding etc, the greatest product is aerosol brake cleaner. Just use with caution with the proper PPE, safety glasses, gloves and use in a well ventilated area, avoiding inhalation of the fumes (use respirator if concerned). I use it all the time on cars, bikes etc. Put a rag underneath the parts you are cleaning to catch whatever drips off.
 
There's a bit of fluid left in the bleeder when you're done. You can see how long it is in Jim's pics. The hole in the end runs almost the whole way through it and that whole "tube" is full of fluid. I clean it out when I'm done. I use pipe cleaners. They fit right in to the bottom of the hole and soak up all that fluid that's left behind.
 
No harm in trying to clean the fork seals before tearing it all down.

https://www.revzilla.com/common-tread/this-tip-could-save-you-a-fork-seal-replacement-job

Yes Sir
+ After Mr 5Twins ..I tried this.
Perhaps this is obvious ,, This is what happened
I took the leg into the kitchen put it in Vice on the floor standing vertical
After the dust cap was taken off I could clearly se dirt and rust in there. ( From the washer I believe )
Wiping it off .. using at Matchstick and rags and tissue.
I took a rather powerful flashlight and a Magnifying glass ..And there was clearly without doubt dirt between the seal lip and the
Tube -Stanchion
I then tried with a piece of camera film ..That was a bit to thin or I made a bad hook .It broke .
Then took a plastic soda bottle cut it to a hook and tried again and yes pulling it out there was dirt coming out
with a little oil. Did that a couple of times and cut a new hook .
Upon testing pushing down 5 - 8 times Still leaking I was slowly accepting that perhaps a replacement seal
still was needed.
Wiped it clean and did it over again less leakage
Same thing again .. less leaking.
And after 3 d time nothing and have tested about 4 times after that .
If I look very closely there is a barely visible line ..but then one needs to look carefully.
I think it is to little to matter . And the seal might need time to get back.

It seems that this was a solution .I cannot try it on a bike now .Still winter .But there are indications it was a solution.

In Madame K s position the Flashlight and Magnifying glass can be a way forward.
And then try the Plastic bottle . hook .
 
You often find that washer and the retaining ring rusty. Obviously, some water gets in there and then just sits there, causing the rust. After cleaning, I've now started coating those parts with grease to hopefully stop this from happening. I used red rubber grease but normal grease would probably be OK too .....

7F9Ge1W.jpg
 
This is where it was at yesterday.
IMG_2997.jpeg

The only "riding" I've been doing since Thursday has been moving the bike up and down the block to re-park due to street cleaning etc. So there is more--though I hadn't gotten to wiping it down since the last pic, so not all of this is fresh. Judging from how much was there the first time, then during and post ride (the pic I took), and now there's extra, my guess is that it's more than just what was left in the bleeder. That said, I'll wipe it up again and see if I get any more action the next time I ride. If so, it seems it's onto a new bleeder screw.
On that note, I was looking around online for a new screw and it seems I'm getting different sizes for the screw--I know you said 6mm Jim, but I"m seeing 8mm listed on MikesXS and on a xs650 forum post--seems it may be different for later models? And getting differing #s for pitch... 1 or 1.25...and i don't really know what that means either haha. ... Okay I just went and measured. The angular bolt shaped part of the screw is 8mm, the nipple shaped part towards the top is around 7mm. Couldn't really fit the caliper around the screw thread enough to get a solid measurement there but it's over 6mm.
 

Attachments

  • IMG_2996.jpeg
    IMG_2996.jpeg
    145.7 KB · Views: 85
Yes, the head is 8mm (takes an 8mm wrench), but I think the threads are 6mm?. Honestly, I can't say for sure, I never measured one, lol. Any I've ever replaced were just used ones in better shape from other calipers. Before buying one, you might want to pull that one out and just clean the end and the seat down inside it seals against. You'll lose some fluid but just top it back up afterward.
 
Yes, the head is 8mm (takes an 8mm wrench), but I think the threads are 6mm?. Honestly, I can't say for sure, I never measured one, lol. Any I've ever replaced were just used ones in better shape from other calipers. Before buying one, you might want to pull that one out and just clean the end and the seat down inside it seals against. You'll lose some fluid but just top it back up afterward.
Oh I was thinking about that but thought I'd have to bleed the brakes again before riding if I did that in case air got in
 
My bad, just looked again and it's 8mm by 1.25mm
Fyi... diameter is the shank or threads... never the head of a fastener. The 1.25 is the distance between threads. You need a pitch gauge to measure that. They're not expensive... you should add one to your growing tool box. Here.


PXL_20210309_010319786.jpg


PXL_20210309_005956044.jpg
 
Oh I was thinking about that but thought I'd have to bleed the brakes again before riding if I did that in case air got in
When you remove the bleeder screw, gravity is your friend and brake fluid will travel down and out of the bleeder hole. Clean up the bleeder and reinstall, air won’t get in.
 
Oh I was thinking about that but thought I'd have to bleed the brakes again before riding if I did that in case air got in

As Bosco says, should be alright. But the test is, does the brake lever feel 'spongy'? If so, you need to bleed. Air is compressible, brake fluid is not.

I'm interested to know how your bike feels after all the work you've done? How is it running? Revs ok? Stops ok? Makes you feel good?

Because it's not all fixing and mechanicing, you will get to a point where you can use the bike and just have occasional routine maintenance. At least, until you choose to strip it down and customise, which I think you intend to do?
 
Specs for master cylinder and stainless brake hose... been trying to look up what I information I need to make sure the fitment on these is correct...
I know @5twins said that a 90cm line is good for the brake hose--but anyone know what size I need the ID/OD to be?
I know the master cylinder needs to fit on 7/8 bars.
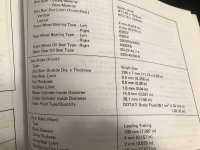
The internet had me going all over, so went to the manual and found these specs:
IMG_3003.jpeg
Soo master cylinder ID (bore?) needs to be 14mm and to fit on 7/8 bars--am I missing any other information?
As for the brake line hose, 90cm hose, and do I need one that has 38.1mm fittings on one end and 14mm on the other? Or am I missing something because I feel like I am. I realize there are going to be some kind of fittings on each end of the hose so those are the specs I'm looking for. I haven't seen those kinds of specs listed for hoses I've seen so far; just the length. Feel silly asking you guys but having trouble finding the info I need to know to find the info I need!
 
I realize there are going to be some kind of fittings on each end of the hose so those are the specs I'm looking for.
The banjo's need to be 10mm. Have a look here.
Soo master cylinder ID (bore?) needs to be 14mm and to fit on 7/8 bars--am I missing any other information?

Most people think the 14mm master has too "wooden" a feel.....no feedback (unless you're running a dual disk). I think the general consensus is to go with a 12 or 13mm master.
Has the weeping bleeder changed any?

Untitled.png
 
20210309_211415.jpg

Banjo width can be confusing. Mostly because the original Yamaha banjos are only 7mm wide. And the original banjo bolts are designed for these fittings.
When you order after market brake lines, I did not find a banjo width option and did receive banjos 10mm wide. This requires sourcing appropriate banjo bolts as well.
I do not have a good source to recommend.
 
A 90cm length does seem correct for your short bars.
Yamaha mastercylinders are thread tapped for a "left hand" thread on the throttle side for the mirror stalk.
If you buy after market, you will need to also buy mirrors. I do not know of any after market MC's with that left hand thread.
Unfortunately..
20210309_211610.jpg
 
Last edited:
Back
Top