Another carb jetting question....

Prisondawg

XS650 Addict
Messages
128
Reaction score
52
Points
28
Location
Illinois
I know what you're going to say

This is all covered in the tech section.
Try searching other threads.
Read the carb guide


But this is such a finicky situation that it truly takes experience.

I've ordered the uni filters with the red sock.

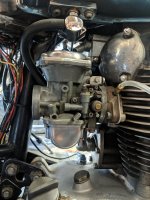
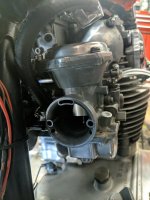
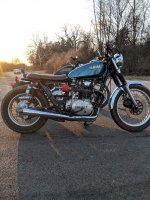
My bike is an 81 engine with bs38s from a 78 special.

My pilot is 27.5 .

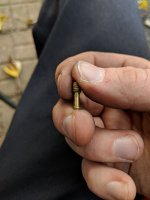
My I don't know what my main jet size is . It says 2.0 which doesn't seem consistent with the other increments discussed on these forums. I know most people can get away with moving up a size on the mains, maybe 2. Possibly going up a clip and going up a size on the pilot.

I don't think I have a movable clip position.

I'm at 614' elevation.

My question is, what size is my main jet .
Where can I order a main jet right now.
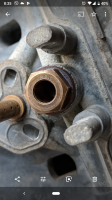
And since I'm using bs38s on an 81 engine, which carb boots do I need to buy so I can get a tighter seal.

One day I hope to be a guru answering the same questions over and over to repay my debt.

Thanks in advance
 

Attachments

  • Screenshot_20181220-203558.png
    Screenshot_20181220-203558.png
    1.1 MB · Views: 296
  • IMG_20181030_171300.jpg
    IMG_20181030_171300.jpg
    110.1 KB · Views: 293
Skull has it; that's the float needle seat which is always a 2.0 on BS38's
Reusing old float needles and seats on BS38's is seldom successful the years have eroded, worn the seat and needle and they will leak no matter how clean.
The main jet is found at the bottom of the float bowl when you remove the drain plug.
79BS38s main pointed out.jpg

The brass you can see in this pic is your pilot jet
BS38BowlTypes w main pointed out.jpg

The jetting through the years.
650carbspecsreducedsizeey7.png

Carb holders to fit 1976 to 1979 XS650 are correct for your carbs. Holders with the vacuum port will aid in doing a carb synch but are not absolutely needed.
Yeah you REALLY need to read the carb guide.
We all had to start somewhere. Carbs are never happy unless EVERY little detail is absolutely right, they are spotlessly clean and assembled 100% correctly.
 
Last edited:
We should see a pic of your carbs preferably looking at the intake side.
Confirm your float bowls are like the one above on the LEFT not like the one on the right.
Look the pic over you'll see the difference.
Note that the pilot jets are of two different types.
 
Last edited:
Dawg, I don't mean to scold, but there's reading and there's scanning, and you didn't read Post 6 in the Carb Guide. When you're approaching a new mechanical chore, go slow--read, look, and if it doesn't make sense, repeat.
 
pilot info
mikunipilotjetsmoddedam2.gif


your moveable clip is found inside the slide at the top end of the needle you see poking out.
lyons 003.JPG
 
Sorry, we didn't answer all of your questions. Re. carb boots, they're the same from 1972-1979, with the exception of vacuum barbs on 78-79 boots. IMO your best bet is Tour Max (a house label from K&L Distributing). Tour Max boots are made in Japan by ARS, the original manufacturer. You'll also need the metal shrouds for the boots; they won't hold up long without support. JBM Industries also makes boots for the XS650. Shrouds don't fit JBMs, and the manufacturer claims that his boots alone give adequate support, with or without air box. That doesn't match my experience with JBM boots.

It appears that JBM and ARS/Tour Max have stopped producing BS38 boots with vacuum barbs. If your tank has vacuum petcocks there are many ways around the problem; the simplest is to use the "Run" position as a shutoff and run the motor on "Prime." If you need a pair of shrouds for BS38 boots, send me a PM. I have several pairs collecting dust, free to good home.

I do have the stock manifolds but the rubber isn't in the best shape so I'm getting the whole climbing idle, should I just try to find some NOS Yamaha ones from eBay ? My current boots have the vacuum Barbs on them but are capped off. My tank doesn't have prime. Only off run and res. I don't mind spending a little extra to get a tighter, leak free set up that can hold the carbs. The original ones lasted nearly 40 years.
 
Confirm leaks or not with some spray carb cleaner at idle. Throttle shaft seals also a common issue. Worn throttle shaft bushings happen on higher mile bikes especially in "dusty, gritty" areas.
 
early manifolds have a different shape, straight instead of a slight elbow shape.

256-13565-00-00 JOINT, CARBURETOR fits the following models and components:

Yamaha Motorcycle 1971 XS1B Intake

Yamaha Motorcycle 1970 XS1 Intake

Yamaha Motorcycle 1972 XS2 Intake

Yamaha Motorcycle 1973 TX650 Intake

447-13555-01-00 MANIFOLD, INTAKE fits the following models and components:

Yamaha Motorcycle 1975 XS650B INTAKE TX650A - XS650B

Yamaha Motorcycle 1974 TX650A INTAKE TX650A - XS650B

Yamaha Motorcycle 1976 XS650C INTAKE XS650C

Yamaha Motorcycle 1977 XS650D INTAKE XS650D
78-79 same as 74-77 but have the barbs.
80 on fit BS34's
 
IMO your best option is new Tour Max boots.The problem with "new old stock" rubber is that although it's unused, it isn't new. Rubber will offgas over time--that is, it loses volatile compounds and becomes harder and weaker. You can buy new OEM Tour Max boots from 650 Central or any shop that orders from K&L.

Thanks for the catch, Gary! Right, 72-73 boots are the same as 70-71, it was only the head gasket pattern and elimination of the intake port crossover that changed.
 
The whole rising and erratic idle thing can be a bear to get a handle on. When I was working on my ‘77 I fought my carbs for a long time until I finally figured it all out. I must’ve had them off and apart six times before I finally got them all sorted. In the end it took new carburetor mounts. New butterfly shaft seals ( I think that should be required)

Here was a sneaky one. I had a big time air leak on the choke housing, that was caused by casting flash, right on the gasket surface ( I have since found these on three sets of carbs )
I could hear the leak right here.
55253A87-EA31-4949-B764-668822B83D06.jpeg

Caused by these surface imperfections not allowing the very thin gasket to seal.
3FF54DBA-118A-4DF2-B5CC-00AFE79470C3.jpeg

I filed them smooth and doubled the gasket.
Also I had wear inside the carb body which didn’t allow the butterfly to seal the bore of the carb, which made it hard to adjust the idle. It gave very uneven vacuuum.
C0820DCA-ED52-4CC5-8FF9-171725E2CDC5.jpeg
E868BB62-EB28-4DA8-BB04-89514BE360C2.jpeg


That one could only be resolved by swapping out the body of the carb.

Here’s a tip for finding air leaks, with your bike running, take a length of tubing, like fuel line and put one end in your ear and probe around your carbs with the other end of the hose like a stethoscope. You will REALLY hear the air leak when you narrow in on it.

Now regarding the carb guide in the tech section. I will admit to glossing over it when I first started out. It seemed rather technical and dense to my little lizard brain. But the more you dive into taking your carbs apart and seeing the internal parts for yourself and then re reading the guide, the more it makes sense. It’s like homework in school and your bike is the test, Haha!
Good luck with your carbs and your bike!
Bob
 
The whole rising and erratic idle thing can be a bear to get a handle on. When I was working on my ‘77 I fought my carbs for a long time until I finally figured it all out. I must’ve had them off and apart six times before I finally got them all sorted. In the end it took new carburetor mounts. New butterfly shaft seals ( I think that should be required)

Here was a sneaky one. I had a big time air leak on the choke housing, that was caused by casting flash, right on the gasket surface ( I have since found these on three sets of carbs )
I could hear the leak right here.
View attachment 131905
Caused by these surface imperfections not allowing the very thin gasket to seal.
View attachment 131904
I filed them smooth and doubled the gasket.
Also I had wear inside the carb body which didn’t allow the butterfly to seal the bore of the carb, which made it hard to adjust the idle. It gave very uneven vacuuum.
View attachment 131906 View attachment 131907

That one could only be resolved by swapping out the body of the carb.

Here’s a tip for finding air leaks, with your bike running, take a length of tubing, like fuel line and put one end in your ear and probe around your carbs with the other end of the hose like a stethoscope. You will REALLY hear the air leak when you narrow in on it.

Now regarding the carb guide in the tech section. I will admit to glossing over it when I first started out. It seemed rather technical and dense to my little lizard brain. But the more you dive into taking your carbs apart and seeing the internal parts for yourself and then re reading the guide, the more it makes sense. It’s like homework in school and your bike is the test, Haha!
Good luck with your carbs and your bike!
Bob
Great write up! I've read through that guide a bunch of times and taken my carbs a part a bunch of times too. Each time they got a little cleaner. Embarrassingly enough I still didn't know where my main jet was hiding ! Every time I read the carb guide it makes a little more sense. But once I get new boots , and the air filters on I'm excited to start trouble shooting a bit more and hopefully that experience will make the carb guide even more demystified .
 
Here's some pics of my carb. I can't believe I didn't know where my main jet was ! It's a 135. I'm using the red angled uni filters
 

Attachments

  • IMG_20181225_133701.jpg
    IMG_20181225_133701.jpg
    206.5 KB · Views: 237
  • IMG_20181225_133721.jpg
    IMG_20181225_133721.jpg
    156.3 KB · Views: 265
Yes, that is a '78-'79 carb set, what many of us consider one of the best BS38 carb sets. The jets you found in there are stock. You will need some minor changes for your mods. I assume that you'll be changing the exhaust as well as the air filters. What usually works for that on this carb set is one or two up on the pilots and 2 or 3 up on the mains, along with leaning the needles a step. I would start with one up on the pilots (#30) and 2 up on the mains (140), along with the needles leaned a step. This carb set requires leaning the needles with pretty much any main jet increase. Studying the carb spec chart above will show you why.

The '78-'79 carb set implemented a very big main jet size increase over the previous '76-'77 set (122.5 to 135). To accomplish that, the midrange had to be leaned out too. That was done by reducing the needle jet size from a Z-8 to a Z-2. Even with this change, the upper midrange on the '78-'79 carb set is still on the verge of being too rich right from the factory. Any main jet size increase, even just going up one, will push that upper midrange into "too rich" territory. That will cause break-up and stumbling under heavy throttle application in the upper midrange, say in the 4 to 5K range. Leaning the needles fixes this.
 
Last edited:
Yes, that is a '78-'79 carb set, what many of us consider one of the best BS38 carb sets. The jets you found in there are stock. You will need some minor changes for your mods. I assume that you'll be changing the exhaust as well as the air filters. What usually works for that on this carb set is one or two up on the pilots and 2 or 3 up on the mains, along with leaning the needles a step. I would start with one up on the pilots (#30) and 2 up on the mains (140), along with the needles leaned a step. This carb set requires leaning the needles with pretty much any main jet increase. Studying the carb spec chart above will show you why.

The '78-'79 carb set implemented a very big main jet size increase over the previous '76-'77 set (122.5 to 135). To accomplish that, the midrange had to be leaned out too. That was done by reducing the needle jet size from a Z-8 to a Z-2. Even with this change, the upper midrange on the '78-'79 carb set is still on the verge of being too rich right from the factory. Any main jet size increase, even just going up one, will will push that upper midrange into "too rich" territory. That will cause break-up and stumbling under heavy throttle application in the upper midrange, say in the 4 to 5K range. Leaning the needles fixes this.
I am keeping stock exhaust. Just running the uni pods. I'm getting some break up just off idle . Doesn't that usually come from the needle clip ? This is my exhaust
 

Attachments

  • IMG_20181225_160007.jpg
    IMG_20181225_160007.jpg
    347.5 KB · Views: 277
That's not stock exhaust it's an aftermarket 2 into 1, that about guarantees you need to fatten the jetting like 5t's suggests.
While single wall pipes tend to discolor that deep blue suggests this engine has been running too lean too long, the short path to a holed piston
 
That's an aftermarket 2 into 1 exhaust, not a stock system. They can sometimes be difficult to tune for. Most weren't designed with peak performance in mind but rather with just fitting on the bike as their main goal. The header tube lengths and diameters are not always ideal. What you have to keep in mind when tuning carbs is that the various circuits in them overlap and influence one another. Your off idle break-up could be related to the pilot circuit or the needle setting, or a combination of both. Just off idle is in the transition area between the pilot and midrange. Your mix screw setting can also influence this area. Stock setting or starting point for your carb set is 2.25 turns out. If you need to set them way off from that to attain a good idle then that's a sign your jetting is off.

Rejetting these 650 carbs isn't that difficult but almost always requires changing several things, not just one. In other words, you usually can't just change a main or a pilot and make them right. Usually you need to change the mains, the pilots, and tinker with the needle clip setting. Here's what usually happens - you increase the mains to get them right. That richens up the upper midrange which requires a needle clip position change (leaner) to fix. Leaning the needles fixes the upper midrange but also leans the lower part that overlaps the pilot circuit. That can make it too lean causing off idle issues, and that requires a larger pilot jet to fix.

Great information, I just put the unis on before I took that picture, I had the at 2.25 out , I'm guessing that unis allow more airflow then stock which might be where I'm getting that blue on the pipes. I've gone up to 2.5 out to add more fuel. I'm excited to rejet it , however I'm from the Chicago area, so can't see much opportunity to test in the coming months. Where can I order the right jets ? I know I want genuine mikuni and to not get them from Yamaha. Also where can I get the tour max boots?
 
Back
Top