-
Enjoy XS650.com? Consider making a donation to help support the site.
XS650.com receives a small share of sales from some links on this page, but direct donations have a much greater impact on keeping this site going.
You are using an out of date browser. It may not display this or other websites correctly.
You should upgrade or use an alternative browser.
You should upgrade or use an alternative browser.
Broken bolt on rebuild asembly
- Thread starter yzwizard
- Start date
If were mine, I would disassemble it and take it to a machinist. Don’t ruin it first. That’s exactly how my last oil change has turned into a transmission replacement and top end overhaul. I’m giving you the same advice I give to myself.
Now if you would just listen to yourself...If were mine, I would disassemble it and take it to a machinist. Don’t ruin it first. That’s exactly how my last oil change has turned into a transmission replacement and top end overhaul. I’m giving you the same advice I give to myself.

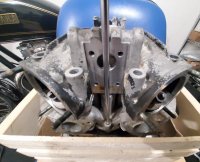
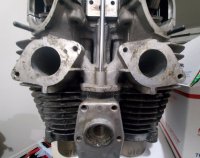
Your pic clearly shows the motor not fully assembled sitting on the bench. Cut your losses and pull the head to do it right. Try the left hand drill bit and torx bit. Failing that, take it to a machinist.
Virtually impossible to access that broken bolt with any guarantee of accuracy while the motor is in the frame. Once you get it out, there's still a good chance you'll screw the job up with drills, easy outs and torx sockets. This is the cylinder head and you need it done right or you'll be buying another. If it's not leaking oil, you can leave it like Randy says, until you need to go in for some other reason or you can pull the head and find a decent machinist. Honestly, that's what I would do.
I remember talking to the manager of an automotive machine shop somewhere in the heartland, maybe Sioux City, who said half of their business is removing broken studs and bolts. They all have the magic down. You wouldn't set your own broken leg, would you? If you're lucky and end up with an insert of some kind, it will be better than original, steel against steel rather than steel vs aluminum. While I was there I would have them put an insert in the front, right, ̶u̶p̶p̶e̶r̶ lower valve cover stud, which will eventually cause problems if it's left stock.
Last edited:
Despite some good advice I ended up at worse case scenario. The guy at the machine shop said he would give it the old college try. The bolt has a hole drilled through it with an easy out broke off in it. Meantime I'm working like a dog getting the Yamabond cleaned up and waiting on the cylinder head.
Those guys usually win. I've seen a lot of bolts with EZouts broken off in them.
Despite some good advice I ended up at worse case scenario. The guy at the machine shop said he would give it the old college try. The bolt has a hole drilled through it with an easy out broke off in it. Meantime I'm working like a dog getting the Yamabond cleaned up and waiting on the cylinder head.
Sorry to hear that ...From bad to worse ... we all been there when something goes wrong
Solution wise ...I would perhaps ..depending how it looks ( Please consider who will do it with what experience , if not comfortable don't try it )
Again apply heat and oil preferably thin oil
Depending on how it is broken off
a ) A Stump is sticking out
Then I would try to give it some Hits with a drift ( No major hard smashing )
holding that drift slanted at an angle if possible
perhaps a small flat screwdriver can come down moving the EZ sideways
getting it loose
b ) A Stump is NOT sticking out
after heat and oil I would go for the Drill bit with the left twist.
The drill tip will be destroyed but I would still try that Carefully
Steve C
XS650 Addict
He brought it over for some help. So we decided to try welding on a nut to the broken remnant of the screw. We used 5/16 nuts and used them kinda like heat shields to build up a little weld on the screw nub. After a couple attempts we were able to solidly weld the nut to the screw and they turned right out without damaging the aluminum. Go slow, little at a time. We used a mig but tig would prolly work best. This certainly wouldn’t be my first play, but if your up against it...worth a try.
I'll pollogize for being late to suggest THIS
Use a sleeve so first hole is centered.
get a set of LH drill bits.
NEVER seldom, use an easy out on a small bolt. I (mostly) suggest the rigid extractor system.
Just keep upping the drill size till you get to the size that is listed to tap that thread.
Try to keep drill speed moderate, pressure correct so you are making a uniform CUT, not metal dust. This increases odds that the LH bit will unscrew the remains of the bolt.
now if you have drilled up to the tap size start working in a tap. use rust buster or mineral spirits, constantly remove tap, blow out swarf with air. Once the standard tap bottoms, change to a bottoming tap. (or grind the taper off the end of a regular tap for a DIY bottoming tap). finish up.
Use a sleeve so first hole is centered.
get a set of LH drill bits.
Just keep upping the drill size till you get to the size that is listed to tap that thread.
Try to keep drill speed moderate, pressure correct so you are making a uniform CUT, not metal dust. This increases odds that the LH bit will unscrew the remains of the bolt.
now if you have drilled up to the tap size start working in a tap. use rust buster or mineral spirits, constantly remove tap, blow out swarf with air. Once the standard tap bottoms, change to a bottoming tap. (or grind the taper off the end of a regular tap for a DIY bottoming tap). finish up.
Last edited:
View attachment 182224 We used 5/16 nuts and used them kinda like heat shields to build up a little weld on the screw nub. After a couple attempts we were able to solidly weld the nut to the screw and they turned right out without damaging the aluminum. Go slow, little at a time. We used a mig but tig would prolly work best. This certainly wouldn’t be my first play, but if your up against it...worth a try.
Never needed to use that method on a Yamaha or aluminum casting, but have done it many times on a cast iron head of diesel engines. Think I had to do 6 or 8 on just one engine where the studs had broken despite efforts to remove rusted nuts.
One option is to use a flat washer that would fit the stud or bolt you are tiring to get out. Hold it in position and weld to the broken part then move outwards to the washer. Then use a nut a little larger that the broken part, say a 10mm nut if the part broken was an 8mm. This gives you a bit more room to fill with weld.
The ones I took out were all done with a little125 amp flux core welder and done by a very low skilled person (me) running it!


