I have a set BS34 carbs from my 81' XS650 that I am working on rebuilding. I got a little carried away and probably tried to strip things down a little farther than I should have. Right about the time I was about to call it a day I found a very small spring (1/16th OD by 1/4" long) and steel ball (1/16 OD) laying on my work bench which I'm almost certain came from the carbs I was working on. I have searched in vain for a schematic of the BS34's so I could identify where the items came from. I've found plenty on the BS38's but not near as much on the 34's. Can anybody point me in the right direction? I apologize if something like this is readily available and I missed it.
-
Enjoy XS650.com? Consider making a donation to help support the site.
XS650.com receives a small share of sales from some links on this page, but direct donations have a much greater impact on keeping this site going.
You are using an out of date browser. It may not display this or other websites correctly.
You should upgrade or use an alternative browser.
You should upgrade or use an alternative browser.
BS34 Carb Diagram/Schematic/Exploded View
- Thread starter bosshasr
- Start date
angus67
Welder's penetrate deeper!!
The spring and ball go behind the choke rod. The spring pushes the ball against the detent in the rod. Both carbs have them. Really need only one.
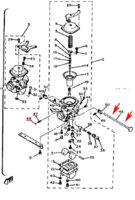

Your floats and float bowls may differ from what's shown in Skull's diagram. In '81, they changed those items. Not a big deal, just something to be aware of. You should have black plastic floats, not brass, and your float bowls should have a drain screw on the side, not a bolt on the bottom. If you do find a newer diagram, be aware that the floats were drawn incorrectly, shown mounted upside down .....

There is a small hole in the carb body to allow removal and install of that spring and detent ball. Holding it all in there until you get the choke rod inserted past it can be tricky .....


There is a small hole in the carb body to allow removal and install of that spring and detent ball. Holding it all in there until you get the choke rod inserted past it can be tricky .....
Last edited:
angus67
Welder's penetrate deeper!!
this is OUR site, you included, bosshasr!
Reviving an old thread, as a result of my search for BS34 schematics...Carb Schematic. I like pictures. If you want to have a 1/2 choke then a recess can be drilled on the rod between the full choke and no choke
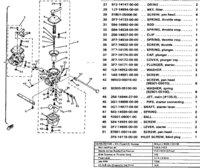
I probably need to remove Item 18, Nozzle, Main from my BS34 bodies... it appears to be held in with some sticky goo, which I assume was once upon a time Item 19, Washer, Main Jet.
- Can anyone confirm that this "washer" is in fact a rubber/Viton O-ring of some sort that holds the Nozzle in place?
- It appears to me that the Nozzle, Main is pushed in from above (ie, from the carb throat). Is this correct? If so, how is the Nozzle removed?
Thanks in advance for help with this. I am trying to save these carbs and therefore don't want to bugger anything due to a lack of prior knowledge of how they are assembled.
PDF covers working on BS34's. From suzuki for their BS series carbs which are basically the same as our BS34's............and yes the needle jet comes out into the throat, carbs need to be dissembled and if that ring has deteriorated then all of the carb needs to be gone through and refurbished.
Symantec covers your Canadian model showing the pilot screw. If you need to replace the pilot screw Yamaha has superseded the original part no


Symantec covers your Canadian model showing the pilot screw. If you need to replace the pilot screw Yamaha has superseded the original part no
Attachments
The "nozzle main" aka needle jet is only held in place by the main jet washer that is brass. It appears as item 23 as I see it. That and they are semi-press fit and can get stuck.
The nozzle (NJ) will press from the main jet side into the venturi
The nozzle (NJ) will press from the main jet side into the venturi
Last edited:
Huge THUMBS UP, Skull. Thanks most of all for the BS repair/overhaul document. I also found 5T's carb guide and between the two, I think that I have all the bases covered. What remains to be seen is how much of the buggered stuff comes in the overhaul kit from Cruzinimage. The stuff that appears to be missing is the pilot jet plug, the pilot screw, its spring , washer and O-ring, the main jet washer...we'll see when I receive those kits.PDF covers working on BS34's. From suzuki for their BS series carbs which are basically the same as our BS34's............and yes the needle jet comes out into the throat, carbs need to be dissembled and if that ring has deteriorated then all of the carb needs to be gone through and refurbished.
Symantec covers your Canadian model showing the pilot screw. If you need to replace the pilot screw Yamaha has superseded the original part no
View attachment 221495View attachment 221497
Thanks for the info, JP. when I heated the carb body to free up the pilot jets, a bubbling goo came up from around the nozzle jet. I assumed that it was a deteriorated rubber seal of some sort. Good to know it wasn't., just more of the molasses which was gasoline, once upon a time!The "nozzle main" aka needle jet is only held in place by the main jet washer that is brass. It appears as item 23 as I see it. That and they are semi-press fit and can get stuck.
The nozzle (NJ) will press from the main jet side into the venturi
Welcome. You mentioned pilot plugs and I couldn't remember which kits came with those (maybe Keyster). Anyway, the Cruzinimage kits don't appear to have the plugs that you need

Dont worry about the plug. I had/have an 83 Canadian i bought in 90 and done a lot of riding in the rain and it never affected the Pilot screw. Also the Pilot screw and associated parts can be bought using the part # in my previous post
No confusion on your part, JP. The pilot jet plugs (rubber plugs, in the float bowl) are the ones that I am referring to. The pilot screw (what I would call an idle mixture screw and what I believe Skull is referring to) orifice usually has an anti-tamper plug, I think. My carbs had no such plugs.My confusion again: the pilot jet plugs (#21 above) not the blind plugs (I never replace those)
I am not sure whether the pilot jet plug is an absolute necessity. Thoughts?
No, you don't need the plugs over the mix screws. The rubber plugs over the pilot jets can be found in 4 packs on eBay for a reasonable price.
The needle jet has a brass washer on the bottom that the main jet fits through. The main jet screws into the bottom of the needle jet and acts like a ''bolt" to hold it in the carb body .....

Remove the main jet and the washer, and the needle jet can be tapped up and out into the main bore of the carb .....


The needle jet has a brass washer on the bottom that the main jet fits through. The main jet screws into the bottom of the needle jet and acts like a ''bolt" to hold it in the carb body .....
Remove the main jet and the washer, and the needle jet can be tapped up and out into the main bore of the carb .....
Last edited:
Thanks for the input, 5T! Have downloaded your carb guide, thanks for authoring that! I think I've got all the bases covered at this point.No, you don't need the plugs over the mix screws. The rubber plugs over the pilot jets can be found in 4 packs on eBay for a reasonable price.
The needle jet has a brass washer on the bottom that the main jet fits through. The main jet screws into the bottom of the needle jet and acts like a 'bolt" to hold it in the carb body .....
View attachment 221529
Remove the main jet and the washer, and the needle jet can be tapped up and out into the main bore of the carb .....
View attachment 221530
View attachment 221531
@Skull, @JP, @5twins, thanks again for your previous guidance... So I have completed the rebuild of my BS34's and have a few residual issues that perhaps someone can clarify for me:
- with reference to the image below, where does the little O-ring (in the bottom left corner of the image) go?
- there is a minuscule spring/ball that popped out of somewhere but not sure where; is this a detent for the choke pull rod? If so, I assume I can deduce which carb body it goes into as I expect that I'll finding a corresponding divot in the choke pull rod.
... please disregard the question about the little spring/ball!!!
Similar threads
- Replies
- 41
- Views
- 1K