BS34 Float Help

To wiggle the carbs into the frame with the manifolds mounted on the engine, you need to remove that top butterfly shaped bracket from the carb set and take the acorn cover nut off the cam chain adjuster. It's still tricky but they'll go in.

Fiver (Hope you don't mind being called Fiver. Just a little reminiscing from reading Watership Down), I have removed the Cam adjuster cap nut & I was able to get the carbs in the space, then insert the boots. I just couldn't get the damn carbs fully into the boots. Actually got the right side in but as soon as I'd try to push on the left carb ol rightie would pop out.
 
Jim, I sure don't see how it's possible to access the Allen head bolts if you put the boots on first. Maybe if I discard the Allen bolts & replace them with hex head bolts. Then I could reach them with a wrench.
I believe I've got an allen around here somewhere where I cut it down on the short leg until it would fit. Not positive about that though. It's been a few days....
 
You need to lube the intake rubbers to help the carbs slip in. I use a little rubber friendly lube of some sort, or even a smear of white lithium grease will work in a pinch. You have to work both carbs in together. I rock them up and down as I push them in, seems to help.
 
FWIW I found getting the carbs in a real faff. If I recall correctly, it helps to loosen the Allen screws on the r/h manifold, but only remove the outer screw. Rotate the manifold up out of the way. Remove the acorn nut on the cam-chain adjuster. Protect the frame with a rag held with masking tape. Wiggle the carbs in from the lower left side. Lift them up and move the r/h manifold back into place. Difficult but not impossible to replace & tighten the Allen screws. Might need to use a hex screwdriver bit turned by a small spanner. Touch of grease smeared around the manifolds. I move to the front of the bike, grasp the carbs in both hands and pull while as 5T says rocking them up and down. Quite satisfying as they pop into place.

The whole process was a lot easier when I did an engine swap. Had the foresight to fit the carbs when I had the engine in the frame but only the lowest engine bolt fitted. The one that passes underneath. Tipped the engine forward and had plenty of room to get the carbs in.
 
I believe I've got an allen around here somewhere where I cut it down on the short leg until it would fit. Not positive about that though. It's been a few days....
.

Jim, Maybe I can do that. It would have to be VERY SHORT though. I have done this for some other applications but never as short as this would have to be.
 
You need to lube the intake rubbers to help the carbs slip in. I use a little rubber friendly lube of some sort, or even a smear of white lithium grease will work in a pinch. You have to work both carbs in together. I rock them up and down as I push them in, seems to help.

Yeah, I did this. Interestingly, the grease also makes it easier for the carbs to pop back out.
 
FWIW I found getting the carbs in a real faff. If I recall correctly, it helps to loosen the Allen screws on the r/h manifold, but only remove the outer screw. Rotate the manifold up out of the way. Remove the acorn nut on the cam-chain adjuster. Protect the frame with a rag held with masking tape. Wiggle the carbs in from the lower left side. Lift them up and move the r/h manifold back into place. Difficult but not impossible to replace & tighten the Allen screws. Might need to use a hex screwdriver bit turned by a small spanner. Touch of grease smeared around the manifolds. I move to the front of the bike, grasp the carbs in both hands and pull while as 5T says rocking them up and down. Quite satisfying as they pop into place.

The whole process was a lot easier when I did an engine swap. Had the foresight to fit the carbs when I had the engine in the frame but only the lowest engine bolt fitted. The one that passes underneath. Tipped the engine forward and had plenty of room to get the carbs in.

Raymond, What a great idea! I'll just pull the engine, slap the carbs on & put it back in! Haha! Just kidding, I know you weren't suggesting that.

Think I saw somewhere where someone said they used ratcheting straps to put pressure on the carbs & force them in place. I might give that a try if I can't get it to go.

Damn! This is sure making me dread the possibility that something doesn't work right & I have to pull the carbs and do this all over again...
 
On refitting the carbs. I installed the RHS intake, slipped the carbs past and rest against rear frame tube and engine case. Installed LHS intake. Lightly lube intake entry, and offer up carbs. RHS carb pushed on, LHS carb needed a light sharp tap with rubber mallet. Job done.
 
Last edited:
On refitting the carbs. I installed the RHS intake, slipped the carbs past and rest against rear frame tube and edging case. Installed LHS intake. Lightly lube intake entry, and offer up carbs. RHS carb pushed on, LHS carb needed a light sharp tap with rubber mallet. Job done.

Adamc, So, nothing to it, right?

Well, I've ordered the boots recommended by Jim. Maybe when they arrive I'll find that installation is no big deal. I sure hope so!!!
 
Adamc, So, nothing to it, right?

Well, I've ordered the boots recommended by Jim. Maybe when they arrive I'll find that installation is no big deal. I sure hope so!!!
Well due to my mechanical ineptitude I had em off and on 4 times in an hour or so. By the fourth time I’m sure the intake rubber had softened up and made my life easier.
 
IT LIVES!!!

Well, Sort of. I received the carb boots Jim recommended. What A Difference! Slipped in, No Trouble!!! Cursing myself for all the hours wasted trying to fit the Chinese crapl Now I have to wonder why some of you have had trouble getting your carbs mounted unless you're also using the Chinese junk... BTW, Thanks Jim for the tip! I'll bitch about the cost but it was well worth the expense!!!

Actually, I think the Chinese boots were designed for a different carb. Anyway, I hooked everything up turned the key, pulled the choke, hit the starter and no start. Seemed like one cylinder was trying but it wasn't enough for me to tell which one. Kept grinding for about 30 seconds till the left carb began spewing gas. At that point I was seriously thinking of a bonfire. Fortunately, I didn't have any matches close by. Frustrated, I threw my tools in the box and stalked back to the house. Not sure what I'd do tomorrow but done for the day.

Next day the sun was shining so I took a chance. Tapped the left carb bowl just in case the float was stuck, turned the key, etc. but pretty much the same thing happened. Thought I'd check the spark so I pulled the plugs one at a time and laid them up against the motor. I didn't see any spark but the right side plug wire came apart in my hand. I pushed it back together and just for grins pushed on the left side wire in case it wasn't making a good connection. Hit the starter button and...

Hot Damn! it fired up! Quickly died since I don't yet have a throttle cable but I worked it manually and the damn thing runs!!! For the first time in 17 years...I let it run for a couple of minutes to see if the left carb would spew gas but it didn't.

OK, it's running but not so great. Wants to die if I let it idle. I have not yet synchronized the carbs but will do that pretty soon. I have the left carb boot spigot connected to the extra spigot on the petcock but didn't have anything to cover the spigot on the right carb boot. It was spitting out some gas. Not a lot but definitely something coming out of there. Pretty sure that's not right so I put my finger over the spigot and RPM instantly dropped by about 1K. Wonder why that is? I don't understand the science behind this phenomenon. Am I correct in how the boots are supposed to be connected? I know you connect them together for synchronization. I didn't think to try disconnecting the other boot to see if that would increase RPM...

So now I will have to find a cap for the right side boot. Then unless someone has some ideas I guess I'll try to increase the idle speed so it will idle. Then manometer synchronizing.

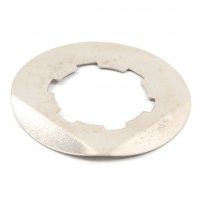
One other strange thing: I pulled off the counter sprocket because I wanted to replace the seal there and on the clutch rod. When I did I found that the locking washer was BEHIND the sprocket. I thought DFO! (or DPO, whichever you prefer). But then upon closer inspection I saw that the counter sprocket shaft does not protrude enough to accept the locking washer. Guessing the PO put on an aftermarket sprocket that's thicker than stock, then didn't know what to do with the washer. Seems odd that the sprocket would be thicker than stock. I could understand if it was stock with 520 chain & wanting to put on 530 but I'm pretty sure it was 530 stock.

So, while I'm still a ways from being able to take it out on the road I'm glad I didn't have to torch it. Since I live in a heavily forested area with a dry climate I'm pretty sure my neighbors and local fire department would not be at all happy with me if I did that.
 
Excellent!!
The spigot you refer to is a vacuum port. Without a cap it's just a huge vacuum leak. Yes, cap it before running again.
There shouldn't be a "classic" lock washer on the front sprocket. There should be a thin washer that's splined for the shaft and that you bend the tabs over to lock in place. It's very thin and shouldn't make a difference as far as threads "left over" go.
Can you put some pics up?


Untitled.png
 
Back
Top