Clutch pressure plate

JRay77

XS650 Junkie
Messages
675
Reaction score
904
Points
93
Location
SOMEWHERE
A7A1A2F8-FCE4-47DE-AFE9-167B06BDA420.jpeg
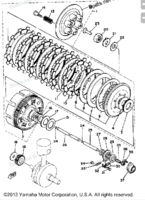
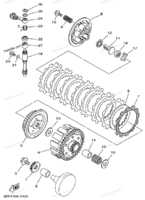
Yeah Fellas I need help. I’ve done a few of these and this one, I dunno. The other clutches I’ve done have been in the motor and just replaced. This motor has been pieced together (just top end and clutch) I have a 80-later motor. Pretty sure I have the right clutch basket and number of plates. 6 friction 5 steel. I’ve read thru threads and really sure I have the stacking order of washer, bearing, etc. The problem, when I tighten up the pressure plate, motor binds up. Take the springs out, no binding. Also, 1mm washer, bearing plate, thick (2mm) washer. Some prints show this washer (1mm) and some don’t. Almond Joy has nuts, Mounds don’t haha! If I run the 1mm washer = binding if not, turns smooth. So I took the 1mm out. Assemble and everything turns, toque is set (50 ft lbs) when I put the pressure plate on and springs = bind. Springs off = free. Springs are new with shoulder bolts and bushings. Clutch plates are new. I realize there’s a spring length tolerance. It’s not like I can shorten the springs. What do I do?
 
Last edited:
.. bearings..spacer behind the clutch basket a issue..?...
 
.. bearings..spacer behind the clutch basket a issue..?...
Stacking order. One print shows a 1mm washer, bearing plate, 2mm washer. This does not work, binds up. If I go by another print I've found, bearing plate, thick washer, no binding. Well no binding until I install the pressure plate assembly. It acts like the spring tension is to much.....?
 
The drawing that doesn't show that one 1mm washer is a well documented mistake. It needs to be in there. This is about the best drawing I've found .....

wfEBron.jpg


Here's another that shows it pretty well .....

xi65L3l.jpg
 
Thanks 5T. I’d seen the bottom print but I really appreciate the top. Have not seen this. I went ahead and ordered a new bearing and 1mm washer. So I’ll put it back together per print and figure out what the hell is going on. I’ll tear another engine apart if I have too.
 
No clutch expert, but the later model have a slightly different start to the plate stack with a "half plate" and wire ring in the mix.
81 clutch.png CLUTCH.png
 
You have aligned the pressure plate correctly when mounting it, right? Hole in plate over dot stamped in one of the inner basket teeth?

c0KGVLw.jpg


Also, the order of the first 2 spacer washers is critical. The smaller washer must go on first. That holds the second larger washer and the whole clutch assembly away from the bearing and engine case.
 
JRay77
Some of those replacement cap head screws for the pressure plate with the spacers were too long and poke out the back of the clutch basket and lock up the clutch. Watch out for that too. There's a thread on here somewhere. got to go now, working 12 hour shifts on a breakdown. Good luck mate.
 
Good point. With the inner hub removed, install one of the screws w/ spacer (no spring) on a spring post and just snug it down. Flip the hub over and observe how much the screw protrudes out the back. It shouldn't stick out more than a MM or 2, and can't be any higher than the flanged center .....

sSr1yjf.jpg


Normally, a 40mm long screw is used and is perfect. 45's are too long .....

2atECtq.jpg
 
Thanks 5T and jonesey! I did notice the Allen head bolts are a c$&t hair longer. I'm talking 3 threads. Didn't think It'd make a difference. Thought about throwing stock JIT style back in to see. I said screw it because surely they know better. I was wrong! Why I ask questions. By the time I toruque them to 6ft lbs, they probably stick thru more. I aligned it to the dot. I've had this apart 4-5-6 times.. Trying different combos. Start second guessing is when I get into frustrations. I'm sure now this is this issue. Bolts to long. I'll definitely let you guys know what happens, ordered the better bearing and 1mm washer from Mikes. Waiting on that.
 
Back
Top