Could This Be Saved?

Bewarethemoon

XS650 Junkie
Top Contributor
XS650.com Supporter
Messages
877
Reaction score
2,060
Points
243
Location
Devon, United Kingdom
Last edited:
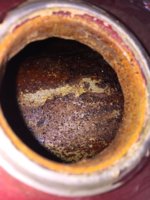
Judging by the rust inside the filler, I wouldn't trust it. If it's that bad at the top of the tunnel, the pitting on the bottom is probably horrendous.

Not worth the punt then? Not even for £60? That’s a shame. I plan to mod it with a R6 filler cap so finding an example that’s almost a throwaway item appeals to me.
 
Not worth the punt then? Not even for £60?
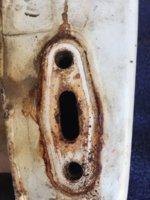
Well, almost anything's fixable, but I suspect that once it's de-rusted the bottom is gonna be full of pinholes. You could weld in new metal... it's fixable... but how much work are you willing to put into it?
 
Well, almost anything's fixable, but I suspect that once it's de-rusted the bottom is gonna be full of pinholes. You could weld in new metal... it's fixable... but how much work are you willing to put into it?

I’m prepared to put in the amount of work required, I like the idea of fixing up an almost junk tank for my exact purposes.

Seems a little wrong for me to source a solid XS1 tank to then just cut it up. Also I’m going to be looking at something like £300 for a decent tank?
 
You’ve talked me into it Jim
Laughing Minions.gif
 
You’ve talked me into it Jim

Just ‘pulled the trigger’, now wait for the all the questions about how best to clean it up before any fabrication can begin.

I have a ‘80 special tank that I’ve welded in an R6 filler cap, and then cleaned up the flash rust with a pure white vinegar, distilled water solution and then gradually diluted bicarbonate soda before sealing with Redkote so I’m not a complete stranger to some of the processes of cleaning up a tank, obviously this will be far more labour intensive and arduous.
 
I just did an old tank.
1. Pulled dents
2. Duct taped over pin holes and blocked off petcock holes.
3. I used the Gold Tank Seal kit. It comes with the degreaser, etching with zinc and the epoxy. $50
4. I used a rubber sink stopper and duct tape to plug the filler hole during this process.
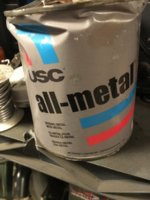
5. Removed duct tape. Used USC All Metal filler (filled back side of holes) sanded down and cleaned surface.
6. Then I used a chemical resistant resin all over the tank bottom where the holes were. Three coats.
7. Did all the paint/body work.
I realize this isn't the conventional way to do this. Lack of the right welding equipment and patience, made me pursue other avenues. Haha! Started to try and weld.....so thin with rust....it was a total shit show.
 
Last edited:
...and weld.....so thin with rust....it was a total shit show. I realize this isn't the conventional way to do this.
There's a good reason that isn't the "conventional" way. An accident on a bike almost always results in a bad day. A tank that ruptures during that crash 'cause the metal's so thin it tears open.... your day just got a whole lot worse. :yikes:
 
I wasn’t aware they made metal based body filler. That sounds interesting, I wonder is it hard to sand and shape?

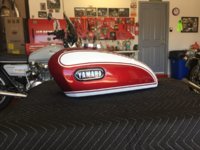
With regards to the original post, wandering if his tank was too far gone. This is what I started out with,
Before,
0767078F-B70C-4643-9D4D-962A5831E2C1.jpeg 72BE78E4-D0F4-4255-B040-7DF15F0CC1EC.jpeg
And after
D69FC258-A51F-4AAF-9B7E-5DB962A270DA.jpeg
The business that painted my tank, sent it out to be flushed and sealed, with a product made by 3M, certified for lining aircraft fuel tanks. So far so good.
 
Re. sanding and shaping, in my experience aluminum-bearing fillers are a bit tougher to work than Bondo, but not enough to pose a problem. I start shaping with a body file, then work down to 320 grit. If I find small pits I use spot putty, and also use it to hide minor edge lines that show up after priming. That's something I always wind up having to do, being among the world's worst at paint-and-body work; takes me a couple of weeks to do what a good hand can do in a day, but the results hold up long term.
 
Did you remove any of the rust yourself Mailman or did the firm you sent your tank to undertake it all?

I spent a lot of time trying to clean out my tank first, before reaching the decision to line the tank. But I don’t think it mattered to the company that did the work. They cleaned it anyways before sealing it.
 
My rough plan of attack (please step-in if I’m missing something) is to drop a chainsaw chain inside and give it a good, thorough shake around before subjecting it to Electrolysis.
Then I’ll strip the outside of paint, remove the old body filler and attempt dent removal.

This should give me a good idea of what I’m dealing before I hand it over to my friend for fabrication.
 
Back
Top