Crimping Tools

Paul Sutton

I Collect Fingers
Top Contributor
Messages
2,730
Reaction score
7,215
Points
513
Location
Cardiff UK
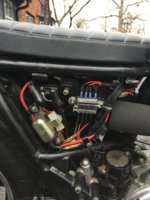
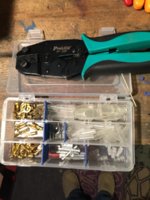
I want to be able to do a more professional job with crimping rather than having to solder my connectors. What do the crimping tool jaws look like that take the following style connector?

images


Any pictures or links to Ebay would be helpful - Thank you.
 
Paul you will want an open barrel crimp-er. This link shows various styles. Open, closed, insulated, non-insulated, ratcheting and non-racheting.
I bought the Eclipse (first one shown) and now wish I had a non-ratcheting type.
For ends I like this place but you would want someone closer.
 
Last edited:
Paul, your pic shows the right type of connector for our bikes. It's known in the trade as an open barrel or F crimp connector. Sorry I don't have a UK source for you. 650 Central sells a good nonratcheting crimp tool. Connectors, vinyl covers, spade connector blocks, and a nice ratcheting crimp tool are available at good prices from www.vintageconnections.com.
I have both tools, and both do a good job. There's a learning curve involved in making a good crimp, so buy plenty of connectors and practice with junk wire a bit. Tip: on smaller gauge wire, meaning most of the stuff in the XS650 harness, the strain relief crimp (the part that grips the insulation) often comes out a bit loose, and you can get a better result if you give the crimp more material to grab by applying a bit of shrink tube at the end of the insulation.
 
Grizld1 for really small (20-24) gauge wire like comes on some accessories do you double the bare wire and fold it half? Good tip on building the insulation diameter with heat shrink.
 
Well, where shall I begin? Thank you everyone for the information you have all provided we. Thank you for all the advice and handy tips. I have traced Mrtwowheel's crimper to Ebay UK based on the code JX-1601 and it comes with multiple jaw sets. I will order one of these to start with and get in some practice. I have a few bits of wiring to tidy up on the bike following my rectifier/regulator build, Boyer Ignition installation and there is a voltmeter waiting to be clipped in also. Must order some F crimp connectors now that I know the name to search for.

Thank you!!!!
 
Last edited:
The tool pictured in the previous post is for use only in emergency situations....like the Zombie Apocalypse.

Marty that was a first blush or minds eye assessment. You would think it is a closed barrel crimper because that is what you are used to. BUT it is actually a open barrel crimper, you just need to look a little harder. They also have a first rate pdf (link click on pdf to download) on wire repair pages 7 and 8 give examples of good vs bad crimps. If I could find just the tool I would buy one. Unfortunately it seems the tool is part of a lit and they run into the hundreds of dollars
 
Marty that was a first blush or minds eye assessment. You would think it is a closed barrel crimper because that is what you are used to. BUT it is actually a open barrel crimper, you just need to look a little harder. They also have a first rate pdf (link click on pdf to download) on wire repair pages 7 and 8 give examples of good vs bad crimps. If I could find just the tool I would buy one. Unfortunately it seems the tool is part of a lit and they run into the hundreds of dollars
Yes, at first glance, it looks like one of those cheap crimpers that Walmart or even Snap-on will sell you. That's what I thought I was looking at. The Pro's Kit frame can be purchased for under $30. $15 more buys the open barrel dies. It's professional grade. There are other ratchet type crimpers out there at various degrees of quality. I bought my open barrel crimper from Mike's XS several years ago. It will do the job, but it's not a quality tool. The ratchet frame will make consistent crimps.
 
And here I thought I had the only one.
View attachment 95615

Justa note, if I recall correctly, the Honda bullets are 3.5mm, Yamaha are 4mm...
That's a nice kit right there! For those who don't have one, fear not. Quality crimping tools are out there!
 
That's a nice kit right there!

Thanx, Marty. Acquired in '73. Quite vintage.

Quality crimping tools are out there!

I have some later/modern ratchet crimps with swappable jaws for varieties of coax. MUCH better quality. The crimps I've seen on Vintage Connections site look very good. Especially since he's familiar with those connectors and what crimps match them...
 
Last edited:
I keep looking at quality crimping tools and terminals, I really should just bite the bullet and do it. Where I get stuck is , I start pricing all that stuff and say to myself " Dang, I'd have more money in the tools and assorted terminals and such, than I have in the part I'm trying to wire up!"

What I'd really like to have is 30 minutes of un restricted time to shop around in TwoManyXS's garage! Any man who has drawers full of WW2 aircraft instrument knobs has got to have more goodies yet to be discovered!

You may need a "distraction" to accomplish that. I'd be willing to be the "distractor" for 50%

Scott
 
I can attest to the quality of the Vintage Connection kit. I bought the kit before I rewired my bike. Factory quality connectors and the crimper performs very well. Like everyone says, practice is imperative to a good crimp. Buy plenty of extras, it's money well spent. I would also advise to buy a quality adhesive lined heat shrink too. I took my time, still screwed up several times....lol. Very happy with my results though. They also sell nice connector blocks too at a decent price. I don't remember who told me the tip, but it was a good one to slightly bend in one of the insulation prongs before crimping the wire. It helped make a tighter crimp. I made my harness so each component could be unplugged for easy replacement.
 

Attachments

  • IMG_1120.JPG
    IMG_1120.JPG
    193.3 KB · Views: 256
  • IMG_1122.JPG
    IMG_1122.JPG
    179 KB · Views: 252
Back
Top