Drilling stock rotors

Highside

Lord of the Flies
Messages
289
Reaction score
6
Points
16
Location
California Central Coast
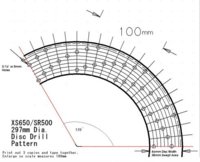
Is there a quick and easy pattern for drilling holes in a stock front rotor? or do I just have to sit and try to figure out a hole pattern myself??

I could do this on mastercam, but I'm having a lazy moment. :bike:
 

Attachments

  • normal_650-500_disc_drill_pattern_jpeg.jpg
    normal_650-500_disc_drill_pattern_jpeg.jpg
    39.4 KB · Views: 1,425
There's a few 'generic' patterns around, when I get off work I'll try to remember to post links. I used a pattern that was 6mm holes on 4* radials, there was another at the same site that was 8mm on 5* radials if you like bigger holes.
 
ggGary swaps some other Yamaha rotor that's thinner (thus lighter) that bolts right up to the XS650 front hub and already has holes or slots - I think it's off a Maxim but he would have to say exactly - I'm just going from memory from reading old posts. Advantage would be reducing unsprung weight a bit more than you could accomplish by drilling the stock rotor. Truth is, I had my stock rotor drilled, but that was before I had read any of his posts and learned about his swap.
 
lots of holes the same thickness as the rotor gives it more surface area for braking as well as making the rotor lighter. I have read that the slotted rotors will chew up the pads faster than drilled rotors, don't know if that is true or not but according to this artical the heat is not dissapated with slotted rotors.
 
hi guys,,, there,s a guy in new zealand in the xs650 community,, that has some sweet drilling patterns,,, and if you,r real nice a a few bucks he send you a couple of A3 clear drawings ,,,so you can simply clamp to the disc and then drill ,,, it lowers the un-spun weight by nearly 1/2 of it origional weight .... well worth the effort remember slow speeds when drilling and sharp or new drills ,,, regards oldbiker
 
hi guys,,, there,s a guy in new zealand in the xs650 community,, that has some sweet drilling patterns,,, and if you,r real nice a a few bucks he send you a couple of A3 clear drawings ,,,so you can simply clamp to the disc and then drill ,,, it lowers the un-spun weight by nearly 1/2 of it origional weight .... well worth the effort remember slow speeds when drilling and sharp or new drills ,,, regards oldbiker

Is this what you are talking about?

http://smg.photobucket.com/albums/v463/GoranXS650/XS650 Brake Disc Drill Pattern/

I did mine a couple of years ago using the first pattern. I printed them on translucent mylar, then used spray adhesive to stick the pattern to the disk. I clamped two disks together and drilled them at the same time. It worked fine, but as you can imagine, it's a little tedious! It only saved about a half pound per disk, though.
 
XS1100 special and Maxim 1100 front rotors bolt on. They are both slotted.
The Xs750 fork conversion allows for more choices of rotors, they use a smaller diameter rotor.
 
Some things to keep in mind ..... You shouldn't chamfer the holes, they work better at keeping the pads clean if they're not chamfered. You shouldn't make the hole diameter any bigger than the disc thickness. If you do, you lose surface area instead of gaining it. Less surface area means less cooling.
 
Yes the maxim series, front rotors are slotted, thinner, and bolt on. Maxim 650, 750 1980-83 I think. The RH rotor would be best, the angled slots are cut for LH and RH
 
That's the one I used, thanks for posting that. I ended up with a 7-hole pattern that repeated 9 times on both disks.

How about drilled disks for earlier bikes like my 72?Anybody found disks from another model that would work?
 
I have a 72' as well and just drilled the rotors. I used the patterns shown through this thread and built my own patterns using AutoCAD. I have 3 different designs that if anyone would like I can post or even have them placed into the tech section. I'll make a small How-To it was really easy to do.

Took about two hours to do everything and it was simple as it gets.

Yeah, I'd be interested to see the patterns. I hope you can drill more holes in them, and make them lighter, without ruining the rotor in the process.
 
Yeah, I'd be interested to see the patterns. I hope you can drill more holes in them, and make them lighter, without ruining the rotor in the process.

Sounds like drilling the stock rotors will be the best option for my 72.I'll look through the patterns in this thread.
 
The last rotors I drilled were for a car. I used my drill press. I noticed the round table of the press spins in a pinching mount. The pinch bolt can be tightened so there is no wobble yet the table can still spin. The arm off the main post that holds the table mount can move sideways. By placing the rotor precisely in the center of the table and using the marked radial lines as an index, I was able to drill the disks quickly and accurately by merely bumping the table to the next circle of holes. The next time I'm going to make an index tape for around the DP table edge.

Center the rotor to the table by using a rod in the DP chuck allong the edge of the rotor. Spin the table and when the rotor is perfectly centered, the rod in the chuck will rub along the entire edge.

t
 
Back
Top