Early model 70-71 instrument rebuild/rejuvenation

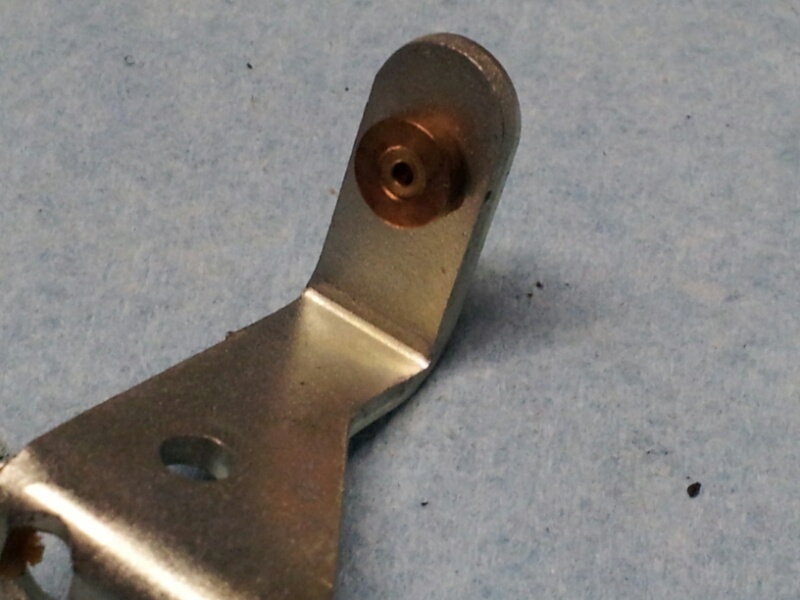
The most likely cause of instrument malfunctions, the rear support bushing (pic #1).
TachD07.jpg


The very tiny and short protrusion of the pointer shaft fits into a very tiny hole in this bushing. Being such a small bearing size, it doesn't hold much lubricant. Vibration forces distributed over such a small area create very high localized loads, accelerating wear. As the wear starts to wallow-out the bearing hole, the shaft bounces about, increasing the wear even more.

This bushing is little more than a small round brass button, press-fitted and staked into the bearing support arm.

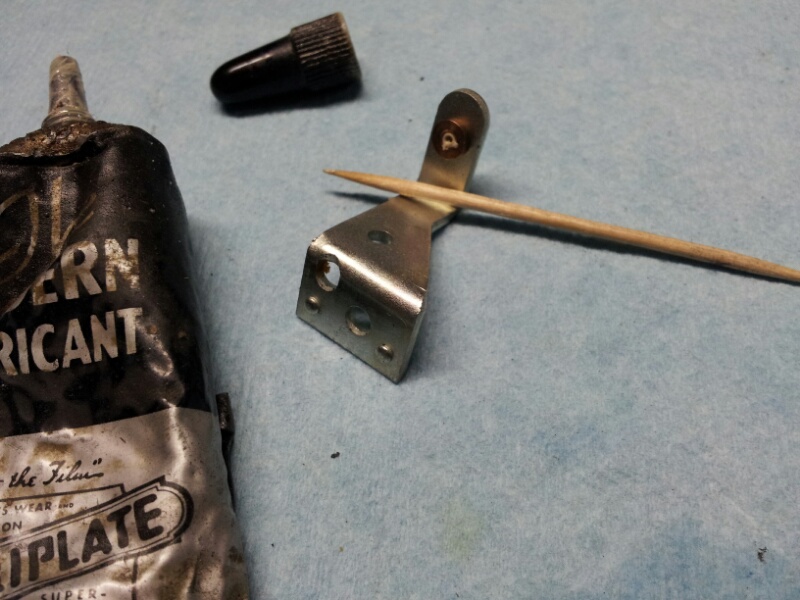
If inspection shows that the bushing is not badly wallowed out, daub a little thick grease into the hole (pic #2).
TachD08.jpg


Reinstall the rear support arm, doing the upside-down, insert, rotate, fit routine (reverse of removal). Be sure to install on the correct side of the aluminum ring arm.

If the bushing is worn beyond useability, it must be replaced. One option is to salvage other instruments to get a suitable replacement rear support arm with a good bushing. The other option is to press out the worn bushing, fabricate a replacement (an ideal machinist project), and press/stake the replacement into the rear support arm.

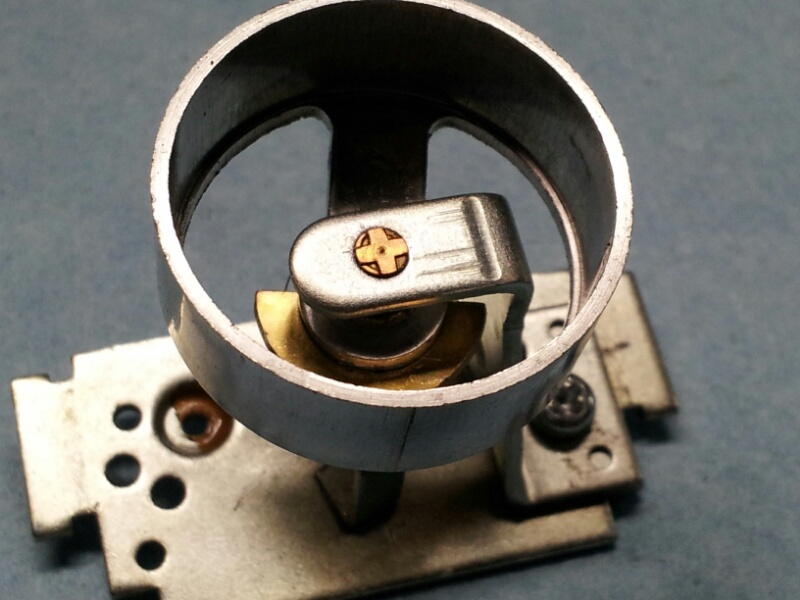
The reassembled movement should appear as in pic #3.
TachD09.jpg


Note the proper location of the aluminum ring arm.

Adjust the end play to achieve good pointer movement, about .005" - .010" (0.10 - 0.25mm). I prefer to set the adjuster to the absolute minimum, while still allowing free pointer movement. Just snug the adjuster nut, this adjustment will be done again and locked-down later, after the sub-assemblies are reassembled.

Next: Chapter 4 Reassembling instrument sub-assemblies
 
Last edited:
Ok, pause this thread for an odometer knob removal question. The XS1 and XS2 odometer knobs are held by a tiny screw inside the knob. My German Wiha #1 phillips screwdriver fits perfectly. The knob is pulled off the shaft. The instrument must be fully opened up, the shaft boot may need to be removed, and a form of contortionist twisting of the innards will get it out of the shell. The shaft remains with the movement.

Pic#1 - XS1 & XS1B odometer knob and screw
Odometer-XS1.jpg


Pic#2 - XS2 & TX odometer knob and screw
Odometer-XS2.jpg
 
Last edited:
Chapter 4 Reassembling instrument sub-assemblies

This is basically a reverse of the disassembly, with a couple of checks and cautions.
Ensure both sub-assemblies have been lubed and are clean of debris.

Pic #1 - Place the sub-assemblies on the clean/padded work surface. Align the rear support bushing arm on the same side that holds the aluminum ring stop finger.
TachF01.jpg


Pic #2 - Fit the aluminum ring into the recess of the spinning magnet.
TachF02.jpg


Pic #3 - Gently fit the front plate into the notched rear frame.
TachF03.jpg
 
Last edited:
Firmly press the front plate into the notches of the rear frame. It should snap right in and hold firmly to allow the fitment test.
TachF04.jpg


Gently, temporarily install the pointer. Move the pointer through its full range, ensure it moves freely and returns freely. Ensure that the spiral spring winds are concentric and dont rub during full pointer movement.

The outer end of the spiral spring is held by a small wedge fitted into the spring mast. Avoid disturbing this fitting, it establishes the spring rate and spring position. If the windings of the spring are not sufficiently concentric, allowing rubbing/binding, the outer wind of the spring can be bent (gently/slightly) to achieve adequate winding concentricity. Be extremely careful if adjusting this. The outer winding must be bent quite a distance to reach the yield point, and bending beyond the yield point results in large changes.

Using a screwdriver or speedo/tach drive cable stub, rotate the spinning magnet. Ensure it moves freely and doesn't drag on the aluminum ring. Be sure that it causes slight pointer movement while being spun, and the pointer movement is smooth and damped, not jerky,
 
Last edited:
If the fitment and movement test is satisfactory, gently remove the pointer.

We may now stake the frame corners to confine the front frame. Place the assembly in a sturdy vice, allowing access to peen the notch corners, avoiding vice jaw contact with the delicate movement parts.
TachF05.jpg


Peen down the notch corners, enough to positively retain the front frame. Avoid excessive metal disruption, as you may need to open it up again at a later time.
 
Last edited:
The 'zero' stop finger is now reinstalled (pic #1).
TachF06.jpg


Fit the finger through the insertion hole, rotating as necessary to achieve full fitment. Align with the previous marks, ensure that the aluminum ring support arm rests against the tip of the finger, and just snug the screw (pic#2).
TachF07.jpg


The 'zero' stop finger establishes the zero position of the pointer. Proper setup here is very important.

Temporarily install the pointer close to its intended position, about 8 o'clock with the movement frame held with the stop finger to the left. You want to position the stop finger such that it is JUST BARELY pressing the aluminum ring support arm away from the spiral spring's normal relaxed position (pic #3).
TachF08.jpg


Jostle/twist/rotate the movement assembly so the pointer moves/jumps a bit off the stop, and watch to ensure that the pointer gently returns to the stop.

You want to have the least possible nudging from the stop finger, while still allowing the pointer to fully return to absolute 'zero'. The 'zero' stop finger can be adjusted slightly by rotating about its mounting screw, restricted by the insertion hole. If necessary, the finger can be bent to accomodate a better position.
TachF09.jpg


Take your time. Instrument calibration (next chapter) will be more accurate with this setup properly accomplished. When satisfied, remove the pointer and tighten the 'zero' stop finger mount screw. Apply a fresh set of fine tip felt pen alignment marks if you desire.

Next: Chapter 5 Instrument calibration
 
Last edited:
Chapter 5a Instrument calibration, Preparation

Pic #1 - Attach the dial face to the movement frame, aligning the previous screw head impressions. Just snug the screws.
TachG01.jpg


If there are no screw head impressions to align, you may need to make reference marks to guarantee realignment at the later reassembly stage, or alter the reassembly sequence to accomodate having the dial guage already mounted. If so, center the dial face over the pointer shaft and screw holes. Then tighten the screws securely, using loctite.

Pic #2 - Gently attach the pointer lightly, aligning the pointer to the zero mark.
TachG02.jpg
 
Last edited:
Tools used for calibration:

Pic #1 - A straight stub of drive cable, square drive to fit the instrument at one end, soldered sleeve (optional) at other end.
TachG03.jpg


Pic #2 - A hand-held optical non-contact tachometer. This will give the most precise readings.
TachG04.jpg


Pic #3 - A stable, horizontal method to rotate the drive stub. I use a multiple-speed lathe, the reflector tape on the headstock chuck triggers the optical tachometer. A hand drill could be used, or a drill press laid on its side, but it must be horizontal, stable, and have a steady output rpm. A piece of the reflector tape will be attached to the chuck.
TachG05.jpg


Otherwise, you will need to supply a known, stable, and repeatable rpm (in the range of 300 - 1500 rpm) from a spinning tool with a horizontal output (or angled output if calibrating later angled instruments), but the rpm must be known.

The tachometer drive ratio is 1:5, an input speed of 500 rpm should display 2500 rpm, input of 800 rpm should display 4000 rpm (the preferred center zone).

Next: Chapter 5b Instrument calibration, Measurements and adjustments
 
Last edited:
Tadd just reported this about the odo knob and shaft.

Re: Speedo trip meter shaft. 70-73
It does indeed unscrew. The threads are backwards.(Lefty Tighty, Righty Loosey) I removed the E-clip inside the body that secures the bushing to free up the trip meter assembly, held the far end of the shaft that spins within the body being cautious not to let it spin, and backed the shaft off.
Done.
 
Chapter 5b Instrument calibration, Measurements and adjustments

There are 3 items that can be adjusted to calibrate the instrument:

1 - The 'zero' stop finger. This has already been properly positioned in reassembly section. Unless there is a problem with a stable/repeatable zero, or pointer position requires it, adjustment is not advised.

2 - The position of the pointer on the pointer shaft. This will be the primary adjustment.

3 - The spring rate of the spiral spring, adjusted by repositioning the end of the spiral spring in the spring post. A small wedge keeps the spring end fixed in the spring post. Adjustment seriously not advised, unless a better correlation of rpm to display gradient is desired.

The basic calibration will be achieved with a reading taken at a specific rpm. The pointer will be repositioned to get an accurate reading for a specific rpm of your choosing. That rpm could be for idle speed, cruising speed, middle position (recommended, around 4000 rpm), or any of your choosing.

The best calibration will be achieved with readings taken at multiple rpm's. Variations of displayed rpm's versus true rpm's will be analyzed to determine if the spiral spring needs to have its spring rate adjusted. This is a very tricky area, let's hope the factory setting is acceptable and adjustment is not necessary.
 
Pic 1 - Take a reading of the running drive tool. Here the hand-held optical tachometer is aimed at the reflector tape zone.
TachH01.jpg


Pic 2 - The reading shows 879.8, we'll round it to 880.
TachH02.jpg


Pic 3 - Carefully fit the instrument's driven socket over the drive stub, take a reading. This one displays 4400 rpm. observe if the pointer is steady or jittery. Remove the instrument, note the pointer's return to zero. It should be smooth, damped and completely return to the zero stop.
TachH03.jpg
 
Last edited:
The variable speed lathe provides the ability to take multiple readings at different rpm's. These different rpm's were noted, along with the expected (calculated) instrument display, and the actual displayed value.
TachH04.jpg


The tachometer drive ratio is 1:5, an input speed of 500 rpm should display 2500 rpm, input of 800 rpm should display 4000 rpm (the preferred center zone). For each driven rpm, multiply by 5 to show the expected value. Subtract the 'expected' and 'displayed' values to find the 'error'.

The tabulated rpm values of 'input', 'expected', 'displayed' and 'error' from this run are:
406 2030 2000 - 0030 low
553 2765 2800 - 0035 high
880 4400 4400 - 0000 good
1171 5855 5900 - 0045 high

This is quite acceptable.

If the 'error' values are all of the same general size, the pointer is simply offset. Reposition it as necessary and re-run the tests.
If the 'error' values are significantly different, you may have a spiral spring giving the wrong rate. Reposition the pointer to closely match the middle rpm (4000 preferred), and re-run the tests.
 
Last edited:
Adjusting spring rate:

If you continue to get intolerable error values that 'slew' at the wrong rate (highly unlikely), you may choose to accept it as-is (preferred), or attempt to change the spiral spring rate to reduce this 'slew'. If the pointer travel is greater than the expected travel, the spring rate is weak, too low. If the pointer doesn't travel far enough to keep up with the increasing expected rpm's, the spring is too strong, its spring rate is too high.

To increase (strengthen) the spring rate, it must be shortened.
To decrease (weaken) the spring rate, it must be lengthened.

The wedge retainer holding the spiral spring to the spring support post is glued in place. Meticulously pick the glue away from the wedge, nudge the wedge out enough to release the spring, and slide the spring in or out a little (1-2mm), and press the wedge back into place.
TachH05.jpg


The spring will now not have concentric winds, and must be bent as necessary, near the spring post, to regain concentricity. The spring's resting stop position will also have changed, and the spring post will need to be repositioned or bent to reachieve the stop position.
TachH06.jpg


An alternative method to increase (strengthen) the spring rate is to apply a small dab of epoxy at the point where the spring emerges from the wedged slot. Ensure complete cleanliness and apply the small dap such that it envelops the edge of the spring post where the spring emerges, continuing out about 1 mm (for starters), completely enveloping this short stub of the spring. The advantage to this trick is that you can 'creep-up' to the desired rate, and the zero stop position remains unchanged.
TachH07.jpg


This is extremely delicate and painstaking work, utilizing a skillset used long ago during the mechanical gear and spring watch era.
 
Last edited:
Now, the pointer's 'zero' position is established:
TachH08.jpg


If the 'zero' stop finger cannot be moved far enough to set this, it can be removed, bent as necessary, reinstalled.

If the pointer is sitting below zero, adjust the zero stop finger to place the pointer on zero.
If the pointer is sitting above zero, the spiral spring may not return it fully and you may need to nudge the aluminum ring against the zero stop while adjusting. Over time, internal frictions may reduce, and the pointer may eventually rest on zero.

Get it as close to 'zero' as possible. The pointer will be fitted at this same position during reassembly.

Tighten the zero stop finger.
Remove the pointer (protects it from disturbances/damage during reassembly)

For regular reassembly procedure: Remove the dial face.

If you cannot reproduce the dial face position, you may use an alternative reassembly procedure. Ensure the dial face screws have been tightened and loctited.

Next: Chapter 6 Reassembly
 
Last edited:
Chapter 6a Reassembly - Preparation

I hadn't planned this thread very well, and neglected to photo the finishing stages of this instrument repair. The pics used here were staged using parts from other instruments, to augment the narration, please excuse.

The clear bezels on these early instruments are plastic, and can be polished-out. The polishes I've used are quite old now, but still work (pic #1).
TachJ01.jpg


The small bottle in this pic is a very fine water-based abrasive. A drop on the fingertip, followed by circular rubbing, takes out most fine scratches and crazing. Modern products are available, used for polishing auto headlights, and are superior to these older items.

Pic #2 - Parts to be reconditioned are:
TachJ02.jpg


Upper shell with bezel - Trim any loose/hanging plastic left from the sawing routine, Exacto knife works well here. Polish out the bezel.

Indicator light tubes - Clean/straighten as necessary. The rubber light seals on these may be cracked and deteriorated.

Interior illumination reflector hood - Clean/straighten as necessary. Polish or paint the underside of the hood to improve light reflection.

Lower instrument shell - Trim any loose/hanging plastic left from the sawing routine, Exacto knife works well here. Clean as necessary, inspect/repair mount studs and light sockets. Repaint interior bottom with reflective white paint.
 
Last edited:
Lower instrument shell - Dry fit the upper and lower shells. Trim any plastic left from the sawing routine, Exacto knife works well here. Clean as necessary, inspect/repair mount studs and light sockets. Repaint interior bottom with reflective white paint. From the photo of this untouched original, it can be seen how crude the reflective white paint was applied. I use flat white modellers paint, covering everthing inside there except the frame gasket and light tubes (they'll be covered later).
TachJ03.jpg
 
Last edited:
Indicator light tubes - Clean/straighten as necessary.

The rubber light seals on these may be cracked and deteriorated (pic #1).
TachJ04.jpg


I've had success micro-glueing the rubber cracks with 'gorilla grip' super glue. They have a slight offset moulded into them which aligns them with the indicator lenses, and prevents slipping down the tube (pic #2).
TachJ05.jpg


If these are too deteriorated, you can replace them with soft/compliant tubing. Glue a stop ring about 1/2" down the metal tube, and fit a piece of soft/compliant black tubing over the top, length trimmed to seal against the backside of the dial face, without too much upward pressure.
 
Last edited:
Indicator lamp lenses - These are glued to the backside of the dial face. A tiny chrome trim ring surrounds the lens. By now, the glue is dry/brittle, if not already cracked off. They easily pop out of the dial face, can be cleaned and polished, then glued back into place. Gorilla super glue works well here, too. Ensure you have 'green' neutral on the left, 'yellow' turn signal on the right.
TachJ06.jpg
 
Last edited:
Chapter 6b Reassembly - Method 1

Pic #1
Fit the movement frame to the lower shell. Attach using the two 5mm screws.
TachK01.jpg


Pic #2
Apply a drop of glue to the base of all three light tubes.
Fit the illumination hood, hood facing inward.
TachK02.jpg


Fit the indicator tubes, rubber light seals offset inwards (Pic #3).
TachK03.jpg


Pic #4
Attach the dial face. Loctite the screws. Ensure the screwheads and dial face are aligned, tighten the screws.
TachK04.jpg
 
Last edited:
Back
Top