That's how I did it Willis. A 90° bracket attached to the muffie bracket and some stick on rubber pads.Maybe I can fab a secondary bracket to attach to the left bracket that bends down underneath.
-
Enjoy XS650.com? Consider making a donation to help support the site.
XS650.com receives a small share of sales from some links on this page, but direct donations have a much greater impact on keeping this site going.
You are using an out of date browser. It may not display this or other websites correctly.
You should upgrade or use an alternative browser.
You should upgrade or use an alternative browser.
Finding my standard...
- Thread starter willis
- Start date
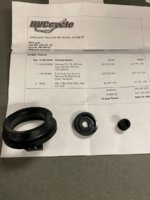
Got some rubber bits in the mail today. I ordered seals from HVC Cycle to rebuild my gas cap. Also got grommets for my side covers and felt washers for my petcocks. I should have everything I need to set up my tins for installation. I had a little spare time tonight so I got the fuel cap all cleaned and put back together.
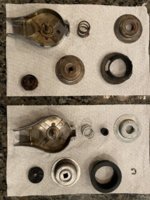
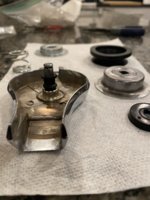
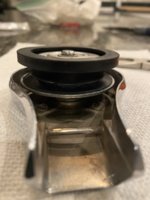
Also went back and addressed the turn signal stem I snapped of. I could not find a left handed drill bit anywhere, so I bought a stripped screw extractor kit which has a cutting bit along with a small left hand threaded end. I wouldn’t really call it a drill bit. It bit into the shaft hard but would not unscrew it. I ended up drilling and running a tap in it. Just happened that I bought the right sized tap today to finish my muffler mounts. So that problem is fixed, just need to secure the threaded shaft to mount it again. Thought I had some old signals around to scavenge but no luck just yet.


Also went back and addressed the turn signal stem I snapped of. I could not find a left handed drill bit anywhere, so I bought a stripped screw extractor kit which has a cutting bit along with a small left hand threaded end. I wouldn’t really call it a drill bit. It bit into the shaft hard but would not unscrew it. I ended up drilling and running a tap in it. Just happened that I bought the right sized tap today to finish my muffler mounts. So that problem is fixed, just need to secure the threaded shaft to mount it again. Thought I had some old signals around to scavenge but no luck just yet.
Nice work! Boy those little rubber bits get expensive don’t they?
They used to be unobtanium. Sure would be great if someone reproduced these caps for 73-75. Finding one with decent chrome is pretty hard and you really have to pay up. I’ll probably have a hundred bucks into mine when it’s all done, and that’s probably not too bad compared to some I’ve seen.
Today I took advantage of the COVID-19 stress. My work has starting a rotation for employees to work from home. Today and tomorrow are my turn to stay home. So between phone calls and emails I spent a little time in the shop. My carbs came back from a thorough clean and rebuild by Rick West at Oldskoolcarbs. The were vapor honed too. Clean as a whistle. Had to pony up for some new diaphragms too though, but I should be golden now. The carbs are on but need a few hose clamps to finish her up.
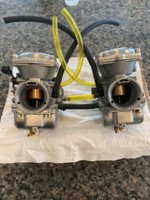
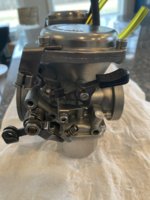
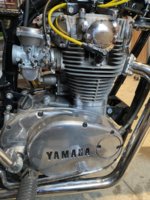
my throttle would not return though, so I had to do some digging. Return springs on carb - check. Cables loose and oiled - check. Has to be in the throttle housing. Opened it up and cleans out the excessive white lithium grease. Nope, still sticking. Then I noticed the little cable bushing that sits in the housing on the cable end had ridden up causing friction on the cable. Shoved it back down and was good to go.
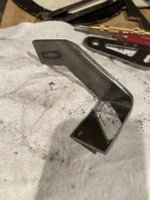
I also spent some time last night working on a bump stop for my center stand on the left muffler. Another cardboard template and I went at it on the same plate I made the hangers from. Same method of cut, drill, grind, file..... DAMN! Finally got a rough piece I think will work with some more trimming and finish work. It will bolt into the back side of the hanger bracket with the same mount bolts. This is the only pic, but you get the idea.
that’s it for now. This weekend I hope to button up the carbs and get the petcocks and cap on the new tank.


my throttle would not return though, so I had to do some digging. Return springs on carb - check. Cables loose and oiled - check. Has to be in the throttle housing. Opened it up and cleans out the excessive white lithium grease. Nope, still sticking. Then I noticed the little cable bushing that sits in the housing on the cable end had ridden up causing friction on the cable. Shoved it back down and was good to go.
I also spent some time last night working on a bump stop for my center stand on the left muffler. Another cardboard template and I went at it on the same plate I made the hangers from. Same method of cut, drill, grind, file..... DAMN! Finally got a rough piece I think will work with some more trimming and finish work. It will bolt into the back side of the hanger bracket with the same mount bolts. This is the only pic, but you get the idea.

that’s it for now. This weekend I hope to button up the carbs and get the petcocks and cap on the new tank.
Exactly what I hope doesn't happen at the shop where I run CNC lathes. Told my Mgr that I'd work straight thru all this which is a very positive and determined attitude.My work has starting a rotation for employees to work from home. Today and tomorrow are my turn to stay home
What we don't discuss is how much XS650 gizmo time I get to do with equipment even "on the clock"
Cool fringe benefit !
Carbies are lookin sharp there Willis! At least something good came from staying home! 

Oh yea, also ordered a new custom seat this week. Shipping from Vietnam so should be interesting to see how long it takes to get here.
All I've ever done for a centerstand stop is stick a hunk of heater hose on the tang, lol. Been working fine for more than a dozen years now .....


On the '83, I had to get a little creative and notch the rubber out to fit around the factory tang brace, but it's been working just fine so far .....


On the '83, I had to get a little creative and notch the rubber out to fit around the factory tang brace, but it's been working just fine so far .....
Interesting. That would be much easier. What size heater hose fits?
I scored a free piece of 3/4” heater hose at my local O’reilley’s auto parts. It was in their scrap bin so he just gave it to me!! I think this will work just fine.
Today was a little slow working from home so I decided to mount up the fuel cap, lock & petcocks on the new tank. Pretty straight forward. I had gone through the petcocks a few weeks ago. They were in good shape so I just cleaned and put new fiber washers on and mounted. The cap went right on, but I struggled a little getting the cap release pivot on. That little spring was kinda tricky. Fortunately the old tank still had it on so after about 15 minutes I went out to the shop and took it apart. I was trying to mount the tension spring on backwards. DOH! It’s all on and fitting nicely now.
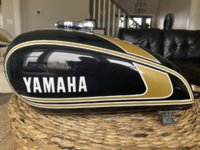
Here’s a little shot of the repainted tank. You can really see the flake and how close it is to a factory paint job. I’ll wait till the bike is all together to give it a good buffing, but I’m really excited about the tins.

Today was a little slow working from home so I decided to mount up the fuel cap, lock & petcocks on the new tank. Pretty straight forward. I had gone through the petcocks a few weeks ago. They were in good shape so I just cleaned and put new fiber washers on and mounted. The cap went right on, but I struggled a little getting the cap release pivot on. That little spring was kinda tricky. Fortunately the old tank still had it on so after about 15 minutes I went out to the shop and took it apart. I was trying to mount the tension spring on backwards. DOH! It’s all on and fitting nicely now.

Here’s a little shot of the repainted tank. You can really see the flake and how close it is to a factory paint job. I’ll wait till the bike is all together to give it a good buffing, but I’m really excited about the tins.

Your tank looks beautiful! 

Everyone was irritating me today. Time for some social distancing in the shop! I finished up the fab on the muffler hangers today. Also took a couple strips of the flat stock and drilled and tapped them to go inside the muffler brackets to finish the mounts all together. I took 5T’s advice on the heater hose and scrapped my fabbed bracket for the center stand stop. Simple is better in my book. Now they just need a coat of paint or powder, not sure what I’ll do with them yet but leaning towards powder to match the frame. I need to order some 1.5” muffler clamps and I’ll put a fork in the exhaust.
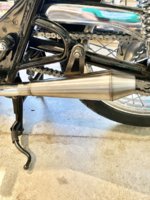
Also finished up mounting the carbs and air boxes. Having some fun with fuel lines now. Trying to get my in-line filters in there but need some more clamps and to work out the routing. Everything bolted up nice and tight. Throttle snaps back nicely. Buttoned that up and mounted my new tins and going to call it a day. I did add a little black sealant to the side cover mount rubbers to try and keep them from coming off so easily. Will see how that holds up in the future.
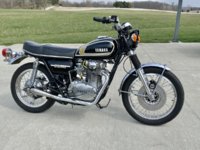
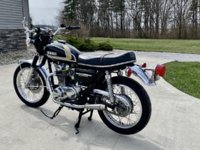

Also finished up mounting the carbs and air boxes. Having some fun with fuel lines now. Trying to get my in-line filters in there but need some more clamps and to work out the routing. Everything bolted up nice and tight. Throttle snaps back nicely. Buttoned that up and mounted my new tins and going to call it a day. I did add a little black sealant to the side cover mount rubbers to try and keep them from coming off so easily. Will see how that holds up in the future.


That exhaust looks sweet but I bet it's gonna bark, lol. Unfortunately, small mufflers are usually loud mufflers too. I like the way it doesn't block rear axle removal. It's a pain having to remove a muffler just to get the axle out.
Those do look nice. Did you give up on the baseball bats? I know you were having some figment issues.
I’m fine with some bark. The commandos were way to quiet for my liking. I’ve never heard the Cone’s run yet but looking forward to it. I really want to run the xs2 baseball bat reproductions I have, but those will require a lot more work to get them where I need them to be.
Did you give up on the baseball bats? I know you were having some figment issues.
Not yet. I shelved them until I’m ready to throw my full attention to them. They may require a new set of head pipes. I’m not certain of anything at this point.
Last edited:
Similar threads
- Replies
- 22
- Views
- 512
