First Top end teardown

macksXS

XSNoob
Messages
26
Reaction score
26
Points
13
Location
MA
Hey Guys,

New to the XS family. These forums have been an amazing resource, so thank you for sharing all your knowledge!

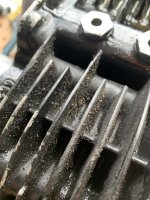
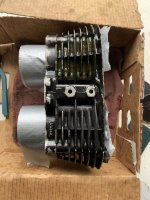
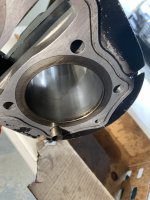
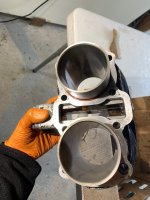
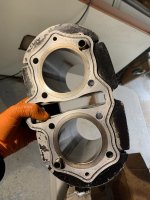
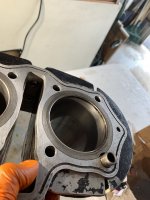
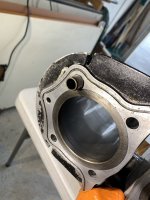
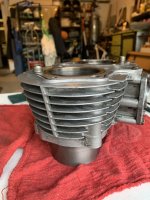
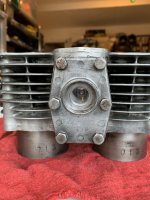
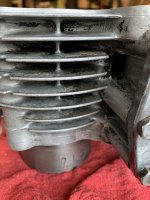
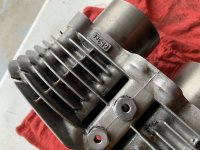
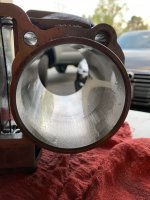
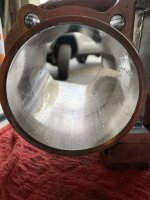
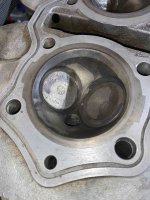
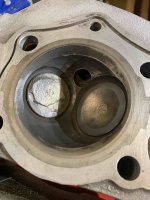
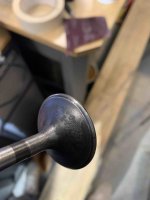
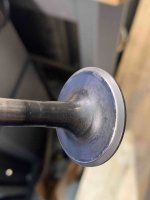
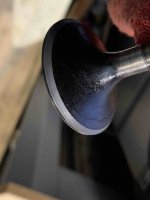
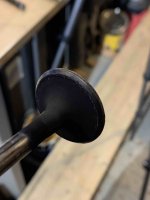
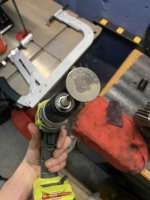
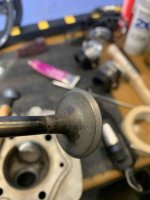
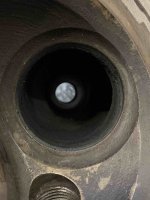
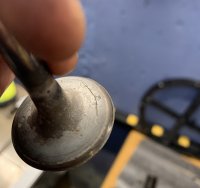
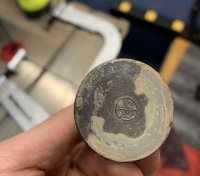
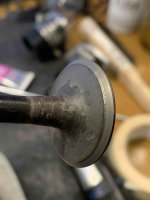
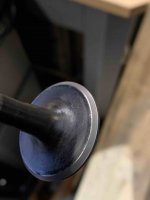
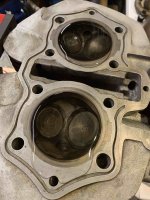
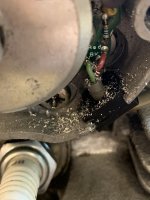
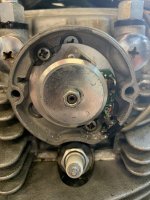
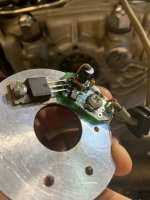
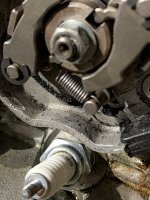
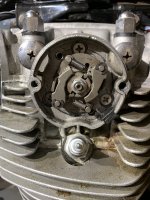
Just completed my first top end tear down on my "new to me" 1980 XS650 and everything looks pretty good.

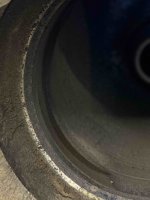
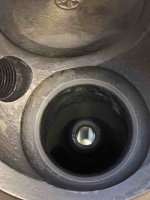
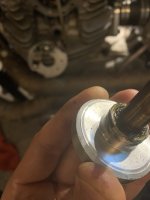
I'm not coming into this too green, I have past motorcycle experience & I've been trolling this forum, reading as much as I can. Although, this is my first attempt and there are several things I am encountering for the first time. I wanted to share some photos with a much more knowledgeable XS650 community to get some more in-depth advice, insight and best practices in regards to this 40 year old motor.

Thanks in advance for all the help and insight you guys provide!

Screen Shot 2020-05-09 at 5.48.30 PM.png Screen Shot 2020-05-09 at 5.47.33 PM.png Screen Shot 2020-05-09 at 5.48.39 PM.png Screen Shot 2020-05-09 at 5.46.55 PM.png Screen Shot 2020-05-09 at 5.47.23 PM.png
 
Last edited:
Those scratches look fine
The rockers look a bit worn. I'll guess it ran on an oil gas mix for a bit but prolly useable, I've seen worse
It's normal to lap valves as long as you have the head off, those look pretty good.
Front cam chain guide is also normally replaced, the glue tend to let go on the 40 year old factory guides. Hoos Racing has good quality guides.

Thanks for the feedback gggGary! Is it common to "re-finish" the rocker faces? The only reason I was going to lap the valves was because I've never done it before, but if they look good id leave em put. Is it possible to clean the carbon off the valve seat area with some carb cleaner & scotch brite without removing valves?
 
I tried a small section with a natural citrus paint remover I found at home depot, it didn't work as fast as id liked so I made a run to auto zone for some airplane paint remover, worked like a charm and fast. I then used a heavy duty nylon brush to aggravate the paint then wiped away, pressure washed, dried and hit the top/bottom with wd40 and some scotch brite (the green pad one) to remove any stubborn carbon/remaining gasket material.

Tried my darnedest but some of that carbon on the upper cylinder wall wouldn't budge. I think i did alright for my first go round. Do you think that carbon will be an issue? Its pretty minimal

Thinking about getting the exterior soda blasted to rid the rest of the old paint. Thoughts?
 

Attachments

  • IMG_7853.jpeg
    IMG_7853.jpeg
    225 KB · Views: 223
  • IMG_5330.jpeg
    IMG_5330.jpeg
    217.4 KB · Views: 205
  • IMG_8739.jpeg
    IMG_8739.jpeg
    149.8 KB · Views: 200
  • IMG_3766.jpeg
    IMG_3766.jpeg
    163 KB · Views: 225
  • IMG_4881.jpeg
    IMG_4881.jpeg
    183.3 KB · Views: 196
  • IMG_4499.jpeg
    IMG_4499.jpeg
    157.3 KB · Views: 223
  • IMG_6579.jpeg
    IMG_6579.jpeg
    176.4 KB · Views: 219
  • IMG_4403.jpeg
    IMG_4403.jpeg
    172.4 KB · Views: 211
  • IMG_0326.jpeg
    IMG_0326.jpeg
    205.6 KB · Views: 226
  • IMG_1045.jpeg
    IMG_1045.jpeg
    200 KB · Views: 189
  • IMG_8384.jpeg
    IMG_8384.jpeg
    179.9 KB · Views: 228
  • IMG_8591.jpeg
    IMG_8591.jpeg
    176.5 KB · Views: 228
  • IMG_6847.jpeg
    IMG_6847.jpeg
    180.5 KB · Views: 224
  • IMG_1893.jpeg
    IMG_1893.jpeg
    173.5 KB · Views: 194
Last edited:
The paint remover can also be used to remove the carbon. It will nicely clean up the combustion chambers and piston tops as well. It may not get the carbon off the valve faces very well because that's pretty baked on. But once you remove them, you can wire wheel them clean. Here's a before and after wire wheeling shot of some valves .....

LAJzqWM.jpg
 
The paint remover can also be used to remove the carbon. It will nicely clean up the combustion chambers and piston tops as well. It may not get the carbon off the valve faces very well because that's pretty baked on. But once you remove them, you can wire wheel them clean. Here's a before and after wire wheeling shot of some valves .....

Good to know, thanks 5twin! I am eagerly awaiting my valve compressor tool. Should be hear tomorrow. Then I can inspect and start freshening up these valves. Is it proper protocol to re-lap them after cleaning?
 
Usually, yes. I test the valves for leaks before I disassemble them. To do that, I install some old spark plugs and fill the combustion chambers with solvent (I use kerosene), then I blow compressed air into the ports .....

dAyCZVL.jpg


scTVevw.jpg


Leaks will show as streams of bubbles from around the edge of the valve .....

mLxDTcb.jpg


EmVtx11.jpg


The exhausts are more prone to developing leaks than the intakes because they run hotter, but I'll lightly lap even the ones that aren't just to clean them up. Once you get the valves out, you'll see that the seats in the head and the seating area on the valve itself are probably kinda beat up. They'll have a scaly appearance and maybe some pitting (black specs). This is just normal wear, they all get like this from use. Even the ones that aren't leaking now will eventually once they wear more. So, I like to freshen them all up. Here's some seats in the head before lapping. They're the shiny rings and as you can see, they look kinda beat up .....

qTKznfS.jpg


And here they are after some lapping. The bottom one looks good with a nice gray mat finish but the upper one is still showing some black specs (pits) so needs a bit more lapping .....

Cg4P7gx.jpg


And here's some valves before and after lapping. The 1st pic also shows them before and after cleaning .....

Hs1wapk.jpg


82uYJti.jpg
 
Usually, yes. I test the valves for leaks before I disassemble them. To do that, I install some old spark plugs and fill the combustion chambers with solvent (I use kerosene), then I blow compressed air into the ports .....
Awesome, thanks for all the detail. I'll try out this method. The pictures are really helpful in terms of what to look for. Hopefully they're not too bad! Ill post some pics throughout the process.
 
Last edited by a moderator:
Just finished cleaning and lapping my valves and valve seats nothing to write home about but I've included some before and after pics...its kind of therapeutic haha...I did the water test, right side valves are ok...left side valves are giving me a run for my money! I've performed the water test on the left side about 3 times now (re-lapping after each test) I keep getting a small water droplet coming through at the bottom of each valve seat. Just keep lapping?

The left exhaust valve looks like it might have a crack (pic at the end). Could that be my issue? Time for new valves?
 

Attachments

  • IMG_3503.jpeg
    IMG_3503.jpeg
    240.6 KB · Views: 167
  • IMG_7984.jpeg
    IMG_7984.jpeg
    207.9 KB · Views: 193
  • IMG_1815.jpeg
    IMG_1815.jpeg
    104 KB · Views: 182
  • IMG_1472.jpeg
    IMG_1472.jpeg
    117.9 KB · Views: 183
  • IMG_8559.jpeg
    IMG_8559.jpeg
    110.4 KB · Views: 192
  • IMG_2684.jpeg
    IMG_2684.jpeg
    107.2 KB · Views: 187
  • IMG_1744.jpeg
    IMG_1744.jpeg
    123.9 KB · Views: 216
  • IMG_2014.jpeg
    IMG_2014.jpeg
    118.3 KB · Views: 251
  • IMG_4746.jpeg
    IMG_4746.jpeg
    160.8 KB · Views: 204
  • IMG_5403.jpeg
    IMG_5403.jpeg
    160.3 KB · Views: 185
  • IMG_2215.jpeg
    IMG_2215.jpeg
    172.7 KB · Views: 191
  • IMG_0744.jpeg
    IMG_0744.jpeg
    159.9 KB · Views: 240
  • IMG_6287.PNG
    IMG_6287.PNG
    490.8 KB · Views: 201
  • IMG_6289.PNG
    IMG_6289.PNG
    557.8 KB · Views: 198
  • IMG_6291.jpg
    IMG_6291.jpg
    395.8 KB · Views: 183
  • IMG_6292.jpg
    IMG_6292.jpg
    448.8 KB · Views: 187
  • IMG_8769.jpeg
    IMG_8769.jpeg
    115 KB · Views: 197
  • IMG_9878.jpeg
    IMG_9878.jpeg
    94.2 KB · Views: 178
  • IMG_1301 2.jpeg
    IMG_1301 2.jpeg
    226.7 KB · Views: 218
Last edited:
Ended up lapping them one more time and that seemed to do it. Let the re-assembly begin.
 
Honestly, I don't think you've cleaned up the parts well enough. The valves and combustion chambers are still like half covered with carbon. You should be able to get the combustion chambers looking like this .....

VFCgqJt.jpg


After I get all the carbon off (using paint remover), I take some chrome cleaner to the combustion chamber. It removes any carbon remnants and discoloration, and results in the above.

As I mentioned earlier, the carbon on the valves is really baked on there. I use a knotted wire wheel in a 4 1/2" grinder to clean them. Yours are only about half done.
 
Honestly, I don't think you've cleaned up the parts well enough. The valves and combustion chambers are still like half covered with carbon. You should be able to get the combustion chambers looking like this .....

After I get all the carbon off (using paint remover), I take some chrome cleaner to the combustion chamber. It removes any carbon remnants and discoloration, and results in the above.

As I mentioned earlier, the carbon on the valves is really baked on there. I use a knotted wire wheel in a 4 1/2" grinder to clean them. Yours are only about half done.

Thanks for the reply. Duly noted. Ill make another pass at it with some paint remover and polish. Some of that residue on the exhaust valves especially aint budging and I didn't want to go at it with more abrasive material potential messing them up somehow.
 
So i hit the valves one more time, and got them looking much nicer. finally was able to finish reassembling the engine found tdc and re linked cam chain and got the engine back in the bike. Adjusted the valves to E- .006 I-.003, and with fingers crossed the bike started right up. idles and revs fine, however, took her for a spin and it seems like she doesn’t want to go above a certain rpm, like something is holding it back (feels like if someone where to drive with the parking break on) upon further inspection i take off the pamco covers and find metal shavings inside the case and it turns out the magnet is rubbing against the screw (pics attached) i must of over tightened the ATU? Could this be what’s causing the hang up when accelerating?

Thanks for the help guys!
 

Attachments

  • 8850776A-9CCF-42E7-97CD-A57F828C588C.jpeg
    8850776A-9CCF-42E7-97CD-A57F828C588C.jpeg
    144.8 KB · Views: 143
  • 3772EFB4-9546-4757-BF7D-8A2F3614B19C.jpeg
    3772EFB4-9546-4757-BF7D-8A2F3614B19C.jpeg
    184.4 KB · Views: 142
  • A8B0F4B7-1B62-4DEF-96D7-2503991548A7.jpeg
    A8B0F4B7-1B62-4DEF-96D7-2503991548A7.jpeg
    98.4 KB · Views: 148
  • 9A79DF22-8108-4C60-94B0-A917E5800991.jpeg
    9A79DF22-8108-4C60-94B0-A917E5800991.jpeg
    152.2 KB · Views: 154
  • 7513768A-0CE7-4749-8E88-63FDDAB11238.jpeg
    7513768A-0CE7-4749-8E88-63FDDAB11238.jpeg
    195 KB · Views: 141
  • 3C461B1D-37B5-41CF-9DFD-F2574D504933.jpeg
    3C461B1D-37B5-41CF-9DFD-F2574D504933.jpeg
    257 KB · Views: 140
hi Mackxs welcome to the forums, water isn’t a great test medium for this purpose because of its higher surface tension, like 5t suggested kerosene or something similar will likely give a better result, water may not leak through when kero would.
 
hi Mackxs welcome to the forums, water isn’t a great test medium for this purpose because of its higher surface tension, like 5t suggested kerosene or something similar will likely give a better result, water may not leak through when kero would.

Thanks Sticky. duly noted if i indeed need to pull the engine i will retest with kerosine!

Regarding the ATU, is it possible to over tighten the “sprocket screw thing” on the right side causing the magnet to hit the screw on the left side?

i ask because i tightened the screw a little tighter this time (after experiencing it come loose on me once before :doh:) reason why i am assuming it could be contributing to this acceleration problem.
 
Is that a replacement ATU and advance rod from MikesXS? If so, I think there have been issues with the advance rod, with it being a little too short.
 
Back
Top