Flattrack racer build

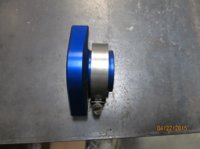
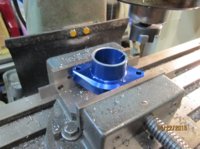
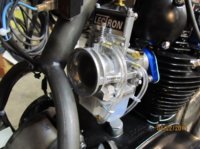
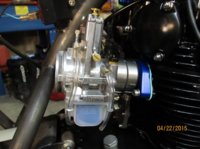
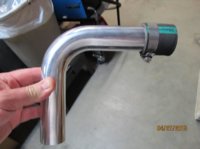
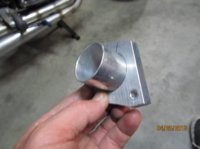
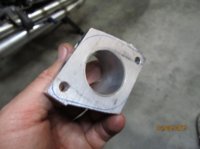
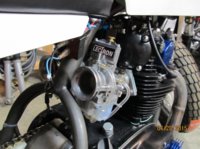
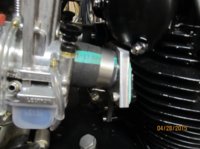
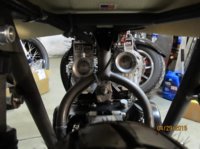
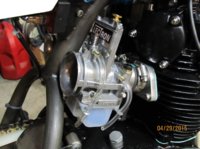
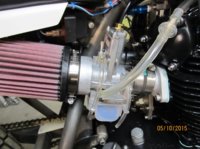
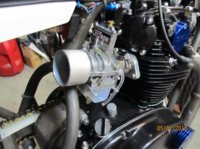
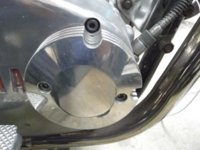
Yes it can. The carb holder can be shortened too. But it's not just the length that's the problem. The angle is wrong too (hard to see in the pic). Making the carb fit will be relatively easy. It's how to make the air cleaner clear the frame.

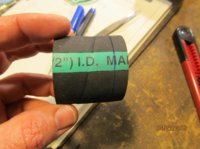
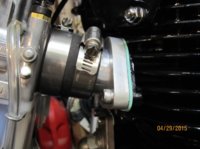
If you can gain a 1/2 inch plus by shortening the rubber hose and or intake manifold, I think a Uni Pod filter has enough give in it to work. A hard K&N type would not give enough imho?
 
Last edited:
Attached is an image from 5 Twins of the clutch cover and copper washer locations. Sorry don't know enough to answer your other questions.
When you get the bike on the track please keep us posted on how it goes.
 

Attachments

  • Copper Washers on clutch cover.pdf
    136.5 KB · Views: 249
Thanks Signal, this helps. Finding bits of info like this is what this forum is all about :)

Ok, so I trimmed 3/8" from the hose and 1/4" from the carb mount which brings the carb closer to the engine by 5/8". Then add the thickness of the gasket and the pic shows where the carb sits in relation to the frame. I can shorten the carb mount some more (flange side) but that doesn't really accomplish anything. In the end I really need to angle the carb up and away from the frame.

So for now I think I'm going to try and mill the carb mount at an angle to accomplish this. It may not be the best thing to do as far as performance but it will at least enable me to get the bike running and ridable.

I think in the end a custom carb mount is in order. Something that gets the carb up and away from the frame but still has a smooth transition to the head.

Also, the oil cooler I'm installing has a paper element filter that fits inside the cooler (red arrow in the pic). Hugh's Handbuilt sells one, Mike's has one and I got this one from 650 Central. The oil filter it uses is a common one found on a lot of Honda's.
 

Attachments

  • IMG_1184.jpg
    IMG_1184.jpg
    150.3 KB · Views: 301
  • IMG_1185.jpg
    IMG_1185.jpg
    196.4 KB · Views: 307
  • IMG_1186.jpg
    IMG_1186.jpg
    158.9 KB · Views: 292
  • IMG_1187.jpg
    IMG_1187.jpg
    200.9 KB · Views: 317
  • IMG_1188.jpg
    IMG_1188.jpg
    163.1 KB · Views: 319
  • IMG_1182.jpg
    IMG_1182.jpg
    148.4 KB · Views: 302
Since you have a mill, could also try to fab a wedged spacer plate.
Start with a long 1/4" plate, clamp down the waste end, angle fly-cut the other end, then drill/cut a pattern like a manifold gasket...
 
Nasty problem.
Is there any pre-bent hose available to mount the carb on that would angle the carb enough and still allow the airflow to enter the head in a mostly straight manner?
Obviously, you'll want to minimize any sharp changes to airflow so close to the head.
Putting the carb right up next to the head does affect power delivery, but probably not enough to concern you in the early stages of optimizing the bike for the track.
 
Ok, this is what I have so far. The tubing is 6061 aluminum mandrel bent from Vibrant performance and is meant for intake systems and intercoolers. The flange of the carb mount will be cleaned up and profiled of course. I will also be attaching a piece of tubing to the intake bell of the carb to act as an adapter for the air cleaner.

This may not be the best thing but I don't what else to do at this point.
 

Attachments

  • IMG_1193.jpg
    IMG_1193.jpg
    218.2 KB · Views: 282
  • IMG_1194.jpg
    IMG_1194.jpg
    115 KB · Views: 282
  • IMG_1195.jpg
    IMG_1195.jpg
    140.4 KB · Views: 305
  • IMG_1198.jpg
    IMG_1198.jpg
    121.6 KB · Views: 296
  • IMG_1199.jpg
    IMG_1199.jpg
    122.8 KB · Views: 317
  • IMG_1196.jpg
    IMG_1196.jpg
    187 KB · Views: 315
  • IMG_1197.jpg
    IMG_1197.jpg
    136.1 KB · Views: 310
Champion, since you are going to be racing in a high temperature environment you may want to consider engine cooling. If you examine photos of the factory XS race bikes from the '70s you will see that their engines were always bare aluminum. This is because bare aluminum throws off heat more efficiently than when painted. Powder coating is especially bad. Anodized aluminum, however, is virtually the same as bare, so if the black "look" is what you're going for then anodizing is the answer. Just something to consider. Keeping the intake charge as cool as possible is always good.
 
Thanks for the tip 650. A little late now tho. I would have left it bare if I'd known it made any kind of difference. The paint is strictly for looks.

Here's some more pics of my progress. One side is finished except for welding. I tried to get a shot of how the carbs look before and after I made new carb holders. Also, I used the original carb holders as a template for the new flanges. It would be nice to see a flow bench comparison with and without the new carb holders.
This is work that I don't enjoy. Too much dependency on my eye and not on machines and measuring tools. Trying to be consistent with both carb holders and trying to get proper angles etc., etc....
 

Attachments

  • IMG_1201.jpg
    IMG_1201.jpg
    171.2 KB · Views: 270
  • IMG_1202.jpg
    IMG_1202.jpg
    180.9 KB · Views: 275
  • IMG_1203.jpg
    IMG_1203.jpg
    145.6 KB · Views: 270
  • IMG_1204.jpg
    IMG_1204.jpg
    209.9 KB · Views: 267
  • IMG_1205.jpg
    IMG_1205.jpg
    162.6 KB · Views: 313
The flow interruption, to the extent it is occurring, is as far from the valves as possible, so you have stacked the odds in your favor as much as you can. My bet is that the negative impact upon whatever power the engine is capable of will be minimal, if even measurable. Most of the tracks in your area are shorter than a half mile, so your real struggle will be traction, not outright power. (Although, there is the annual vintage Sacto Mile which I am quite sure you will not miss.)
 
Just about ready to start. Just need to bleed the brake, add oil and double check some of the fastners.
The pic shows how the carbs ended up. The carb mounts got welded on the inside (tubing to the flange). The port matching isn't perfect but it'll have to do for now. Also the air cleaner adaptors are held in place via a light press fit.

I've decided to run 20/50 standard (non synthetic) oil for the initial heat cycling. I'm thinking I should be able to start it on Tuesday. I'll set up my GoPro and take a video. It's always fun to watch the head pipes change color when they heat up for the first time :thumbsup:
 

Attachments

  • IMG_1209.jpg
    IMG_1209.jpg
    197.8 KB · Views: 352
  • IMG_1210.jpg
    IMG_1210.jpg
    223.4 KB · Views: 379
  • IMG_1207.jpg
    IMG_1207.jpg
    190.5 KB · Views: 345
  • IMG_1206.jpg
    IMG_1206.jpg
    173.7 KB · Views: 324
With the long rods and that cam profile, the idle will be a little more erratic with a deeper throatier sound. Can't wait to hear it:thumbsup:
 
Well I got it started today and I'm pretty happy. No smoke, no leaks and it runs decent. It seems like it's running on one cylinder when the throttle is cracked just a bit (check the video at about 0.55 seconds). Also my tach is reading like 4k rpm when it's just above idle. Like it's reading twice what the rpm's really are. Probably because each cylinder fires at every TDC instead of every other TDC.

I'll heat cycle it a few times before I take it for a spin.

I can't believe I've come this far. Thanks to everyone for all your help. I'd be lost without this forum and all the great people in it.

Here's the link to the YouTube video I posted. You might need to turn your sound up. I did.


Congratulations on getting that long rod beast up and running:thumbsup: Despite the minor tuning issues with those Lectrons,it sounds awesome with those open megaphones and has convinced me that I won't be rephasing my long motor,love that parallel twin L/R sound.
 
Turns out I had an oil leak at the clutch side cover. Found a tear in the gasket. Not sure it that happened before or after I removed the side cover. Going to try and re seal the gasket with silicone.

Boy that flat tracker looks natural in that position doesn't it? :thumbsup:

Once I have the oil leak fixed and the tach reset so that it reads correctly I need to get the engine to idle on its own. Then I can check the exhaust pipe temps with my laser temp gun to see if the carbs are balanced and adjust as necessary. Then I'll take it for a little ride around the neighborhood :D
 

Attachments

  • IMG_1213.jpg
    IMG_1213.jpg
    152.2 KB · Views: 321
  • IMG_1216.jpg
    IMG_1216.jpg
    146.9 KB · Views: 297
  • IMG_1215.jpg
    IMG_1215.jpg
    228 KB · Views: 389
motor sounds great and build looks solid, very well done. what kind of rake does that neck have? and whats the wheelbase compared to a stock framed "tracker" ?
 
While you have the oil filter off, if you machine some slots in the filter housing that allow access to the clutch cover screws you won't have to remove the filter to get the clutch cover off.
 

Attachments

  • compressed.JPG
    compressed.JPG
    39.5 KB · Views: 251
Back
Top