Yeah maybe it'll corrode it or eat it away a little bit. Just fill the ultrasonic cleaner with carb/parts cleaner, like the stuff you buy in a can to dip your carbs in. The stuff works great and I can only image would be even better in an ultrasonic cleaner.
-
Enjoy XS650.com? Consider making a donation to help support the site.
XS650.com receives a small share of sales from some links on this page, but direct donations have a much greater impact on keeping this site going.
You are using an out of date browser. It may not display this or other websites correctly.
You should upgrade or use an alternative browser.
You should upgrade or use an alternative browser.
angus67
Welder's penetrate deeper!!
Ok! moderator Travis says get back on topic, so-
When I look at all of everyone elses bikes, they look so clean and well thought out. they all look so bitchin.
I'm sure mine will turn out ok, but mine looks cluttered and hurried.
I didnt change the rake, cuz I wanted to Keep it simple, and try to keep cost down by using only yam parts, so as not to mix. I also didnt change the way components of charge/ignition parts plug in, so in the future if need to replace, would be plugnplay.
Im hoping im being too critical, and am assuming its because it is my first ground up biuld.
When you guys did your first bike,how did you feel it would be percieved?
I'm not saying im worried that others wont think it isnt cool, and all that 'want to fit in' thing, Ill just be happy that I made it.
angus67
Welder's penetrate deeper!!
I know it has a lid, but wouldn't it evap. really fast?Yeah maybe it'll corrode it or eat it away a little bit. Just fill the ultrasonic cleaner with carb/parts cleaner, like the stuff you buy in a can to dip your carbs in. The stuff works great and I can only image would be even better in an ultrasonic cleaner.
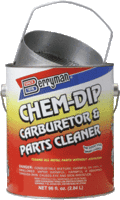
Also, I don't recall seeing cleaner in gallons. Ive only seen carb cleaner in aerosol cans. maybe I just need to ask the guy at the counter?
How bout de-natured alcohol? kerosene?
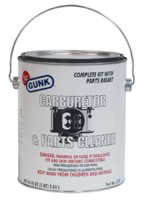
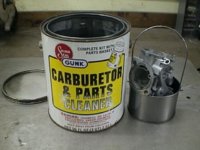
You should be able to find the carb cleaner in a gallon can. Looks like a paint can and comes with a little metal dip basket. It's not the same stuff as carb cleaner in the aerosol cans because it doesn't evaporate like that. Look on the bottom shelf by all the other cleaners and stuff at the auto parts store. Should be like $20 and will last a very long time since you don't really use it up that fast. It just gets dirty.
Attachments
angus67
Welder's penetrate deeper!!
ahhhhh-huh
crash
XS650 Junkie
we use the gunk carb-parts cleaner here in our shop.
Trex
XS650 Addict
The gunk works good..even bettter in a heated ultrasonic. Seen boat anchor carbs clean up to useable...and lil elbow grease and buffing wheel work will make them pretty again
angus67
Welder's penetrate deeper!!
will do. Ill head to Hf friday(payday) for the ultrasonic cleaner. and start on my carbs
angus67
Welder's penetrate deeper!!
So I found a front fender to use on the rear. its pitted, and nasty. I'm gonna have to strip and paint it, but I'm sure its the direction I want to go.
I cut the mount brace thing off, rounded it really good with a angle grinder, drilled a couple holes. mounted it to the bracket that also has the seat springs.
I plan on using flat bar to make the struts for it. I'm gonna keep it low-pro, go with the limp-dik tail light, and license plate on the side.
Here are a few pics of before after.


Hey, on a side note, I went to Harbor freight, and got the one liter PA sand blaster. I already had the 12grit walnut shells, and the directions said it could shoot it, but it clogged way easy. So I put baking soda in it instead, and it worked great on some old frying pans I had. But, boy what a mess.
I cut the mount brace thing off, rounded it really good with a angle grinder, drilled a couple holes. mounted it to the bracket that also has the seat springs.
I plan on using flat bar to make the struts for it. I'm gonna keep it low-pro, go with the limp-dik tail light, and license plate on the side.
Here are a few pics of before after.
Hey, on a side note, I went to Harbor freight, and got the one liter PA sand blaster. I already had the 12grit walnut shells, and the directions said it could shoot it, but it clogged way easy. So I put baking soda in it instead, and it worked great on some old frying pans I had. But, boy what a mess.
Gordon
XS650 Junkie
Not so bad, Angus.Don't look hurried to me.Like the spring's on the seat, got some movement to 'em.
Yea, blasting without a cabinet is best done outside, esp. if you are using baking soda. Water will dissolve it so clean-up is pretty easy.
The problem I run into with media blasting is moisture causing the sand or nut shell's to get wet & clog the tube. And I got a pressurized unit from HF. I did get a good dryer for the air, so now, no more clogging.
If you can afford a good dryer, get one that's like a small A/C unit, you won't be sorry. Just remember to empty it once in a while.
angus67
Welder's penetrate deeper!!
That seat is pretty solid, so I'm sure it will ride well on the road without pitching me off, or shifting around.
I can get that fender closer, I just tossed it on to check it out.
a friend of mine has a dryer, he said he paid 300 for it to paint his 96 suzuki 900. He said it worked really good, but kinda pricey in my book. I'l stick to the mechanical version. The compressor I have at the moment has the inlet filter busted off, so its only good for airtools, since the threaded part of the filter is stuck in there.
angus67
Welder's penetrate deeper!!
Tore my 34'carbs apart. Took two cans of carb cleaner. Never got the ultrasonic cleaner from HF. they weren't in too bad shape. the diaphragms for the slides are still good, the floats are still sealed.(copper, not plastic) the jets came out easy, although, I couldn't get the mixture screw outta one of 'em. I had to use a dremel cutoff wheel to make a new slot for the screw driver. when I got it out, the spring was in sad shape. Neither of them had a rubber o-ring on it. Mike's(MIXTURE) needles have o-rings.
These slide needles are the emisioned ones, so I'll get either John's adj. needles, or the Canadian ones. Also need bowl gaskets and pilot jet rubber stoppers. Mikes kit for these is very basic compared to the 38's. These rebuild kits from Mikes don't come with float valves. can I use38's? is there another seller that sells a more thorough kit for the bs34's
These slide needles are the emisioned ones, so I'll get either John's adj. needles, or the Canadian ones. Also need bowl gaskets and pilot jet rubber stoppers. Mikes kit for these is very basic compared to the 38's. These rebuild kits from Mikes don't come with float valves. can I use38's? is there another seller that sells a more thorough kit for the bs34's
Gordon
XS650 Junkie
Angus,I had the Canadian needle's, they worked pretty good. But decided to give John's a try, & the bike run's excellent! He was with me all the way with guidance, & a few suggestion's. I am very happy with the purchase, a little pricey, but I feel worth every penny!! When I got the kit's from Mike's, the needle & seat were in the kit. He might have changed the content's.
The main reason for all the carb work was it sat for a while, & the left carb would flodd over every now & then. Plus, I put on new pipe's & cone filter's. Couldn't see spending &25 on each filter every year.
The main reason for all the carb work was it sat for a while, & the left carb would flodd over every now & then. Plus, I put on new pipe's & cone filter's. Couldn't see spending &25 on each filter every year.
angus67
Welder's penetrate deeper!!
ive heard lots of good things about john's needles, and I just rechecked mikes, and your right, they do come with float valves. guesse I forgot. been awhile since I went window shopping
Maybe you're already aware of this but those little mixture screw o-rings and those tiny washers that go over them will a lot of times will say in the carb bodies. I take a sewing needle and bend about 1mm of the tip over 90 degrees and use it as a pick to pull the o-ring and washer out. Most of the time it takes several attempts to get them out. Make absolutely sure they aren't in there before you go and install another o-ring and washer.
crash
XS650 Junkie

angus67
Welder's penetrate deeper!!
i will check again. Thanks. what do you think of my rear fender?Maybe you're already aware of this but those little mixture screw o-rings and those tiny washers that go over them will a lot of times will say in the carb bodies. I take a sewing needle and bend about 1mm of the tip over 90 degrees and use it as a pick to pull the o-ring and washer out. Most of the time it takes several attempts to get them out. Make absolutely sure they aren't in there before you go and install another o-ring and washer.
It matches the radius much better!  Now you just need to get it a little closer to the tire like you were talking about.. I'd say about 1/2" of clearance just for tire grown and it should look great!
Now you just need to get it a little closer to the tire like you were talking about.. I'd say about 1/2" of clearance just for tire grown and it should look great!angus67
Welder's penetrate deeper!!
update.
Ordered John's needles. What a helpfull man that man he is.......
A couple Q's though. That john couldnt answer, or maybe I worded wrong. Before I took them apart, I checked the diaphrams by pushing the slide up, then licking my thumb,(eww, carb cleaner!) sealed the oval inlet in the bell, and released the slide. they both fell very slowly. thats what I want, rite? In though-o-ly cleaning my carbs, had the MJ's out, the Jet needles, the needle jets, everything out, except the butterfly assembly. I cleaned it within an inch (or mm) of its life. If I sprayed into a hole, I made sure it came out some where else. I put johns needles in with the middle custom spacer, new 137.5 jets,(mikes was out of 135's) checked float levels, put in new pilot plugs, bowl gaskets, mix screws. By the way, my stock plastic spacer was indeed .132, John. You were rite. I didnt include the little bump on there. Anyways, got it all back together, then checked the slides again, same method, They fell like I didnt plug the oval hole. I took the tops off to make sure I had the 'notch' in the rite place, and I didnt twist the rubber, put it back together, and still slides fell quickly. Do you guys think that in cleaning these carbs that I had removed any biult up residue in the ridge the diaghrm lip sits in? MAybe some gunk had been help seal the rubber, and I removed it? Im not saying did the carb cleaner eat the aluminum, but, is it 'too' clean now? could I put I lite coat of grease or something in the lip to help seal it?
Ok, next thing.
I ordered new clutch plates for my 1980 clutch. When I got them, I mic'd them to compare to the old ones I had. The old ones are thicker by .04 . I measuered in three separate places, and thats the average. I mentioned this to a guy at work, and he thought maybe that the new clutch material might be of different composition that might last longer, so they put less there. I dont want to use my old clutches, because when I got the motor, one piston pin broke out of the skirt, and chewed the crap out of the rest of the piston, resulting in a sand oil mixtuer throughout the motor. prolly grit in the old clutches, that Ide rather not put back in. Whats the deal with the thinner clutches? will it be fine? I also got the upgraded clutch springs from mikes. John says start off using three old, and three new. I will.
Drive plates. My drive plates are really discolored. Im sure that they get plenty hot down there, bathing in that oil, but, 3 outta 5 is dark brown, and in some places, show purple. ARe they OK? Also, when I put them on a piece of glass, 4 of the five are flat. cant 'rock them at all, but the 5th has a very slight wiggle. what do you guys make of this?
Also, I found a good front fender. good chrome. And I got a Hi-perf ciol(not the green one, the one that kinda looks stock). I was unsure about the what caps to get , so I went with the 5k resistor, and the black silycone wires. ARe these the rite caps? Do I just screw the wires onto the threaded posts(kinda look like the pionted end of a wood screw), while trying to keep contact with the actual wire in the wire with the coil contacts?
angus67
Welder's penetrate deeper!!
Finally got around to digging up, and shooting the piston that killed this motor before I got it.

Looks like, pin keeper let loose, pin slides round, scars sleave, rings bind, piston locks, skirt cracks breaks, other cylinder still runs, jamming this piston against the valves wich are trying to do there thing.
There is about 5 'dents' from the valves on the crown of this one, wich leads me to believe, this motor might still have ran for a brief time, though, dont know how long.