-
Enjoy XS650.com? Consider making a donation to help support the site.
XS650.com receives a small share of sales from some links on this page, but direct donations have a much greater impact on keeping this site going.
You are using an out of date browser. It may not display this or other websites correctly.
You should upgrade or use an alternative browser.
You should upgrade or use an alternative browser.
Forking around with Lucille
- Thread starter MaxPete
- Start date
Norton7d
XS650 Junkie
Well I am convinced a socket is unable to achieve enough contact with the top of the damper rod to stop it from rotating.
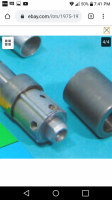
As you can see from the attached image from an Ebay current listing, the flat sided upper portion just isnt "rectangular" enough to allow a socket to provide sufficient contact; due to its lack of internal material when compared to Mr Pete's tool. Whatever tool is used, it should have completely flat sided internal surfaces, like Pete's tool.
I will now try to make something from solid aluminium rod, as I dont have the tools to cut up solid metal. I think wood could be used but if would need to extremely hard wood.
Attachments
The only tools needed to make something similar to Pete's tool is either a 10 mm drill bit, a drill, hacksaw and a flat file. Or just a small angle grinder with cutting and grinding discs. Or maybe just a notching disc. Maybe you can borrow or rent an angle grinder? And use safety goggles!
From what I recall, the amount of torque on the tool is rather low. Really, all it does is hold the upper end of the rod while you loosen or tighten the socket head cap screw (SHCS) securing the lower end. The head of that SHCS is up in the semi-circular pocket above the front axle.
in fact, I don’t think I even used the tool in removing the rod - I just applied an electric impact ratchet (buzz gun) to the SHCS and out she came.
The tool IS needed for re-installing the damper rod as you need to carefully torque the SHCS back into position and without the holding tool, the rod would just spin.
Pete
I am not completely convinced about that theory. Spring steel should not "creep" when the torsonial stress is at "parked on sidestand" levels. The stress is a lot higher when braking hard, hitting severe bumps or when heavily loaded. Under those circumstances, the stress could approach the yield stress of the spring steel.Just a little note on all these sacked out fork springs we seem to encounter and my theory as to the cause. I'm a big fan of centerstands and use them whenever my bikes are parked for more than just a short time. But, many people don't use them. They'll store the bike all winter or maybe even for years parked on the sidestand. This puts more weight on the forks and compresses them more, and I think this is a big contributor to the sacked spring problem.
I have a suspicion that the stock springs were not made from the best spring steel available, and that Yamaha did not consider these bikes to last for 50 years
")
I bought (constant rate/linear) Racetech fork springs for my RD350, and they turned out to be a lot lighter than the oem springs, despite being stiffer. Racetech claims this is partly due to the high quality spring steel they use. So if I ever decide to replace the aftermarket, progressively wound springs in my 650D, I will definitely order a set from Racetech.
Norton7d
XS650 Junkie
I dont disagree on the low torque, but if it spins, it spins.From what I recall, the amount of torque on the tool is rather low. Really, all it does is hold the upper end of the rod while you loosen or tighten the socket head cap screw (SHCS) securing the lower end. The head of that SHCS is up in the semi-circular pocket above the front axle.
in fact, I don’t think I even used the tool in removing the rod - I just applied an electric impact ratchet (buzz gun) to the SHCS and out she came.
The tool IS needed for re-installing the damper rod as you need to carefully torque the SHCS back into position and without the holding tool, the rod would just spin.
Pete
I have taken an impact gun with short bursts, but mine doesnt break free.
I will make a tool wih a similiar head as Pete which can be attached to a piece of long threaded rod, to reach the part.
Couple hints; Yamaha used thread lock on that bottom bolt; turn fork upside down to get the oil away from the bolt area use a heat gun and warm up the fork leg, use a hand impact, (I cut an allen wrench and made a long reach 3/8" drive tool for this) give it some blows, BOTH tighten and loosen. Clamping your extended special tool in the vice then setting the leg over it and applying your impacts to the bolt works best here.
Last edited:
Have you read this? Scroll down to comment 5 for pics of the tool you need to make.I dont disagree on the low torque, but if it spins, it spins.
I have taken an impact gun with short bursts, but mine doesnt break free.
I will make a tool wih a similiar head as Pete which can be attached to a piece of long threaded rod, to reach the part.
That post #5 pertains to the '77 damper rods only. They differ from both the later and earlier ones. They are similar to the early ones with flats on the sides at the top, but wider. A tool for the '77 rod isn't going to fit an earlier rod, the slot will be too wide.
Yeah... guess I should have backed up a page. I just figured the 7D in Norton7D meant he had a 77D. My bad.That post #5 pertains to the '77 damper rods only. They differ from both the later and earlier ones. They are similar to the early ones with flats on the sides at the top, but wider. A tool for the '77 rod isn't going to fit an earlier rod, the slot will be too wide.
Last edited:
Norton7d
XS650 Junkie
Jim, I cant blame your logic, 7dnorton is because I also own a 70 Commando, and that email / user name is always taken.Yeah... guess I should have backed up a page. I just figured the 7D in Norton7D meant he had a 77D. My bad.
I ordered a piece of 3/4 aluminium rod from Graingers today, i then can make my tool to handle the unique damper rod end.
Norton7d
XS650 Junkie
Regarding installing new fork seals, do they need to get pushed down to the ridge? Or just far enough to get the washer and clip back in?
My new seal was real difficult to get in, should we use grease to lube the path?
How about sanding smooth the inside of the fork leg to ease install?
My new seal was real difficult to get in, should we use grease to lube the path?
How about sanding smooth the inside of the fork leg to ease install?
If you get the washer and clip to seat, the seal is seated. I use a little oil to lube the seal, but it's still gonna require some grunts to seat it.do they need to get pushed down to the ridge? Or just far enough to get the washer and clip back in?
Agree lube and yes if the aluminum bore is corroded a bit of careful work with fine paper may be needed. some sort of mandrel ( a large socket?) will help retain the correct round shape. I like a bit of mineral spirits on wet or dry sandpaper for this kind of work, avoids getting water where it might be hard to get out.