gggGary's latest XS project "madness"

4AD49B90-4A8F-4CEA-A39E-8BA238DD14C5.jpeg
Oh oh! I know what that is! But alas, I cheated.:cautious: Looking forward to the big reveal!
 
I'll help, it's going in the SC.
Long as I have the rh cover open. I see it had some stronger springs in but was still slipping after 5k. Bob; rh end is dead steady no wobble.
 

Attachments

  • 1519322951166-1090194669.jpg
    1519322951166-1090194669.jpg
    135.7 KB · Views: 186
Go ahead tell me what you think.. More details and explanations to follow.
Only problem I see is the cleanness of the hole in the end of the crank (burrs and such). Other than that, it looks like a valid check. You could even do some fulcrum/distance calculations and get a reasonably accurate idea of how much runout you got.
 
Let the tip rub against a piece of aluminum foil (like the pre-digital strain gauges) and measure the rub mark. Divide that by the fulcrum ratio...
 
Yeah it's in one of the descriptions 6 to 1, 1mm at the end equates to .007" at the crank end which is a ways out from the bearing on this side. The hole is countersunk, the bearing rests on the tapered walls of the chamfer. I'll assume that's the center originally used to make the crank end. The other end on madness has zero runout.
The idea was to come up with a method to measure crank runout with minimal time, effort, and expense, no fancy measuring tools needed. I'll check some other engines when the weather's warmer but I'm expecting about 1mm to be the norm. Would be cool to have some others try this.
to recap;
period piece, resto mod, and survivor all have about 1mm or less runout, madness has 2mm. My current plan is to fire it up, listen and keep an eye on the runout see what happens. The pointer is just a piece of rod, one end flattened and slotted to fit around the cover bolt. I lightly drilled the rod to create a divot at the crank distance and epoxied a ball bearing into the divot. Snug the cover bolt down just enough to keep the bearing in the counter bore.
Background back several years resto mod really started to shake and grind suddenly by the time I made it 10 miles home it was awful. There's video around of both crank ends wobbling horribly, I swapped in a different motor. When madness started to shake 4 years ago, I thought the same thing had happened and parked it, then while it was on the lift for some parts measuring last month, I opened it up to look then devise a way to measure.
 
Last edited:
"since the government has revealed their existance
Here's the videos."

Gary, I sure hope I didn't rush your article. Looking at your videos, I'm not sure what surprised me more, the fact that there is as much wobble as there is, or the fact that the number three survivor had virtually none.
I'm guessing that this wobble must be characteristic to any original motor that hasn't had a bottom end rebuild?
What causes it? Forty years of two Pistons hammering up and down in unison creating slop? What's the cure?
This is a new one on me, although I have read of people welding the crank, I always thought that was for high performance modified engines.
 
Cool, an impromptu wiggler.

Only problem I see is the cleanness of the hole in the end of the crank (burrs and such)...

Ditto. If I may suggest......

The center hole should be a 60°.
Centering01.jpg

As Jim sez, I wouldn't trust the outer portion. Exposure to the elements and rotor pullers.
Centering02.jpg

Recommend cleaning/derusting the hole, Q-tip and rust remover. Non-ferric scotchbrite, plastic/brass brushes only.

Then, use a ball bearing diameter that'll only ride in the better surface.
Centering03.jpg
 
Yeah the was the first motor in the resto mod, that lump is sitting on the motor shelf. A bit more info about madness and this happened 4 years and maybe 15 other bikes on the lift ago so it's fuzzy I had been tuning a differnt exhaust and a couple different mikuni carb sets. I had felt some "extra vibration" after one of the "tuning runs" This bike came with a marsden ignition system one of hte earliest electronic points replacements. I started a pamco conversion. then rothought what hte vibration might mean. So basically stopped working on it an put it back in the shed.
Recently while measuiring some back wheel stuff for the pentagram wheel conversion on period piece, I noticed one muffler mount was MIA. This got me thinking; maybe THAT was make'n the shake'n. It's winter so I'm kinda going through it to do a fire up. It's been a long term goal of mine to come with a low tech, easy to do crank run out test so that's what's up here. I will do some recheck of the counterbore bearing size stuff, nice diagrams 2M! I did check that bore with a magnifying glass looking for any lumps bumps that might throw off the wiggler. Thinks for the tin foil idea Jim! I am still looking for better ways to quantify the wiggle.
tenor.gif

What ever I use for the gauge has to be attached to the motor, I'm now thinking of something bolted to the front rotor cover mount, extended forward to the wiggler end. kind of along the line of a bar type torque wrench. There also is an underlying issue with attaching the wiggler, as the crank offset goes fore aft, as well as up down. Idon't think this throws out hte validity of the wiggle check. As noted way above the RH crank end is perfectly centered, no wiggle.
106468-5e46ff32da93ef6d29c8e49b9e276a3d.jpg
 
That’s very informative Gary. I am still unsure of the root cause of the wobble, and what is the cure?
 
Sorry forgot that, my opinion;
Lets start with "he twisted the crank" We've heard the term, a not uncommon event in high performance engines being pushed hard. It's the nature of a piston engine, straight line piston motion is converted to rotating motion through the connecting rods and crankshaft. These are big forces. The battle between strong and light is endless.
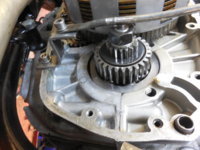
Next; plain bearing vs. roller bearing cranks. Both are used on many engines, a difference is plain bearing cranks are forged from one piece of steel and the rods are bolted on. A one piece crank is pretty resistant to twisting 'til design limits are exceeded. Roller bearing (the XS650 uses both ball and roller bearings) cranks are made up of a bunch of pieces, the bearings are installed and then the pieces are pressed together with lots of force.
On the the XS the mains are provided with splines to maintain the correct relationship, the big end pins are smooth press fits, the "press" providing all the resistance to any twisting. If you do a search on "scissoring" you will find this is a "common" issue with pressed cranks, the pieces can shift or twist through time and or hard use. I think time is a factor here, over 30+ years the metal at the press fit can "relax". Steel flows (very slowly) over time. So that's one way the ends can show wobble.
A different problem that pressed cranks can experience is the pressed joints can start to separate, allowing the end sections to move away from the big end pins. Both types of movement create stress on the bearings, increasing wear and vibration and eventually failure.
Pressing apart and reassembling a crank also reduces the the strength of the pressed assemblies, hence welding the joints to prevent movement on rephase motors. For a while big full welds were done, current thinking is more like a few small welds to keep movement from starting, with the pressed joint doing most of the work.
This is not a problem unique to the XS650, Some Harleys are prone to scissoring under hard use. Suzuki had issues with the built up crank GS series also as they kept increasing horsepower. There was a recall, crank welding campaign on some years of GS1100s.
Remember that Yamaha was a 2 stroke company. 2 strokes have to have ball and roller cranks to operate in a fuel supplied lubrication environment. The very first XS's even had roller small end bearings, THAT was an immediate problem, and the roller small end was converted to plain bearing part way though the first years production. When the 447 motor was introduced in 74 they changed the wrist pin from 22 to 20mm to reduce stretching of the rod ends from a "too thin" top section, a left over from the "quick fix" plain bearing conversion.
I have a few welded cranks "in waiting", maybe this year I'll build an engine around one and go flog the crap out of it.
 
I ordered barnett hd clutch springs and installed the ippytattoo 8 pack conversion so the clutch perch will get a needed rebush to remove the slop, I will also make up some tungston disulfide oil mix in a special use oil gun and use that in the cable. Gotta try to reduce the pull against those HD springs.
1519497746539305242855.jpg
 
Last edited:
What do you use for a bush in the clutch lever? I'd like to see how that's done as I have a couple bad ones. New ones are only about $10 but if I could save them for like $2, that would be better. Old BMW R bike levers are my favorites. They have a replaceable nylon bushing and BMW actually sells it, cheap too .....

WIMXzwJ.jpg


H0ouMSV.jpg


And here's what can happen if you fail to replace one in time .....

eGtUwWD.jpg


uDYSau7.jpg


Hmmmm, I wonder if a BMW bushing would fit/work?
 
Back
Top