Helpful tools.

toglhot

First class butcher.
Top Contributor
Messages
1,061
Reaction score
3,417
Points
263
Location
Adelaide
I made these tools to help diagnose the problem with my 74 TX 650.

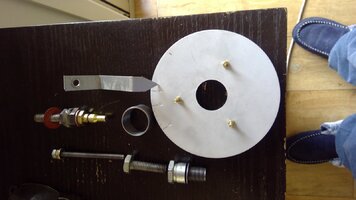
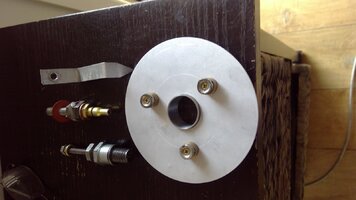
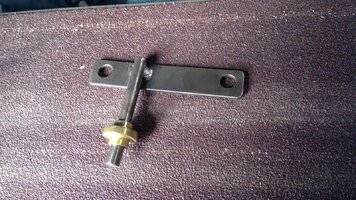
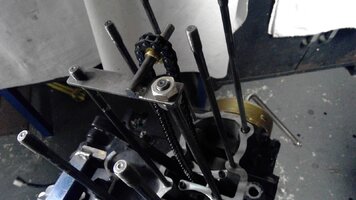
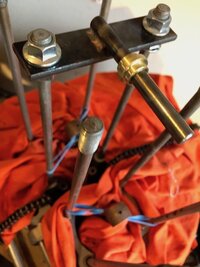
I made up a TDC finder by tapping a stripped plug, inserting a 10mm bolt and tapping that for a long M6 bolt. Next I made a degree wheel and pointer to check the TDC marks I made on the PMA rotor. The degree wheel has 5 degree marks from TDC to 40 degrees before. It's held on the rotor by rare earth magnets and centred using the short tube which is a tight fit in the central hole and around the socket, when centred the tube is removed to allow for some socket wriggle. The pointer is attached to the crankcase.

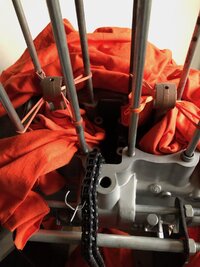
The screw in fitting was screwed into the modified plug, then screwed into the plug hole and connected to the compressor. And lo and behold the valves were leaking. I've always replaced guides and ground valves myself. The one and only time I've ever trusted this work to someone else, a local bike mechanic in this case and he let me down. This is why I prefer to do these things myself. Never trust a tradesman.

As it turned out, my TDC marks on the rotor were correct, so that'll be the last time I use the TDC finder. I guess.
 

Attachments

  • WIN_20231023_16_12_23_Pro.jpg
    WIN_20231023_16_12_23_Pro.jpg
    160.5 KB · Views: 68
  • WIN_20231023_16_33_25_Pro.jpg
    WIN_20231023_16_33_25_Pro.jpg
    153.5 KB · Views: 66
I made a similar tool using rare earth magnets, an old CD and a protractor. I had a store bought piston stop but found I had to be really careful when turning the engine over. The angle of the spark plug hole made it really easy to bend the long rod of the piston stop. Fortunately that rod is made of a very soft steel so if one is a bit ham fisted while rotating the flywheel, no damage would be done to the piston. I too used this once and will likely never use it again.

IMG_1012.jpegIMG_1011.jpegIMG_3394.jpegIMG_3405.jpegIMG_3407.jpeg
 
I also found turning the engine around until the piston hit the stop a little hit and miss. Was thinking of putting a Delrin tip on the plunger. Might be a little difficult on a 6 mm plunger though. Make the plunger any larger though and it hits the valves.
 
Make the plunger any larger though and it hits the valves.
What I do when checking for TDC with a bump-stop is screw the tappet adjusters all the way out.... remove them even. Pretty well eliminates any valve interference problems.
 
Another single use thingamajig. Got sick of chasing the chain in the crankcase and not being able to turn the engine over when the chain was held up by wire or string, so I made this little thingamajig.
 

Attachments

  • WIN_20231024_16_19_16_Pro.jpg
    WIN_20231024_16_19_16_Pro.jpg
    599.3 KB · Views: 91
  • WIN_20231024_16_22_37_Pro.jpg
    WIN_20231024_16_22_37_Pro.jpg
    227.4 KB · Views: 68
  • WIN_20231024_16_22_24_Pro.jpg
    WIN_20231024_16_22_24_Pro.jpg
    218.4 KB · Views: 90
Got one made.See pic. Question, how come your chain reaches all the way up and around the guide? Mine barely reaches it and I only disconnected it from new.
 

Attachments

  • IMG_0176.jpg
    IMG_0176.jpg
    99.8 KB · Views: 51
Your rod is welded in the center between the studs while his is welded towards the front? Maybe flip yours over so the welded rod is on the bottom?
 
Duh! Thanks Gary.

Even though it just barely reaches now with the connector attached it still appears he has more slack than I. Just want to make sure I have enough to connect over the cam when the time comes.
 
To connect, I wind the nut on all the way past the thread so the chain supporter thingy can be lowered down enough to get the chain over the brass thingy.

If you haven't looped an unbroken chain over the cam sprocket before, there is a trick to it.

Firstly make sure you insert the cam the right way and not back to front like I did, threaded end on the right. You cant get the chain and sprocket together in the gap , so, once the cam is through the chain and roughly in the middle, stretch the chain in front of and behind the round boss on the side of the sprocket, that way it will fit in the gap. There is a boss either side of the sprocket, make sure the chain is on the side with the smaller, thinner boss.Then arrange the cam lobes so they are pointing upward on the chain side, and slip the chain over the teeth.

Did I really just say 'slip the chain over' hahaha, you'll see.

It is imperative that you swear and curse - a lot. If you don't the chain will not fit. It also helps if you can drop the chain in the crankcase a few times. The chain will then know you are serious. Make up a long hook from an old wire coat hanger.

Once the chain is on, you'll have to bunch the chain up one tooth at a time and rotate the cam until you have it timed. Although, I did find with a little jiggling you can turn the cam so the chain slips over the crankshaft teeth. This is with a near new chain, they do stretch, so an old chain with a few klms on it will be easier.
 
Last edited:
To connect, I wind the nut on all the way past the thread so the chain supporter thingy can be lowered down enough to get it over the brass thingy.
If you haven't looped an unbroken chain over the cam sprocket before, there is a trick to it.

Firstly make sure you insert the cam the right way and not back to front like I did. You cant get the chain and sprocket together in the gap , so, once the cam is through the chain and roughly in the middle, stretch the chain in front of and behind the round boss on the side of the sprocket, that way it will fit in the gap. There is a boss either side of the sprocket, make sure the chain is on the side with the smaller, thinner boss.Then arrange the cam lobes so they are pointing uoward on the chain side, and slip the chain over the teeth.

It is imperative that you swear and curse - a lot. If you don't the chain will not fit. It also helps if you can drop the chain in the crankcase a few times. The chain will then know you are serious.

Once the chain is on, you'll have to bunch the chain up one tooth at a time and rotate the cam until you have it timed. Although, I did find with a little jiggling you can turn the cam so the chain slips over the crankshaft teeth. This is with a near new chain, they do stretch, so an old chain with a few klms on it will be easier.
Thanks T. Your thingamajig works really well upside down as G suggested. Think Im good and I got the swearing part down real good. lol. Thanks again.
 
I don't know how that "rumor" got started, but I'm not Gary, lol. He's like 3 States away.
 
I made up a TDC finder by tapping a stripped plug
Some 70's vintage Kawasaki dirt bikes came with a twin plug head. Only one hole was used and the other hole had a hex head 14 X 1.25 short bolt. These make into a much neater TDC finder than an old spark plug.
What I do when checking for TDC with a bump-stop is screw
I set the plunger in the TDC finder (locked with a set screw) so that the piston hits it before TDC, and I mark the flywheel. Then I rotate the engine in the opposite direction until it hits the plunger and again mark the flywheel. TDC is exactly half way between those marks.
 
I have an old two stroke timing gauge from my two stroke days that I use. Basically, it's a holder for a dial gauge that screws in the spark plug hole, similar to this one ......

https://www.ebay.com/itm/2019840857...MIzfy_kqLqggMVz1FyCh3SagQgEAQYCiABEgIsHPD_BwE

You set the piston close to TDC (just before) and install the gauge so it's "loaded" by pressing on the piston. Then you slowly continue rotating the crank and watch the gauge. It will continue going up until you reach and go past TDC, then it goes in the opposite direction. I've checked mine and several others but never found any that the marks didn't line up, so I've pretty much stopped doing it, lol.
 
I’ve commented on this in my beetle post but want to share this again. This “cats paw” pry bar / nail puller has proven to be invaluable to me over the years for woodworking and mechanical projects. The latest discovered use is as a scraper as I am in the rust removal game right now. Can’t say enough good stuff about it. The curved end gets into sneaky places and provides leverage to break free stubborn rust.
There’s lots of these available at big box stores but this one was purchased at Lee Valley Tools (orignating in Canada, distributing quality woodworking tools). This one was made in Japan. The big box store bars seem to be bulkier. If you’re north of the border, grab one. Iirc Lee Valley tools sells into the US too.
This one has been indestructible. I’ve beat on it pretty hard. I have the same tool at the cottage that got a chip in the corner but a few seconds with a flap disc on the grinder and it looks like new. Just checked by toolbox downstairs and I have a new spare 😀

Price has gone way up. When I bought mine they were $9.99.


https://www.leevalley.com/en-ca/sho...y-bars/32014-restorers-cats-paws?item=60K2106

0BB3BF43-80C9-4A4A-8740-C9F4F4ED402F.jpeg
 
Last edited:
Back
Top