arod_1
XS650 Fan
Hi Everyone,
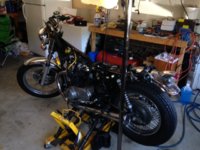
I haven't been around here in a couple of years, but finally rolled this project out of the shed and started working on it a month or so ago.
I picked this bike up as a basket case. The PO was going to chop it and had disassembled much of it. The air boxes, battery box, carbs, exhaust, seat, fenders, gauges, and foot pegs were all removed and in a couple of totes. The wiring harness was still connected at the headlight and coil but was removed from there back and was hanging over the handlebars. He included a hardtail and some pod filters. I don't intend to install either. The bike has clubman bars and a cafe style seat I have seen on Mikes XS. I kind of like the look so will leave it that way.
What I've done so far:
Rebuilt the carbs. I studied the carb guide and tore into them. New parts included carb kits, butterfly seals, mix screws, and new float needles and seats. I verified the stock jet sizes and re-used those. I ran everything through the ultrasonic cleaner and followed up with carb cleaner and compressed air. Plastic floats were set to 22 mm. The most tedious part of the process so far I may add. I eyeballed the sync and set the mix screws to 3 turns. I was alarmed when I compared my new mix screws to the originals. They are somewhat shorter and the taper is different. One search on this site put my mind at ease.
I had to drill the heads from the butterfly screws and remove the remains with a needle nose. The new parts from Mikes seem to be steel instead of brass, so could not peen them. I used blue loctite. I think I would use red if I did it again. I don't think those will need to come apart again in my lifetime.
Since the carbs were already removed, I skipped over that part of the carb guide. The installation took longer than it should have. Lesson learned.....
Many thanks to the gentlemen that put the guide together.
While the carbs were off I adjusted the cam chain and set the valve lash. A little easier to access the cam chain adjustment with the carbs out of the way. Little Bills video series was very helpful.
I managed to get the wiring harness routed pretty much properly (I think) with help of some diagrams found on this site. I had two extra plugs I couldn't identify that turned out to be for a long gone sidestand relay and switch. I just left them hanging. I installed the stock ignitiion box and reg/rec. just hoping for the best.
I put the exhaust, gauges, fenders, pegs and a bunch of other parts back on.
With all that done, yesterday I ran down to Wally World and picked up a battery. I charged it up and installed it, hooked up my temporary tank, pulled the choke and hit the start button. It started on about the 3rd turn of the engine. I was shocked. I didn't even have to break out the can of either. It seems to idle fine and rev nice. I'm sure more tuning will be needed after I test drive it, but I'm off and running.
My plans for upgrades at this point are an oil change, new brake fluid in the front, and a clutch rod the PO included. The starter drive hangs a bit, so I will have a look at that as well.
The center stand doesn't get the back wheel off the ground, so I might look at a different set of shocks also. I suspect these are too long.
Long post, but I'm pleased with progress. I have a mystery bracket I'll post a picture of later. Hopefully someone can tell me what it is.
Thanks for reading.
Arod