-
Enjoy XS650.com? Consider making a donation to help support the site.
XS650.com receives a small share of sales from some links on this page, but direct donations have a much greater impact on keeping this site going.
You are using an out of date browser. It may not display this or other websites correctly.
You should upgrade or use an alternative browser.
You should upgrade or use an alternative browser.
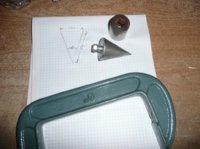
Home made Chain Riveter "Will it work"?
- Thread starter xsPete
- Start date
Poverty
XS650 Addict
Ok I understand what item in the pic is a plumb bob .. but out of all of my mechanical schooling / college and weekend classes I have not the slightest clue as to WTF a plumb bob is .. would you care to elaborate its purpose ?
jd750ace
Front Toward Enemy
Ok I understand what item in the pic is a plumb bob .. but out of all of my mechanical schooling / college and weekend classes I have not the slightest clue as to WTF a plumb bob is .. would you care to elaborate its purpose ?
A plumb bob is attached to a string and hung in a position where it is desireable to place a perfectly vertical, square line. They are used in survey work and masonry extensively. I use them on aircaft to determine if the aircraft is still geometrically sound. You establish the centerline by dropping the bob from pre-determined points at the front, back, and in the middle. Then you drop from symmetrical points on the wings and tail, and measure the distance to the center points. If the lines are quartering forward or aft, you can tell if the wing is still straight in relation to the fuselage. Numerous other determinations can be made, but this is an example.
On the riveter, something like a roll pin punch does a better job of evenly driving the flange outward on the link pins. 40 degrees sounds like it will be much too steep to flare it out enough. Compare your finished diameter to a factory pin. It should be about 15-20% wider for a good installation. If your new chain came with spacer plates, you can tie them in place with a twist tie. You will want to make sure they are in place when you push the side plate on, and when you rivet. If not, you can pinch the side plates too tight and cut the o-ring, or X-ring, or whatever ring you have.
Good luck. Also, Cycle Gear has a nice press/riveting tool right now for 29 bucks with any other purchase. You can do without it, but if you have more than 1 chain driven bike, it's well worth it.
XStretchified650
Back in the 650 Saddle
A plumb bob is a hanging pointed weight. Hanging it on a string from an object lets you find the center of what it is hanging from. In other words...it's just a pointy thing for hanging from other things.........now you know Pov.
Flaring chain rivets? ..I don't know...maybe....it will probably require a lot of swearing.
Flaring chain rivets? ..I don't know...maybe....it will probably require a lot of swearing.
jchrisk1
XS650 Junkie
You would need construction schooling for that one. It hangs from a string and shows a point from above. Mostly used for things that levels are not tall enough or inconvenient. Lots of fun on windy days.
I guess the best person to explain it would be Bob "the know-it-all" Villa.
http://www.bobvila.com/articles/495-the-plumb-bob/pages/1
I guess the best person to explain it would be Bob "the know-it-all" Villa.
http://www.bobvila.com/articles/495-the-plumb-bob/pages/1
xsPete
XS650 Addict
Thanks for the replies, I was thinking it was to sharp an angle, guess It'll be plan B when I work out what it is. In Aus you're up for $ 70 to a $100 for a proper set.
And yes as a mason, I used it to determine plump=vertical. Very handy if you want to pickup a start point for columns etc working from the top down as well.
When you use them enough you can determine the centre point by picking the centre of the swing as it pendulums. Also the thinner the cord the less resistance in wind. I use fishing line on mine.
Poverty
XS650 Addict
couldnt you just dull the point on a bench grinder and re angle it ?
xsPete
XS650 Addict
couldnt you just dull the point on a bench grinder and re angle it ?
I wouldn't trust getting dead even.
The idea was the small end going in the square drive opening on the socket and the socket over the swivel would centralise it.
I might look at getting one turned. I read somewhere wher someone used the end off a plumbers flaring tool and had no problems.
OakBehringer
XS650 Guru
I splayed the end of mine with a hammer, backed by a steel block. In fact, I did that twice in 2011. No problemo.
xsPete
XS650 Addict
A plumb bob is attached to a string and hung in a position where it is desireable to place a perfectly vertical, square line. They are used in survey work and masonry extensively. I use them on aircaft to determine if the aircraft is still geometrically sound. You establish the centerline by dropping the bob from pre-determined points at the front, back, and in the middle. Then you drop from symmetrical points on the wings and tail, and measure the distance to the center points. If the lines are quartering forward or aft, you can tell if the wing is still straight in relation to the fuselage. Numerous other determinations can be made, but this is an example.
On the riveter, something like a roll pin punch does a better job of evenly driving the flange outward on the link pins. 40 degrees sounds like it will be much too steep to flare it out enough. Compare your finished diameter to a factory pin. It should be about 15-20% wider for a good installation. If your new chain came with spacer plates, you can tie them in place with a twist tie. You will want to make sure they are in place when you push the side plate on, and when you rivet. If not, you can pinch the side plates too tight and cut the o-ring, or X-ring, or whatever ring you have.
Good luck. Also, Cycle Gear has a nice press/riveting tool right now for 29 bucks with any other purchase. You can do without it, but if you have more than 1 chain driven bike, it's well worth it.
Just checked the Cycle Gear site, thought "you beaut" proceeded to checkout, $50 to ship to Aus so It's back to $80.
Shipping to Aus seems to have gone through the roof.
Tks anyway.
pamcopete
Ride.Enjoy.Life is Simple
Thanks for the replies, I was thinking it was to sharp an angle, guess It'll be plan B when I work out what it is. In Aus you're up for $ 70 to a $100 for a proper set.
Pete, I always admire innovation, but in this case you should do an estimate of the cost of having the chain come loose at 100 KPH.
jd750ace
Front Toward Enemy
The 37 1/2 degree (from flush, not vertical) of the plummer's flare would probably work good. they are usually not truly round, by design, but if you seated it and gave it a couple of full turns after you got the depth you wanted, it would round out nicely, as it does with the tubing. I would check it carefully for cracks, as the pin shaft that goes thru the link is case hardened, but they anneal the end where you flare. Might be a good inexpensive option for you. If you have a verier caliper, you can measure the expansion. As long as the protruding end is about 20 percent bigger than the shank thru the plate, it should hold fine.
Hope it works out. If you try it and it works, let us know.
Hope it works out. If you try it and it works, let us know.
I saw a pic of somebody using a nut cracker tool to splay out one end. Don't know if it's advisable, but it's better than rigging a similar tool from scratch. My thought is it would at least as well as something hitting the chain, with a block on the other side, all floating in air.
http://www.chain-auto-tools.com/general_auto_tools/AMR713L.htm
http://www.chain-auto-tools.com/general_auto_tools/AMR713L.htm
cros36
thread killer
all i know is i spent alot of time messing around with home remedies for this one. none really worked to my liking. 30 seconds with the tool and it was done and i was very confident. also helped to push the link out when i needed to remove the chain as well. sometimes its better to bite the bullet and get the real stuff.
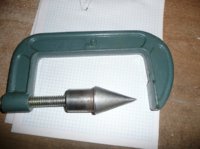
on that note, anyone know of a good homemade valve spring compressor? i was able to get the collars off with some notched out pvc and c-clamp, but getting them in is going to suck....
on that note, anyone know of a good homemade valve spring compressor? i was able to get the collars off with some notched out pvc and c-clamp, but getting them in is going to suck....
jd750ace
Front Toward Enemy
On airplane engines, we used to pile the BTC cylinder full of nylon rope, then turn the motor up to compress the rope into the valve face. at that point, even with those heavy springs, we would press the spring and upper keeper in with a non-metallic tool, while the other guy fiished the locking collar halves free with a magnet. Going in is just as easy, but I assume your motor is apart. There are some carpentry clamps that can work, or you could bolt the head to the work bench face down, just tight enough to hang onto it, and proceed as above for the springs. One man can get them done this way, without a compressor.
anyone know of a good homemade valve spring compressor? i was able to get the collars off with some notched out pvc and c-clamp, but getting them in is going to suck....
Here's a few
http://www.xs650.com/forum/showthread.php?t=14973
meanstreakmark
Thinkologist
Plumb bob for vertical? Nahhhh. I use a pair of Hugh's eyecrometers. 
Poverty
XS650 Addict
Just checked the Cycle Gear site, thought "you beaut" proceeded to checkout, $50 to ship to Aus so It's back to $80.
Shipping to Aus seems to have gone through the roof.
Tks anyway.
Im sure someone could ship it to you for cheaper .. I just shipped a glass headlight there(AU) for around 20$ .. weight would be comparable .. if not more
xsPete
XS650 Addict
Pete, I always admire innovation, but in this case you should do an estimate of the cost of having the chain come loose at 100 KPH.
I splayed the end of mine with a hammer, backed by a steel block. In fact, I did that twice in 2011. No problemo.
I saw a pic of somebody using a nut cracker tool to splay out one end. Don't know if it's advisable, but it's better than rigging a similar tool from scratch. My thought is it would at least as well as something hitting the chain, with a block on the other side, all floating in air.
http://www.chain-auto-tools.com/general_auto_tools/AMR713L.htm
all i know is i spent alot of time messing around with home remedies for this one. none really worked to my liking. 30 seconds with the tool and it was done and i was very confident. also helped to push the link out when i needed to remove the chain as well. sometimes its better to bite the bullet and get the real stuff.
on that note, anyone know of a good homemade valve spring compressor? i was able to get the collars off with some notched out pvc and c-clamp, but getting them in is going to suck....
Plumb bob for vertical? Nahhhh. I use a pair of Hugh's eyecrometers.
Im sure someone could ship it to you for cheaper .. I just shipped a glass headlight there(AU) for around 20$ .. weight would be comparable .. if not more
Im sure someone could ship it to you for cheaper .. I just shipped a glass headlight there(AU) for around 20$ .. weight would be comparable .. if not more
Tks all,
I hear what's being said.
I think I'll be investing in the correct item.