XS650_Bobber
Working in my project
Hi guys, I've been doing this for long time now, I built 10 or more of these, I wake up this morning thingking in reborn my tail light in my gn125 Suzuki, so, I think in build something good and useful, what about parking lights, plate light, turn signal and stop (very bright) light... Great... Let me try to explain how to do it step by step...
What you need, patience, Leds, resistors, solder, wire solder, some skills in electronics, universal circuit board and some time...
I use piranha Leds to the parking light, 5mm 20 degrees amber to the turn lights, 5mm 20 degrees red to the stop and 4.8 straw hat with Leds to the plate light.
Resistors, the red, amber and yellow Leds work with 2.4 volts, the normal Leds like 5mm and similar with 20ma, the other colors like, white, blue, green and UV work with 3.6volts and the same 20ma, so, this is the table for connect Leds to vehicles, 14,4volts are;
One red, amber or yellow Led 620 ohm to 1k 1/4 watts
Two red, amber or yellow Leds 510 ohm to 560 ohm 1/4 watts
Three red, amber or yellow Leds 330 ohm to 390 ohm 1/4 watts
Four red, amber or yellow Leds 220 ohm to 290 ohm 1/4 watts
One white, blue, green or UV 560 ohm 1/4 watts
Two white, blue, green or UV 330 ohm 1/4 watts
Three white, blue, green or UV 180 ohm 1/4 watts
I will use 1206 SMD resistors 330 ohm 1/4 watts for all Leds.
Lets get started...
First cut a template with cardboard and cut the unirversal circuit board with the size, I cut the circuit and put the piranha Leds, you will check first were and how many Leds can fit in the circuit board, try to do it in pairs or in gruops of three Leds. The piranha Leds had four legs, two are anode or positive and the other two are cathode or negative.
Some piranha Leds had three die inside, I am using a normal piranha Led with a single die.


You can see the resistors and the Leds connections, three Leds in serie, them a make the connections for the positive and negative, the positive is in the middle of the two Leds strips, two positives in the other side, boths positives will be connected, this connections will used for the plate light too.

Parking light ready

Plate light, I put the white Leds a little out of the circuit to blend its to the light of the Leds point 45 degrees pointing down.

Turn lights Leds, when you put the Leds solder first one leg, them hold the circuit in your hand, press the Led to the board and touch that leg with the solder, when the Led are good in place solder the other leg.

Them connects all the positive and negatives of the Leds togueter, just the turn lights, just the negative of all Leds are connected.


Them connect the wires to the board

I recomend put some thermal silicone were the wire are connect, the motorbikes tend to vibrate so much.

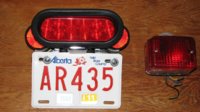
Done, off tail light

Right turn signal

Left turn signal

Parking light and plate light

And the most important to me, the super bright Stop Light

If you have ANY kind of doubt I will help you...
I almost forget, I dont recomend use white, blue, green or UV Leds with red or amber plastic in tail lights, their dont bright at all, this happen because the wavelength of the Leds. The only colors or wavelength that work fine is red and amber Leds in red or amber plastics, as you can see in the images.
Remember, dont be afraid to ask, I will happy in help you with your project and point you were to find the nessesary...


What you need, patience, Leds, resistors, solder, wire solder, some skills in electronics, universal circuit board and some time...
I use piranha Leds to the parking light, 5mm 20 degrees amber to the turn lights, 5mm 20 degrees red to the stop and 4.8 straw hat with Leds to the plate light.
Resistors, the red, amber and yellow Leds work with 2.4 volts, the normal Leds like 5mm and similar with 20ma, the other colors like, white, blue, green and UV work with 3.6volts and the same 20ma, so, this is the table for connect Leds to vehicles, 14,4volts are;
One red, amber or yellow Led 620 ohm to 1k 1/4 watts
Two red, amber or yellow Leds 510 ohm to 560 ohm 1/4 watts
Three red, amber or yellow Leds 330 ohm to 390 ohm 1/4 watts
Four red, amber or yellow Leds 220 ohm to 290 ohm 1/4 watts
One white, blue, green or UV 560 ohm 1/4 watts
Two white, blue, green or UV 330 ohm 1/4 watts
Three white, blue, green or UV 180 ohm 1/4 watts
I will use 1206 SMD resistors 330 ohm 1/4 watts for all Leds.
Lets get started...
First cut a template with cardboard and cut the unirversal circuit board with the size, I cut the circuit and put the piranha Leds, you will check first were and how many Leds can fit in the circuit board, try to do it in pairs or in gruops of three Leds. The piranha Leds had four legs, two are anode or positive and the other two are cathode or negative.
Some piranha Leds had three die inside, I am using a normal piranha Led with a single die.


You can see the resistors and the Leds connections, three Leds in serie, them a make the connections for the positive and negative, the positive is in the middle of the two Leds strips, two positives in the other side, boths positives will be connected, this connections will used for the plate light too.

Parking light ready

Plate light, I put the white Leds a little out of the circuit to blend its to the light of the Leds point 45 degrees pointing down.

Turn lights Leds, when you put the Leds solder first one leg, them hold the circuit in your hand, press the Led to the board and touch that leg with the solder, when the Led are good in place solder the other leg.

Them connects all the positive and negatives of the Leds togueter, just the turn lights, just the negative of all Leds are connected.


Them connect the wires to the board

I recomend put some thermal silicone were the wire are connect, the motorbikes tend to vibrate so much.

Done, off tail light

Right turn signal

Left turn signal

Parking light and plate light

And the most important to me, the super bright Stop Light

If you have ANY kind of doubt I will help you...
I almost forget, I dont recomend use white, blue, green or UV Leds with red or amber plastic in tail lights, their dont bright at all, this happen because the wavelength of the Leds. The only colors or wavelength that work fine is red and amber Leds in red or amber plastics, as you can see in the images.
Remember, dont be afraid to ask, I will happy in help you with your project and point you were to find the nessesary...