B Burdine97
XS650 Addict
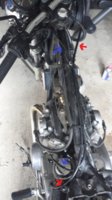
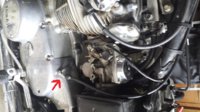
Hello guys, just thought I'd post a thread showing how I routed my stock clutch and throttle cables, hopefully possibly helping someone out down the road. I have an 81' special, so of course all the cable are extremely long to start. This will be mainly for specials, seeming as they came with bars that had a lot of pullback, requiring longer cables. You could solve this the easy way and just get a shorter clutch and throttle cable. Or if you'd like to save a couple bucks you will have to reroute them. I decided to install drag bars, but I believe this will work with most bars that are lower than stock, possibly even clip ons. All I did is make the cables go around the triple tree on the opposite side of their corresponding lever, then down the top of the frame, under the tank. The throttle cable from factory goes down the top of the frame, but the clutch cable didnt. So you'll have to use the factory wire ties to hold it in place or use zip ties. Here are some pics to help. Notice in the last pic the elbow on the clutch cable is where its suppose to be in its stock position. The clutch lever is extremely easy to pull back as well.
Note: Blue arrows are the throttle cable, red arrows are the clutch cable.
Note: Blue arrows are the throttle cable, red arrows are the clutch cable.