Just another first build.

Rd51

XS650 Addict
Messages
189
Reaction score
0
Points
16
Location
Orange County
Hello everyone. New to the forum. Appreciate all the helpful info I have found thus far. Little background about me before I dive in to this build.

I'm a 23 year old punk kid living in Southern California. I'm a marine diesel technician. I've been around motorcycles my whole life; primarily dirt-bikes. Been riding and racing for almost 13 years. I've wanted to have a motorcycle to ride on the street for quite some time (father is a firefighter captain for Los Angeles City) Which pretty much sums up why it has taken me so long to finally get a bike. With all competitive motocross bikes being Japanese made, it was only natural that I began looking to purchase a Japanese made motorcycle for the street.

Thus leading me to find this 1979 XS650 with 10k miles in Camarillo, CA.

Still trying to figure out how to upload pictures. Bear with me here.
 

Attachments

  • xs6501.jpg
    xs6501.jpg
    260.1 KB · Views: 433
  • xs6502.jpg
    xs6502.jpg
    286.2 KB · Views: 364
I rode the bike around town for a few weeks while in the process of receiving my M1 license. Bike rode and ran great. I was instantly hooked.

BUT. Once I received my license, I decided to take it on the freeway on a nice Sunday afternoon. Merged on the freeway, clicked through the gears; everything was working great. After cruising aprox 73mph for a few miles, the bike started to lose HP. Throttle response was gone. Speed starting to drop quickly. At first I thought I pulled a rookie move and ran the bike out of gas. Tried switching the bike to reserve; no luck. Pulled off at the next off ramp and pulled into the gas station to assess the problem.

Nothing to be found. Bike was running great at idle. So I began on my way again on side streets. Bike ran flawless.

Decided to take it back on the freeway to see if the problem persisted. Sure enough, it did. Limped the bike home. And began tearing down the bike to see what was up.

I suspected it was either A.) Charging related- at higher, consistent RPM's the charging system couldn't hold the load and wasn't giving the plugs a good spark. or B.) Fuel related- bowls running dry from float level, etc.

I brought home my multimeter, and tested the battery at different RPM's. At 3000 rpm and higher, the voltage only rose to 13.4 V, where it soon after started fall off.

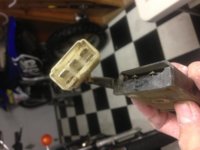
After some more investigation, I found faulty (if any) connections to the voltage regulator.
 

Attachments

  • xs65022.jpg
    xs65022.jpg
    170.9 KB · Views: 325
  • xs65023.jpg
    xs65023.jpg
    138.7 KB · Views: 345
It was then that I truly realized that I was riding a bike that is almost 35 years old. It needed to be torn down and gone through. As much as I did not want to take the bike apart after only riding it for a few weeks, I knew what needed to be done.

My technique for lifting the engine out. A-frame with a come-along winch.
 

Attachments

  • xs6503.jpg
    xs6503.jpg
    219.2 KB · Views: 415
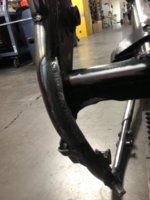
After spending a few days after work tearing it down, the "fun" process of cutting and grinding the frame began. I thought about doing a "bobber" build on the bike and hacking the sub frame, but after some thought I decided I'm aiming for something different than bobber/brat look.

As always, the necessary cutting and grinding pictures.
 

Attachments

  • xs6506.jpg
    xs6506.jpg
    261 KB · Views: 376
  • xs6505.jpg
    xs6505.jpg
    181.4 KB · Views: 365
  • xs6504.jpg
    xs6504.jpg
    144 KB · Views: 350
One of the shock mounting studs was broken. The previous owner was using a long bolt to thru-bolt the shock. I had a new stud made, as well as any other "conspicuous" welds gone over.
 

Attachments

  • xs6507.jpg
    xs6507.jpg
    162.9 KB · Views: 364
  • xs6508.jpg
    xs6508.jpg
    163.4 KB · Views: 349
My tool for disassembling the forks. I chose to sacrifice a good ol' 9mm socket. Because if you're using the 9mm socket, something's wrong. :laugh:
 

Attachments

  • xs6509.jpg
    xs6509.jpg
    139.7 KB · Views: 380
The previous owner was using an aftermarket fuel tank. I prefer the look of the stock XS650 tank (which he gave me when I purchased the bike) The tank had a ton of rust on and in it. I took the tank to a place in Santa Ana called "Strip Clean" that got the tank down to bare metal. I then took it to a body shop to have the few dents pulled out, etc. (this is it before the body shop)
 

Attachments

  • xs65010.jpg
    xs65010.jpg
    234.1 KB · Views: 441
I began bead blasting parts that I wanted powder coated. I'm going with a matte/satin black for almost everything. This is the first batch of parts I've received so far.

The bars are not powder coated; I was sure I wanted to go with a tracker/moto bar. But I just ordered a drag bar. I'm sure everyone can relate!
 

Attachments

  • xs65012.jpg
    xs65012.jpg
    232.2 KB · Views: 375
Ordered a Bridgestone BT45 tire. I wanted to go with the firestone deluxe champions, but I plan on commuting this bike everyday in heavy traffic and I want to have tires I can trust should I be put in a precarious situation.

Side note: this is the first part that has been fully completed for my bike :)
 

Attachments

  • xs65015.jpg
    xs65015.jpg
    193.4 KB · Views: 367
  • xs65016.jpg
    xs65016.jpg
    168.6 KB · Views: 321
I sent out my carbs to be ultrasonically cleaned and rebuilt. They look great inside and out! Unfortunately, I was told the threads for the pilot jet mixture screw are stripped. The gentlemen who cleaned them for me told me he put the mixture screw in with a plastic straw so the threads could "bite" and actually tighten in all the way.

Plastic straws are a no go for me. :shrug: I determined the thread size and pitch for this mixture screw ( 5mm X .05 pitch) Currently trying to find this odd ball sized tap so I can clean the threads up and hopefully eliminate the marvelous plastic straw that is holding in the mixture screw at the moment.

Question: Does anyone know if this screw is adjusting air or fuel? I know some bikes use this screw to control fuel flow, and others use this screw to control air flow. If it controls air flow; do I need to worry about the mixture screwing threading in perfectly? Since there would be no fuel leaking there?
 

Attachments

  • xs65020.jpg
    xs65020.jpg
    222.3 KB · Views: 293
  • xs65019.jpg
    xs65019.jpg
    178.3 KB · Views: 308
I ordered a seat pan from Wes Boege at counter balance cycles. I love how his seats turn out, and it saved me a lot of time.

I ordered turn signals and a brake light from wrenchmonkees (boy was that expensive)

I dropped my frame off at SS metal fabricators to have my good buddy Joe weld on new tabs for the blinkers, brake light, ignition coil, and seat pan. I will not be running a rear fender.
 

Attachments

  • xs65014.jpg
    xs65014.jpg
    221.9 KB · Views: 354
  • xs65017.jpg
    xs65017.jpg
    236.3 KB · Views: 305
Received the rear mag wheel (drum brake) from gggary. Thanks again! Currently bead blasting the wheel to have it powder coated within the next few days.
 

Attachments

  • xs65018.jpg
    xs65018.jpg
    204.2 KB · Views: 247
My box of parts at the moment. Hugh's Handbuilt PMA, PAMCO, new wire harness, and few other misc items.

I was tempted to make a new wire harness, but I decided to run an OEM one because the blinkers seemed a little complicated. Maybe not. Wiring is not my forte.

Another question: When I install the PMA, PAMCO with a SHORAI battery...do I just tape up the plug connectors on the harness that would normally plug into the OEM reg/rec? What else can be eliminated while still allowing the system to work correctly? (igniter unit, pickup coil, reserve lighting unit is what I'm primarily asking about)
 

Attachments

  • xs65021.jpg
    xs65021.jpg
    221.3 KB · Views: 293
Little more progress today. Finished bead blasting the rear wheel. Dropping it off for powder coating tomorrow. Cut and shaved the fork springs about 7/8" for the 1" lowering kit. Once I have the fork seals I can reassemble the forks.

2pqq0dg.jpg


erhht0.jpg
 
Got the tank back today from the body shop. It came out great. There were a ton of dents before. Still trying to decide which color I want to paint it...

Rear wheel is back from powder coating. In the process of installing the seals, sprocket, etc. Tire is on its way.


Got the rear tire installed today. Rear wheel is all assembled now. Bridgestone BT45 130-19-16.

2dkffc.jpg


And now I wait for more parts.
 
Plastic straws are a no go for me. :shrug: I determined the thread size and pitch for this mixture screw ( 5mm X .05 pitch) Currently trying to find this odd ball sized tap so I can clean the threads up and hopefully eliminate the marvelous plastic straw that is holding in the mixture screw at the moment.

Question: Does anyone know if this screw is adjusting air or fuel? I know some bikes use this screw to control fuel flow, and others use this screw to control air flow.

Plastic straw? Eeooww! Double check the screw pitch, isn't it 5mm x 0.5 ? This tap is available, but may not solve this problem if the aluminum threads are severely stripped, and if not run precisely over the old threads, may strip it even more. If the aluminum threads are still halfway there, new mix screws may have enough external diameter to sufficiently grab.

This would be a good project for a budding lathe student. Make replacement screws with a slightly larger (.005") diameter, same pitch.

Caswell offers an electroless nickle-plating kit, easy to do at home, could add .001" to .002" plating to the threads to improve purchase (thread engagement).

The mix screws handle a fuel/air mix, they aren't air screws.
 
Back
Top