Lacing mikes 2.5x18 rims to stock hubs w ss spokes

gggGary

If not now, When?
Top Contributor
XS650.com Supporter
Messages
30,953
Reaction score
60,932
Points
813
Location
Baraboo, WI, USA
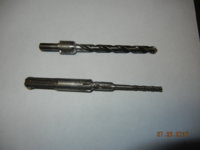
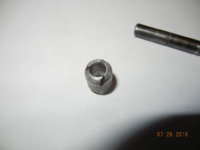
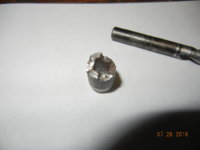
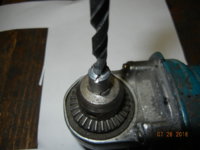
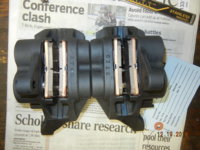
Did this today, I kinda made a spoke hole "straightener" out of an old masonry impact bit with a Makita drill, grinder and dremel cut off wheel. It let me aim the hole to the matching hole in the hub and recut the the nipple seat for a more square to the hole connection. By grinding the cutting slots away from the seat I kept a rather round hole at the inner seat end, hope that will be a stronger mod than just twisting a running drill bit. This rim is a kinda, fitz all, fitz none well, deal) I would say it could not be laced to the front hub without the spoke hole remodel. I started and soon was unable to get nipples threaded to spokes through the rim holes. I found the the same issue last year lacing the same rim to a rear hub, I ended up filing spoke holes on that rear but wasn't real happy with the result, some bowing of the spokes is visible. I am going to do a second rear set up using this rim and hole straightener or a mark II bit version.

From mikes site:
"WM 2.5x18x36 hole Rim, polished aluminum.
Very hard to find new. Classic 36 hole pattern will work with many vintage bikes. Works with XS650, XS400.
This is a quality rim comparable to what you see on other sites for much more money.
Great for chopper and bobber projects.
DOT approved.
Rim Profile WM Type
Part #34-0007 $99.95 USD Ea."
Also from Mikes a front spoke set to install an 18" rim on the XS650 disk front hub.
https://www.mikesxs.net/yamaha-xs650-stainless-steel-spoke-set-18-front-36-spoke.html

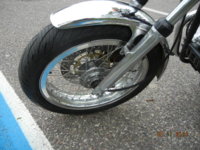
The joining seam is not perfect, I'd say acceptable but there is a bit of a bump, this has been true with all the mikes rims I have used. the 2.5 x 18 is not stamped anywhere, so take the DOT approved with a grain of salt.
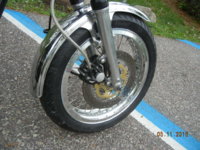
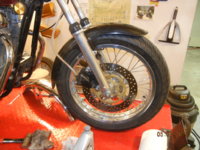
It trued up fairly easy. I kinda like a video I just saw where cycle world went to Buchanons and the Buchanon guy said "don't drive your self nuts with a dial indicator, use a wire (I like using a magic marker) and get it decent then quit worrying, it will run just fine, tires aren't perfect either." I hemmed and hawed but finally angle ground, filed, wheeled and buffed away the 2 casting webs on the hub. Note the outer spoke heads are a bit of a sloppy fit in the hub also. The 64 spoke 21" rim conversion was very straight forward by comparison. No "Custom" work needed. Pretty sure I am going to bite the bullet, and order a pair of Michelin pilot power 3 110/80 18 front tires and run them with tubes on both ends. The rear will be my 5th wheel lace job this spring.

So I guess for wider rims the choice is work with these $100 dollar rims or spend 3 times that at Buchanons.

pics in no particular order.

xs wheels 003.JPG wheels 003.JPG

wheels 006.JPG wheels 007.JPG

wheels 009.JPG wheels 012.JPG

wheels 014.JPG wheels 015.JPG

stand 004.JPG stand 003.JPG

stand 001.JPG

rim lace true wm3 wm4 stainless steel spokes rim hub wheel front rear drum disk truing true lace pattern cross swing arm swingarm.
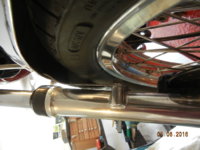
I'm real happy with the swingarm based truing stand I built.

edit 1-23 to add the link to the 18" front spoke set from MikesXS
 
Last edited:
Been beavering away on this.
Some more pics.

I also laced up a 2.5 x 18 to a rear hub


mower 001.JPG mower 002.JPG

mower 004.JPG mower 005.JPG

Faced the same issues "re-aiming the holes" it went pretty quick this time. Used a couple of spokes and blocking to set up the rim hub relationship and then redrilled as I installed the inners then repeated as I went around and installed the outers. Truing went well with the same issues in that the rim weld area is not very "true" in width or height.

Got the 110/80/18 pilot power radial front installed with a tube on the rear wheel, should have the same tire mounted on the front tonight.

This is out in hotrod territory, not what all or even many would do, I have worn the test pilot jacket before. The 2 months til first riding weather is going to be a drag. Will keep a close eye on things and report back how it all seems to work.

If you didn't catch it this is a TX750 rear hub with the larger brake, the mikes XS SS spokes for the XS650 hub and 18" rim worked fine for length, they are just a bit longer than perfect but none stuck out past the nipple head so no problem there. The outer spokes kind of have to curve around the flange. I used a 2x4 and hammer and persuaded a bit of a bend into them so they aren't bowed over their length.
I removed the casting webs from both front and rear hubs and cleaned them up "a bit"

rimztirez 001.JPG rimztirez 002.JPG
 
I ran into that problem with 650 outer spokes on a 750 hub. Unfortunately, they started popping the heads off shortly after I put the wheel in service, lol. The 650 inner spokes fit fine. The problem wasn't the rim holes, it was the length of the bent over part on the top of the spoke. 750 spokes are apparently just a little longer up there.
 
some details of the TX750 hub spoke dilemma, and hopefully solution. 5twins experience may have been lurking in the back of my mind somewhere

mower 008.JPG

mower 009.JPG

mower 010.JPG
 
OK, I see what you did there, put a bit of a curved bend in the top inch or two of the spoke. Please keep us informed on how this works out. Real TX750 spokes are hard to come by and not stainless either. If a method of adapting the readily available (and in stainless too), usually cheaper 650 spokes can found, that's a really good thing.
 
Great write up and just to be clear, the spoke angle was an issue with both a stock xs650 rear hub as well as the 750 hub?

I was about to purchase the Mike's 18" rear rim but after reading this I don't want to have to mess with drilling angles.

This is going to be my first wheel rebuild and would like to eliminate as many variables as possible.

Do you happen to know of an 18" WM style rim that requires no drilling?
 
Sorry but this seems to be a very common issue (for me anyways)

I made a mark II version of my hole rejiggering tool. seems to work well but the angling and nipple head seating while keeping the wheel flange thick enough is a serious deal!
I'll post up some pics of the tool later.
 
Here you go. A piece of steel I found in the bits and pieces tub shaped with a cut off wheel in a dremel tool. the tangs on the back fit between the jaws of the drill chuck so it doesn't free spin. IMHO you don't want to make the cutting edges too aggressive, would put a real damper on your day if you drilled too far into the rim....... I kept the drill bit way out also so the side flute cutting edges were only cutting the outside of the hole not the inner edge where the nipple head seats. Again this is out there, could be unintended consequences. After about 1000 miles I did a round of spoke checking tightening. otherwise the rims I did seem fine (so far).
 

Attachments

  • spoke hole tool 001.JPG
    spoke hole tool 001.JPG
    170.9 KB · Views: 403
  • spoke hole tool 003.JPG
    spoke hole tool 003.JPG
    175.9 KB · Views: 450
  • spoke hole tool 002.JPG
    spoke hole tool 002.JPG
    189.4 KB · Views: 450
  • spoke hole tool 004.JPG
    spoke hole tool 004.JPG
    179.1 KB · Views: 406
Here you go. A piece of steel I found in the bits and pieces tub shaped with a cut off wheel in a dremel tool. the tangs on the back fit between the jaws of the drill chuck so it doesn't free spin. IMHO you don't want to make the cutting edges too aggressive, would put a real damper on your day if you drilled too far into the rim....... I kept the drill bit way out also so the side flute cutting edges were only cutting the outside of the hole not the inner edge where the nipple head seats. Again this is out there, could be unintended consequences. After about 1000 miles I did a round of spoke checking tightening. otherwise the rims I did seem fine (so far).
Do you happen to know what size bit you used? I'm about to try this on a 16" rim with 18" hub. Thanks!
 
Thanks gggGary, Great Post. I just came downstairs to the computer to order a Mikes xs rim for the new "Scrambler" project I`m doing and decided to read the site`s new posts first. The rim is now on hold pending more info. I was going to use the "H" style or lipped rim 19" and lace it to a Bultaco Pursang front hub-brake. I`m using Ceriani forks so the 15mm axle won`t be a problem (I hope). I have never laced a wheel before so all the information I can get will be greatly appreciated. In fact before this project is over I`ll probably be here on the forum begging for help!
 
A long overdue update. I ended up selling the 2.5 x 18 rear and the 21 65 spoke front to member here so had to start over on my own wheels. I used an XS650 rear hub shaved and polished it cleaned up the drum and fitted new shoes. then did a front hub to match. Bought a pair of 3x18 alloy flange rims from Italy, laced them, and shod them with the Michelin PR3 110/70/r18s. I mounted them on the resto mod, ran them this summer, put on about 2K miles and am as happy as a tic on a hound. There was an issue with getting the caliper mounted with that 3" wide 18" rim in the way. Had to install the pads after the caliper was inside the rim. So I got rid of the caliper spacers mikes sends with their performance rotor, and machined a 7mm (ish) thick rotor spacer instead. Now the rotor is further out instead of the caliper being further in. Probably better all around and the caliper goes on and off no problem, close fit but clears rim and spokes. I used a special fender and drilled new mounting holes so the fender better fit the smaller OD tire. I kinda like the; tire's too wide for the fender look. Several guys rode this bike and a stock 79 standard, swapping several times and this was preferred by all on twisty back roads. I feel more confident pushing the bike harder on this set up than the stock.
Turn in was quicker and it seemed to hold a line rock steady. Not twitchy in the least; straights, curves, wind, rough roads etc.. This spring I had the resto on 2.15 19 front 2.5 18 rear rims with Michelin Pilot Activ tires; that rode, handled better than the stockers but I think this is another step in the right direction. Next change will probably be better front brakes, a braced fork, stiffer swing arm. Then more horsies will be needed wanted, etc etc.
 

Attachments

  • DSCN6558.JPG
    DSCN6558.JPG
    237 KB · Views: 432
  • 20160604_160328.jpg
    20160604_160328.jpg
    370.9 KB · Views: 452
  • resto mod front wheel 004.JPG
    resto mod front wheel 004.JPG
    194.5 KB · Views: 431
  • resto mod front wheel 003.JPG
    resto mod front wheel 003.JPG
    193.7 KB · Views: 468
  • resto-mods 001.JPG
    resto-mods 001.JPG
    199.3 KB · Views: 428
  • widewheelz 005.JPG
    widewheelz 005.JPG
    192.6 KB · Views: 412
  • hubz 007.JPG
    hubz 007.JPG
    180.4 KB · Views: 395
Last edited:
I finally went with Mikes XS rims for the front and rear of the scrambler project. All the pros and cons aside I had good luck with the rims and didn`t have to make any adjustments or redrill any holes. Welded seam was barely noticeable. With 16 & 42 gearing I`m probably not going to go fast enough to notice any high speed discrepancy`s anyway? If nothing else the price was right. Under $90 each rim.

rear wheel 001.JPGScrambler Forks 001.JPGrear wheel 002.JPG
 
A few details on the rotor spacer. This was was thin enough that the rotor still centered on the hub flange. Used rotor bolts from a later model Yammie, FZ750 or some such, they have longish full size shoulders.

brake rotors spacer poa 014.JPGbrake rotors spacer poa 013.JPGbrake rotors spacer poa 007.JPGbrake rotors spacer poa 006.JPG
 
Last edited:
Beautiful stuff, Gary! You're way more meticulous about modding the nipple seats than I am, and that's way to the good. That alignment tool shows the mind of a Master of Improvisation at work; where did you do your grad work? Back in the day we'd have called that sort of bike a sleeper--stock looking (if you don't look too close) and chock full of treachery.

Pay attention, children. If you want to go fast, follow the sequence in this thread: suspension first, motor after.
 
Get into the Christmas hooch a little early ole' Grizzly bear? :cool: ;)
That danged gggGary's late fall "easy flip gentleman's express" has a bad case of "scope creep" going on, it's interfering with my XS plans.
So far; replacement front rim, rebuilt brake calipers, new seals, pads, rebuilt forks w/ seals bushings, drivers backrest, wider mirrors, bar risers, LED headlight conversion, steering bearings on order, finger hoovering over the buy it now button on a pair of PR4GT's GPS phone power feeds, thinking about cruise control, then there's a few projects on the RS venture, steering bearings tops THAT list. Arkansas is looming on the horizon, gotta tweek the resto a bit before that. :eek:
 
Back
Top