Well its been fun watching your progress. Brings back some nightmares I had though. Good job.If I recall my screws came out easy on my 72 carbs. Great idea on that wood helper stick thing.

Thanks! This bike is a lot more challenging than my later model 650.
 
Be very patient and don't rush things is all I can tell you. I just tackled a bunch of these butterfly plate screws recently. I was rebuilding the '83 carbs off the $200 Special. The P.O. apparently tried to get the screws out and buggered up both in one carb badly. In the other carb, the screws looked pristine, which allowed me to crack them loose easily. Back to the bad carb, I was able to get one of the buggered screws loose, but there was no hope for the second. The Philips slot was really trashed, pretty much all gone. There was no option really except to drill it out. But, I know from trying it last summer on some junk carbs, that drilling these screws out can easily go awry.

So, I figured I better line up some spare parts. I happen to have 2 spare sets of BS34s so I pulled them out. I couldn't budge any of the screws and the ones in one carb set were kinda rusty. So, I proceeded to clean them up, then applied penetrating oil and heat several times. Still no joy. So, I juiced them all up again and let them sit overnight. The next day, I hit them with oil and heat again a few times and gave them another go. They all cracked loose !! So, like I said, have patience. The thing you don't want to do if at all possible is bugger up the heads to the point that they need to be drilled out. I will also warn you against trying to use a hand impact on them. I've had absolutely no success with that and is the reason I needed to drill some out on those junk carb sets. All the impact did was totally round out and strip the Philips slots.
 
Oh yes, the drilling part, lol. I got very lucky on the '83 carbs. I started with a 1/8" or #30 drill bit to get the head off the screw. This is just slightly larger than the 3mm screw shaft. Drill through just the right amount and the screw head pretty much just falls off. Usually you can stop when you're nearly through and just knock or pry the head off. This does no damage to the butterfly shaft. Next, you switch to a smaller drill, one a little smaller than the 3mm screw shaft. I used a 7/64" (2.8mm). Now the intent here is to drill just enough of the screw shaft away so that you can slide the butterfly plate out. Then you can turn the shaft completely around and work on getting the remains of the screw out. Like I said, I got lucky here. After drilling for just a few seconds, the bit grabbed onto the screw remnant and spun it right out the back of the shaft ! So, I was able to drill this one out with absolutely no damage to the butterfly shaft. I wasn't quite so lucky on some of those junk BS38 carb shafts, lol. Drill bits walked, shaft holes got egged out some, but in the end, the screws came out. The shafts aren't pristine anymore but I think they'll still function OK.
 
I rescued a butterfly shaft this way: drill same or slightly larger than the screw, and head will disappear. Don't go any deeper. No threads in that half of shaft so will not damage any threads if small slipup. Use regular right-hand bit and this may loosen it enough to let you turn the screw on out through the backside with pliers. If not, next get a bit that's quite a bit smaller than screw (to help avoid threads in shaft) and start going down the screw. This will most definitely turn the screw on out through the back. I used a regular handheld drill, but it needs to be a good one with no wobble. The screw is very soft, as you found when you stripped out the head :) So use that to your advantage. Looks like a much worse problem that it really is.
 
Regarding the shaft being true, I don’t have dial indicators or precise measuring tools. Can it be eyeballed? Taken out and rolled on a flat surface to look for a wobble? Hold it against my steel ruler straight edge?
Yes and yes... obviously not as accurate as a runout indicator... but, depending on your eyeball, they'll both work. You can also chuck it up in a drill and look for "wobble."
 
Yes and yes... obviously not as accurate as a runout indicator... but, depending on your eyeball, they'll both work. You can also chuck it up in a drill and look for "wobble."

Hey back in my welding days I did a ton of layout work. I’m pretty good at spotting something that isn’t straight. They didn’t call me old square eyes for nothing!
And I like the drill idea!
 
Should be able to get a first blush idea just turning them in place once the butterflies are out. Then I agree roll on a flat surface, most mirrors are quite flat.
Old carb fixer-upper's hint; once the butterflies are out, take some super fine paper and lightly work the edges of the butterfly slots in the shafts BEFORE you attempt to remove the shafts. I find there is always a bit of burring on those edges that hangs up in the bushings on the way out. No reason to make the bushings worse.
 
Yup - that's how I would do it.

The point is that a dial indicator isn't much use measuring straightness unless you've got a straight surface to run it against (like a surface plate). Sooo...a good quality steel rule is just about as good I'd say.

Pete
 
MORE FUN WITH CARBURETORS!!

Today I took another shot at getting the butterfly screws out. First , using a dremel I ground the back side of the staked screws off as close as I could without damaging the shaft.
07A142DD-1BD6-404A-8E88-6C42912000CD.jpeg


Then I sprayed them with penetrating oil and let them sit. After a while I tried the old soldering iron trick, I like the way you can concentrate heat in a very specific area.
78B7E5A5-38A8-4424-B7F5-1E5A7AFDECF2.jpeg

Then I turned it over and tried to remove the screws. I promptly stripped them both. AARRGGG!
So...plan B
Following Weekend Riders post on drilling out butterfly screws I used a 7/64” bit to remove the heads.
60BBA98D-40FC-49EF-8D1C-BD88A50AFC7A.jpeg


18438D4C-66C5-43AE-B0AD-6CDEF6EC8E73.jpeg


That was nerve racking but it worked like a charm and they came off cleanly. Then I used a 1/16” titanium bit to drill through the center of the bolts. Why titanium? I had a two pack laying around. Hey you know what’s fun? When your titanium drill bit breaks off in the hole!
A2D4E7F2-E19D-45CB-8CA8-81D59BDD3401.jpeg


Fortunately it wasn’t too hard to get out and I DID have a two pack, so you know....
I was able to get nice clean holes drilled through both holes, but they are still in there. I’ve got them soaking in penetrating oil right now.

FBCA1B05-C8D7-4426-8905-716C7C5E6E5E.jpeg


So what’s the best way to now remove those hollow bolts hmmm?

Then I moved on to breaking down my other carburetor. More of the same funk clogging up the bowls, but it was interesting to me that this carburetor didn’t seem like it had the bowl removed by the guy before me when he was trying to get the bike running. And I found some discrepancies between carburetors.

Like the float needles for one. This one had a Viton tipped needle with the wire clip, the other had a steel needle.

E5F42C2A-261B-4713-90ED-E75B8E32FDEF.jpeg

The sizes were different also. The left was a 2.5 float valve and the right was a 2.0.
The carb that had not been taken apart had a Mikuni needle jet, while the other had what looked like an aftermarket with no external markings. The sizes were the same.
One needle jet had an o ring the other did not. One had a pretty nice rubber bowl gasket, the other had a hard dried out and broken fiber gasket.
D4716B38-35EF-40E3-A118-A90B688D5BF8.jpeg


The choke assembly had no gasket at all, the other carb had a wrong gasket for a later model carb.
527765F9-5697-466E-98C6-7643279DEECA.jpeg

One final question. This is new to me, anyone know how this metal cap is supposed to be removed from the butterfly shaft seal?
C06A77C5-6A7C-42D9-AEC8-B4106D54E3D4.jpeg


That’s all for now. I might not get back this for a while. I’ve got a bunch of honey do’s and family stuff goin on for a while. I’ll sneak back out to my cave as soon as I can.
Until next time
Bob
9C9C431C-F384-4585-AB06-630D08D16E4F.jpeg
 

Attachments

  • DE39682A-F7DF-4543-A40C-35A082164B31.jpeg
    DE39682A-F7DF-4543-A40C-35A082164B31.jpeg
    63.6 KB · Views: 216
You might try starting a very small tap in the holes you've drilled through the screws (from the screw head side) and maybe when it "bites" into the screw, it will turn it out?

I don't think there is a gasket on the right carb choke plate. There's no choke on that carb and the plate is just a cover. The viton tipped needle and seat are incorrect and from some other carb. I certainly would like to find a viton tipped float needle that would swap into these BS38s. They seal much better than the steel ones.
 
Before those screws will go out the backside, using a tap or something else.....those drilled off screw heads look like they still have too much meat (rivet) on them. Maybe use a slightly larger bit to cut a countersink and remove the rest of that head plus a little more.

Scott
 
Regarding the shaft being true, I don’t have dial indicators or precise measuring tools. Can it be eyeballed? Taken out and rolled on a flat surface to look for a wobble? Hold it against my steel ruler straight edge?

You're close. I couldn't detect a 0.005" runout on a flat plate.

http://www.xs650.com/threads/on-the-road-again-at-40-the-bike-that-is.49360/page-4#post-511270

There's three chapters in the shaft straightening book.
1. Is it bent?
2. Where is it bent?
3. How do I straighten it?

1. Lathe with DTI is the best way for this. All three can be done there.
Suitable field checks can be done with:
A long precision hole. (Our 8mm valve guide is good)
Two flat plates. Roll it between the plates.
If straight, it'll roll like a new roller bearing.
If not, you should be able to feel it.

2. Paint the thing with machinist's marking fluid, or a Sharpie.
Work it in the valve guide, or the roller thing, check the marks.

3. You'll find that the solid shaft portions of the throttle shaft will still be straight. It's at the ends of the slit where most of the bending exists. Dealing with brass here, so go gently, avoiding bending the middle area where the plate fits. Could slide the plate back in there, to protect and reinforce that middle section, concentrating any rebending forces to the slit ends...
 
Last edited:
Not sure this would help at the stage that your at, and this does require a bit of finesse, but welding on to the screw has the added benefit of adding heat to the joint which breaks the rust bond.

For straightening the shaft, I found that making a wooden saddle to mimic the position where the brass bushings are and pushing gently in the opposite direction of the bend worked for me... I didn’t rely to much on a dial gauge/lathe chuck to know that I was close, I just kept test fitting to the carb until it turned freely...


F6CAC7C9-AA5D-43B4-8D8F-226199F94AF2.jpeg
 
2M, thanks as always for your thoughtful analysis and suggestions. As soon as I get things free I’ll give everything a good look and see what’s doin. I sure hope that all my efforts to loosen the butterfly screws didn’t cause the shaft to bend any. It was always supported with my carb stick and I never hit it. Just pushed hard to to try and seat the screwdriver.
I like the idea of the torx head extractor, I might give that a go! Also thanks for the idea with the vice grips. This set of carburetors has so many differences from my ‘77.
I’m anxious to get back out in the garage and get things going, but this is a holiday weekend and I’ve got family dinner with the in laws.
965A11EC-65F0-42C3-835F-8D9806F2FDB2.gif


Next week Dr appts. And yada yada yada, I just want to go back out in my cave and obsess over something mechanical!
 
So I had the opportunity to sneak out to the garage for a few hours and see if I could make some progress on breaking down my carburetors.

This morning I ran to Harbor Freight and picked up a few things, a set of Torx head bits, ( I could not find any bolt extractors nearly small enough ) a hole punch set so I can make my own gaskets and something I’ve wanted for a long time, an ultrasonic parts cleaner. They had 25% off today.....woo hoo! So I’m going to try the Pine-Sol ultrasonic treatment, and I’m gonna crank that baby up! I also intend on spraying out all the passageways Berryman B-12 Chemtool. I want these baby’s to shine!

Back to my carburetors......I got my new Torx bits out and grabbed the smallest tip, and Crap! Still too big to fit inside my drilled my drilled out butterfly screws. I tried a few other things to try and back those screws out but no luck. So....I got my drill out and went one size larger than my drilled out hole and drilled it again. This time I had complete success! The drill bit caught and spun those screws right out and didn’t leave a mark on the threads!
B4EBB006-03DE-46BA-AE7D-14D238BA704A.jpeg


Then I broke out my other carburetor that has been soaking in penetrating oil for the last 24 hours, and.... long story short, I stripped the heads out of those too. They wouldn’t budge. “ That’s OK “ I said , brimming with new found confidence, “I’ll drill those puppies right out!”
Well, I did....but not without some damage this time. When the drill bit caught the screw and spun it, it kinda flattened, smoothed the threads on both holes. I can still screw a new screw into it but I don’t have a lot of confidence in the integrity of the threads.

So what is the solution here? Should I just locktite it and hope for the best? Is this butterfly shaft from my XS2 BS38 interchangeable with later models? Or , I probably have room to put a thin nut on the backside that could also be locktited, would you trust that? I would LOVE. some input on these questions. Thanks in advance!
3B7E122E-6784-41EA-8808-CC94685B3B12.jpeg
F90949E9-CEF4-4173-8529-A2D71C073432.jpeg


Now on to another issue that I swear I would not have even thought of.
Is my butterfly shaft true? I’ll be darned if 2M didn’t call it. The first shaft was binding slightly in operation before I pulled it out. After removing it, I rolled it across a flat surface, and to my eye I couldn’t really tell anything. Then I held it against a steel ruler and I could see the smallest of gaps in places. But here was the real show, I chucked it in my drill ( Jim’s idea ) and when I turned it on you could see the end bobbing up and down. I held my ruler next to the end and it was moving up and down approximately 1mm.
88A20027-DE9F-4B47-BE1F-51CF07655BAC.jpeg


I was remembering what 2M said that the solid parts of the shaft would most likely be straight, with the bends near the butterfly slot. So I left the butterfly screwed into the slot for support and placed the whole assembly on top of a couple blocks of wood, and just using pressure from my hand I pressed down to straighten the shaft. It didn’t take much, just a couple of tries , double checking by putting it back in the drill and in no time the shaft was dead straight.
06265B62-8D3A-48F7-BCC1-198A8D25E0E6.jpeg


I put the whole assembly back in the carburetor and checked the action and the hang up was gone. It works smooth and seals cleanly against the throttle bore. Success! The other shaft had no such wiggle, but that is the one I messed up! :banghead: Go figure!

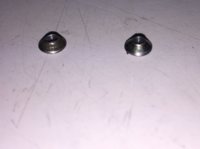
Two other items, I went to remove the butterfly shaft seals and one looks like a regular old shaft seal , but the one that was under that metal cap....is that seal different? Does that seal have a metal band around it? I didn’t want to start prying on it until I was sure.
65E088FD-906E-4B57-9AA6-A4C0729DBCBD.jpeg


And lastly, I was curious about these plastic elbows, I can’t seem to find any replacements for them. What do people do with broken ones. They look brittle, and also some of the brass nipples have come loose from the carb bodies. Any tricks on re installing them?
AFF07B0D-7B50-4D4E-ACCB-1483864A5910.jpeg


I’ve asked a lot of questions so I’m going to sum up here.
1. How can I resolve the issue with the weak threads on my butterfly shafts?
2. What’s the deal with the seal under the metal caps, is it different from a regular shaft seal.
3. Are those plastic elbows replaceable? Removable?
4. What’s the best way to cement the brass nipples back into the carb body?

I’m gonna try digging up some answers in the archives, but any help appreciated.
Thanks guys!
Bob
 
Back
Top