THE CURIOUS CASE OF THE EARLY CLUTCH

5166975C-5321-4D79-A73E-7092C69B4F4B.jpeg

Today I pulled my clutch apart for inspection. I have already purchased a complete newer / improved clutch assembly from forum member Daniel Black, which I intend to install. However, this older style clutch interests me and I had considered running it for a while, but I think it would be problematic due to some obsolete rubber o rings used in the assembly. There are other unique properties that I thought some of you gear heads might find interesting. So here we go!
Here is what I’m starting with, six friction plates instead of the more modern seven, and take note of the color of the two friction plates in the center. 5Twins picked up on that right away, he said that the two center plates have aluminum centers and he was quite correct.
C8025B62-D435-4B79-B89B-B181FE7CF4E5.jpeg

What really surprised me though was that the other four friction plates seem to be made up entirely of fiber. ( If I’m wrong please correct me ) but I could not see any metal in them and a magnet won’t stick to them.
79B0F8C8-E2BC-4215-8860-FA49AB24A0B5.jpeg


Another difference is the absence of alignment marks on the pressure plate.
FE17D37C-F0EC-4403-9730-D8424B789EFB.jpeg


Speaking of pressure plates, one of the reasons that I purchased a newer clutch assembly is that on this one, the only solid connection between the hub and the pressure plate is the six bolts. On the newer pressure plates they have splines on the outer edge that tie into the hub to make it much stronger. ( that info from 5Twins )
1A935B68-B2CA-4C69-9377-372660D7C6EE.jpeg


And then there are the o rings. One of the primary reasons I switched to a newer unit. Here you can see how they are positioned on the hub.
253F88DB-FE16-4726-9BFF-34B968A4EDE5.jpeg
448D4C93-7DE5-43C2-A62F-F5414676A522.jpeg


They are not really an o ring at all, they are shaped like a channel, and these are still very pliable and look to be in original shape.
61AE8FB5-9356-4F45-9ABA-8AD6F46232C4.jpeg
51688412-45CA-481C-B92D-F11382AEAC4E.jpeg

02D73D49-913C-4702-9C4B-E59471BF333E.jpeg


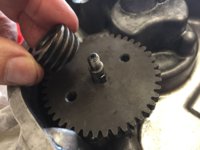
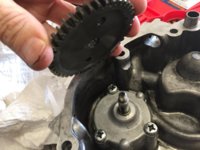
I also pulled my starter gear for inspection. The gear looked to be really not all that bad, some wear on the teeth, all the rubber is in perfect condition. I checked the slip resistance of the wishbone spring with a fishing scale and it slipped at ONLY TWO POUNDS !!
40D8DC9E-5AF1-491A-A820-7E23238AD51A.jpeg
0E1BD537-3209-46AE-991E-4C6D9301969D.jpeg


I intend to replace the gear assembly and squeeze the new spring down to increase the slip resistance.

So until we meet again,and the case is sol-ved!
9C749F4F-359D-4FCF-B62E-4F5F65C6FCF5.png
Later, Bob
 
Interesting.....

I don’t think I’ve ever run across anything like those “o-ring” creatures in a wet clutch before. Also, the starter gear hairpin looks to me to be wound of fairly thin wire and it sure looks like it has been squeezed already. Certainly, the 2 lb figure doesn’t sound promising.

One things is for sure, all of the parts look to be in excellent condition.

Will you use a one-piece or 2-piece clutch pushrod Bob?

The hairpin spring IS noticeably thinner than the replacement springs. As for the clutch push rod, one good thing about the early bikes is they came with a one piece long rod.
 
This is interesting Bob, thanks for posting it. I didn't know of those 'cushion rings' I now see their called. I suppose yours have been covered with oil in there and hence still soft and supple. It will be interesting to see what shape mine on my TX are in. Was going to pull apart my clutch but it broke free, wish I could say the same for the engine.

I will skip the obvious comment and say I was pleased to find a long rod in the TX when I was doing a little cleaning.
 
Yes, the long one piece pushrod was stock up through 1975. Many of us prefer it and change to it on later models. The biggest benefit is less seal and bushing wear because it doesn't wiggle side to side as much.

Bob, you will have to check the size of the groove on the #4 gear for the hairpin drag clip. It may be smaller and the later, heavier wire clip may not fit in it. The upgraded parts were meant to be replaced as a set which tells me they may not mix and match .....

RriZnP9.jpg

Yes, thanks 5T. I had thought about just trying to find a replacement spring, but I think I want a fresh gear also, with perfect teeth.
 
This is interesting Bob, thanks for posting it. I didn't know of those 'cushion rings' I now see their called. I suppose yours have been covered with oil in there and hence still soft and supple. It will be interesting to see what shape mine on my TX are in. Was going to pull apart my clutch but it broke free, wish I could say the same for the engine.

I will skip the obvious comment and say I was pleased to find a long rod in the TX when I was doing a little cleaning.

I too will be interested to see the condition of your clutch assembly. Among other things! ;)
 
Bob, measure the width of the clutch damper o-rings. Original friction plates are 3.5mm, the o-rings should be slightly thicker.

Also note that the 256 pressure plate and hub don't have the oiling holes present in the 447 clutch...

Good point about the oil passageways, I had forgotten that. I’ll measure those o rings next time I’m working in the garage.
 
I noticed in your photo of your clutch Bob that the hairpin is in the "old" position (see 5Twin's service posting above). That suggests to me that nobody has ever been in there - although that hairpin sure looks as if it has been squeezed.
 
That old position is correct for the old skinny wire clip, re-squeezed or not. So, it could have been squeezed, but with the apparent low miles on this bike, I doubt it has been.

Yeah , I really have the impression that I’m the first one in there since it left the factory.

Mailman, just remember if you need any clutch parts I still have that much of the 1972, not sure of the condition but know it's out in the barn.

Thanks Ken, :thumbsup: I’ve got you on speed dial buddy!
 
Just a little update,
I have been working a little here and there, chipping away at things. I spent two days ( I’m not kidding ) trying to remove all the gasket material from my clutch side case and clutch side cover. Gasket adhesive had been applied to BOTH sides of the gasket and the gasket was rock hard. I had to keep applying paint stripper and remove a little more. It was slow going.

I also got my new starter gear assembly ordered , as well as a set of Allen head clutch screws from Mikes, and new clutch springs from EBay.
They are in transit right now.

Today I spent time on my clutch cover, I pulled the tach drive assembly out, so I can replace the seal and the o ring.

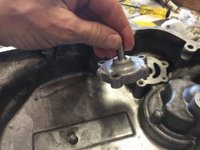
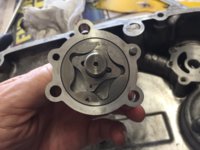
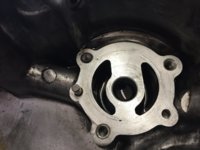
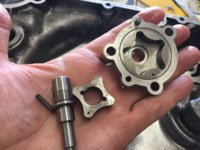
I also cracked open my oil pump, something I never thought I would do again after the disastrous results I had when I opened up the oil pump on my ‘77. I wanted to be able to inspect the condition of the oil pump and to give all the oil passageways a good flushing out.
4EDE69AB-1366-4EC0-A79D-7AA9F0C96650.jpeg 97816DB2-F87D-464A-8F3C-F0B15BB94B0D.jpeg ACE0B202-E281-449A-89BA-1A20108DB896.jpeg 0D3A75BA-1750-4F3B-B22B-5ABE60AA0BB3.jpeg BAB85464-0388-47AC-8302-C23B4F536DEA.jpeg 5BC627B1-D782-47E9-AE9F-7C6A011A9C21.jpeg
Spending my days cleaning cleaning cleaning. One of these days I’m going to run out of things to clean and polish and I’ll actually have to start putting things back together! Yikes! :yikes:
 
Bob, nice pics. Snagged copies for my files. There've been questions in the past about proper reassembly of the oil pump gearing. Your pics show the correct "recess side down" for the large gear, and "recess side up" for the tach drive worm. The 4th pic also shows the correct rotor assembly, both indicator marks go towards the sidecover base surface...
 
Last edited:
Bob, nice pics. Snagged copies for my files. There've been questions in the past about proper reassembly of the oil pump gearing. Your pics show the correct "recess side down" for the large gear, and "recess side up" for the tach drive worm...

Thanks 2M!
Here’s one more.
9628AE03-1E45-484F-98F5-9CF368B72D53.jpeg


Did some polishing on my oil pump parts today. 1500 grit wet sandpaper
1D64E487-FC22-4B63-AE8C-A568CD343882.jpeg


And stripped the clear coat from the cover.
9BB654BC-B912-4172-A9E5-BDCF659ECA7E.jpeg
 
I have still been busy chipping away , working on the right side engine cover. After stripping all the clear coat off, I realized that there was no clear coat left on the bottom half of the case and the dark stain that was visible on it was not just oil stains , it was oxidation of the aluminum itself. I tried a couple of the least aggressive approaches to cleaning this off , and was getting nowhere. Then I went to 400 grit wet sand paper and didn’t do much better.
Finally I broke out the Dremel and small sanding disks and just started buzzing it off. As soon as I got down to clean aluminum then I started with the wet sand paper. I have not polished it yet, just cleaned it up. This was a rough ugly mess when I started, but now it’s ready for the buffing stage.
58B5B455-9003-4FFD-A7B6-2F2A6556CCD3.jpeg
683CF040-5C70-4E99-BBCF-D4BF72D80F2C.jpeg


Then I reassembled my oil pump. Thankfully, no drama there this time!
08162091-4142-4C86-9D89-8E5E0644C54C.jpeg


I installed a new oil seal for the kick start shaft. This turned out to be one of the easiest seal replacements on the bike. I just pried out the old one and cleaned the opening up, then I oiled the opening and the outside edge of the seal and just pressed it in with my thumbs. Easy Peasy!
6AC728FA-9A2A-4C01-A907-045775078B6B.jpeg


I then installed a fresh oil filter and gaskets in the cover along with new copper washers.
Then I moved on to cleaning up the tach drive assembly and replacing the seal and o- ring.
First I pried out the old seal and removed the old o-ring.
66AE18A5-E2E3-4DF7-82CA-3AE2860B1A87.jpeg
850F57EB-C4A2-4999-989C-A7DAE3EAC5B3.jpeg


Here you can see the original parts on the left and the new parts on the right. You can see how worn out the original seal was.
21719836-C58B-4912-B6F8-43A453D5E5B7.jpeg


I used a 9mm socket to push the new seal into place, it’s small and I oiled it up and it is easy to push into place.
A526EE18-075D-478D-BBE6-04F61D4F0D8E.jpeg


Seal is in, the tach drive shaft has been cleaned and polished and I put the assembly together.
C7F38E8F-1BDD-4923-8B22-89782D462482.jpeg


Then installed it in the side cover.
336DA23E-35A8-4423-8960-7AE63DFA415D.jpeg


Make sure the little washer is in place at the bottom of the shaft.
27BC90B9-E94A-4B86-9870-2A37A69F4227.jpeg


Placed a new copper washer on the retaining bolt and fastened everything together.
40990A80-817F-4E83-BC33-F4A1B8052613.jpeg
B76E7CB7-3285-40C1-A135-E36ED03EAC43.jpeg


You don’t think about it, but there is a lot going on inside right side engine cover. I have now replaced almost all of my engine seals. All I have left is the starter to case seal and the cam seals.

B35983F6-5AC8-47F9-8C98-A373790F452A.png
Parts have been rolling in........new starter gear assembly, new clutch springs, new clutch pressure plate Allen head screws, so with any luck I have reached the tipping point and I am moving from the big dis assembly phase, to finally putting this puzzle back together. I sure hope I can find all the parts! Haha,
Stay tuned!
C6A3036D-E1A6-4C40-AF59-FBB6FDDC022E.gif
 
Last edited:
Back
Top