'm pretty sure the clear coat changed about 75-76 from an old easy to dissolve lacquer?
I think you're right. I'm also thinking they changed the formula for the materiel to plug the oil passageways. The stuff on my resto (80) is still rock solid.
 
Last edited:
I found the early D.I.D. TX750 flanged alloy wheels ('73-'74) I got weren't even clear coated.
 
As far as I'm concerned, that's what this place is all about, learning the fine, obscure details about the various models. Your '77 thread covers the middle models pretty good but as you've discovered, there's differences on your '72. Jim's '80G thread covers the later models pretty well, but there's always more we can discover and learn.

Eventually, maybe we'll get threads like this on the very early models (XS1's) and the last late models ('82-'83) with all the added safety B.S. I think it would be very beneficial for someone to spell out how to easily remove that happy horse shit, lol. Oh wait, I might be just the guy for that, lol. An in-depth thread on the early mid-line bikes ('74-'75) with the separate carbs and 34mm forks would be nice too.

A couple more early bikes waiting in the wings, Robins TX and Jim’s XS1 speed twin tribute build, and 5 Twins, I would LOVE to see a well documented build thread from you! And now that I think about it, I think Gary has been mulling over building an early bike. Lots of possibilities!
 
Just a little update,
Today I broke out the JB Weld and sealed up those oil passageways. First I ground them flush with a Dremel, cleaned the surfaces up with paint thinner, and sealed them up.
CD8D24C0-B4BB-43F5-8737-2D3716D22BA9.jpeg
AD18C045-1A82-4561-9F4E-B4DE4881A790.jpeg


Then , just to keep some progress flowing, I got my rotor and stator out. They had not been touched since removing them from the engine. I cleaned the slip ring on the rotor and checked it with the multi meter, everything was in spec.
The stator looks like new. I pulled all of the wires out of the multi plug and cleaned them with a wire wheel Dremel, and then ran all the recommended continuity and resistance tests. Everything checked out beautifully, so that has been bagged and put away for reassembly.
89E14910-03F8-4DD4-893F-9F300BD8F65C.jpeg


Chip chip chippin away
 
Bob, something to check on your epoxy seal job. The clutch worm's sealcup comes close to that bulge on the case. Some folks that didn't fully seat their clutch worm experienced contact with that bulge.
WormTooHigh02.jpg


You can check the clearance by putting the worm on the end of the pushrod.
WormN02b.jpg


Recommend having at least 3mm clearance there...
 
( Edit: months after getting this bike on the road the clear coat yellowed. I don’t recommend it.)

I found the paint I’m going to use on my engine case. Duplicolor ceramic engine paint,
It can withstand high temps and resists oil and gas. I did a test sample spray on a broken fork leg I have. I think it came out great, 3 coats of color, followed by 3 coats of clear. All have to be applied within 1 hour. It has a smooth as glass appearance with nice gloss. I’m pretty happy. I’m prepping my case for paint right now. I am right at the upper limit for temperature to apply this. I’ll have to do it early in the day.
D943D47C-4B46-4341-A1DE-3365A7183E15.jpeg
205C9D90-8DC3-4EA3-849F-42955EEBDE8E.jpeg
93F26BB6-FAD3-44E6-96E7-98E9EA7C9AF9.jpeg
 
Last edited:
Bob,
I seem to recall that you used to paint for a living, so you prolly already know this..... but if you wipe those cases with lacquer thinner or acetone immediately prior to painting, you'll get your best adhesion.
 
I found the paint I’m going to use on my engine case. Duplicolor ceramic engine paint,
It can withstand high temps and resists oil and gas. I did a test sample spray on a broken fork leg I have. I think it came out great, 3 coats of color, followed by 3 coats of clear. All have to be applied within 1 hour. It has a smooth as glass appearance with nice gloss. I’m pretty happy. I’m prepping my case for paint right now. I am right at the upper limit for temperature to apply this. I’ll have to do it early in the day.
View attachment 123685 View attachment 123686 View attachment 123687
Looks great, Bob !
 
PAINTING THE ENGINE CASE

Edit: 2/7/21. The clear coat that was used, turned yellow and was later re sprayed with the silver only.

So as I mentioned the paint on the engine cases was in pretty sad shape. Yellowed in spots, oxidized in other spots, scratched and stained. My first thought was to spray it with my go to paint, Rustoleum Professional rattle cans. I like that product because it sprays a nice fan shaped spray and goes on nice and heavy , it levels nicely and has good gloss and durability. However Yamadude mentioned this,

I doubt that the Rustoleum will be gasoline-resistant, Bob, unless you get the engine enamel. I think you would be better off with a can of automotive DupliColor gloss silver/aluminum.

Well that caused me to dive into doing some product research, I contacted Rustoleum directly and asked them about my intended use. They responded quickly ( much to their credit) and replied that their product was good up to 200 degrees and could withstand oil and gas , as long as it it was wiped up quickly.
I thought I could do better, so I started reading up. After considering all the high temp engine paints on the market, I came right back to Jeff’s recommendation.

Jim had really good results with Por15 and he suggested a low cost spray gun from Harbor Freight , and I do believe that Por15 is a superior product. But I would not only have to buy a spray gun, but all of the supporting equipment, and then find room for it in my garage. So I kept my focus on spray cans.

My prep was this,
1. Degrease
2. Clean all the nooks and crannies with a Dremel and assorted wire brushes
3. Wipe down with paint thinner
4. 180 grit sandpaper to remove any big scratches or roughness
5. 400 grit sandpaper, followed by 800 grit sandpaper
6. Wipe down again with clear water and cover for the night
7. Next morning right before shooting , wipe down with paint thinner
ED84FFE6-DE93-4CD7-9B55-3D48BFC038B6.jpeg
B8AF6FAB-654D-477B-B995-3D2ABC1E2B07.jpeg
3C9808C1-CB79-4F0E-8620-37CD8FA54F9F.jpeg


After three coats of aluminum spray it looked like this.
6837916E-B855-4AC5-8576-284FBF314940.jpeg


And after two coats of clear, the final results. It was supposed to be three coats, but I was a little heavy handed and it ALMOST got away from me and ran. So I stopped at two.
3EDDF221-B031-4130-A98D-FCCBADCEDDC6.jpeg
85E979CC-51C9-4DF8-BC3E-0590462137FF.jpeg
42201895-BDAE-4F1B-86CB-5B52172A58EA.jpeg
4DDE020A-BD45-40C9-9F4A-97A3DF757B12.jpeg


An observation about using this product. There is a great disparity in characteristics between the silver color coat and the clear. The silver drys in a flash, literally by the time you’ve gone all the way around, the beginning point is dry and you can launch right into the next coat. The clear coat (which I think is key to having a durable paint job) is an entirely different animal. It has a syrup like consistency that drys much slower. I’m sure that’s what gives it , it’s great self leveling characteristics and gloss. But it also makes it easier to run if you’re not careful. Overall, I’m very happy with the results. My one critique would be , I wish the spray tip gave a more fan shape pattern instead of just a circular shape direct spray. I hope the clear coat doesn’t yellow, that’s always a fear of mine with clear coats.

One more thing, a quality paint like Por 15 that has a catalyst in it would be able to be handled in something like 24 hours. Whereas I have no intentions of touching the cases for at least a week to give the paint a chance to harden up. Our humidity is low and my garage is an oven so it should cure nicely. So in the meantime, I’ll work on other things!
 
Last edited:
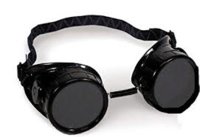
Unbelievable Bob! That is incredible! Shades? You'd better wear a pair of these!

View attachment 123761

I sure hope you're building more shelves to make room for all the trophies!

Trophy’s? After stripping this bike down to piles of nuts and bolts, I’ll be happy if the Darn thing runs and can be ridden down the street! :cool:
 
The clear coat (which I think is key to having a durable paint job) is an entirely different animal. It has a syrup like consistency that drys much slower
Well, Hey Now !!
upload_2018-8-7_16-55-56.jpeg

Looks to me like a museum-quality finish !
...and your experience with the clear coat is helpful for the future, Bob.
 
Well, Hey Now !!
View attachment 123764
Looks to me like a museum-quality finish !
...and your experience with the clear coat is helpful for the future, Bob.

Thanks Jeff, and I appreciate your tip early on!

Very nice Bob!!
Fwiw, I've always had real good results with Dupli-Color as far as going the distance. I seems to hold up well.

Thanks Jim, this is my first time using a Duplicolor product, it seems like good quality.
 
Back
Top