Thanks Scott! It’s getting there!Looking damn good Bob!!!!!! Strangest disc brake and wheel design I've ever seen, but it was an early one.
Scott
-
Enjoy XS650.com? Consider making a donation to help support the site.
XS650.com receives a small share of sales from some links on this page, but direct donations have a much greater impact on keeping this site going.
You are using an out of date browser. It may not display this or other websites correctly.
You should upgrade or use an alternative browser.
You should upgrade or use an alternative browser.
Mailman’s XS2 a full on restoration
- Thread starter Mailman
- Start date
Agree with Scott. Very Strange ! I had no idea of all tthe differences.
You've mastered another one
-RT
You've mastered another one
-RT
Agree with Scott. Very Strange ! I had no idea of all tthe differences.
You've mastered another one
-RT
Thanks Randy! Yeah a lot of unique parts on the early bikes!
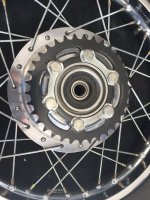
With the speedometer drive installed, now the front wheel can be lifted and the front axle slid through the left fork, speedo drive, front wheel, the disc carrier, and the right fork. PHEW!! That’s a lot of stuff to support and align while trying to wiggle the axle through!
Now that the axle has been slid through all of that , I give it a few taps to make sure it’s seated fully and install the final nut (FINALLY) the castle nut that holds the axle in place and insert a new cotter key.
View attachment 133168 View attachment 133169
( I know you don’t see a cotter key, I did it later)
Let’s talk for a moment here about how I very narrowly averted disaster at this point.
View attachment 133171 What is it with me knocking bikes over? Huh?
Here I’ve got my bike up in the air, on my bike jack, and I have two tie down straps holding it on, one on each side at opposite corners. I was tightening that great big nut that holds the brake disc to the fork leg, when suddenly my bike scoots sideways on my bike jack, the tie down strap went slack and it came within a fraction of an inch of falling off the side of the jack and falling to the floor! I quickly got another tie down strap on the other side and managed to scoot my bike back to the center AND THEN fastened the bike with tie down straps on EACH corner.
I just about crapped my pants!
View attachment 133172 View attachment 133173 View attachment 133174
Anyways.......
Then I broke out my new brake caliper and installed it. It was pretty straight foward with no surprises.
View attachment 133175 View attachment 133176
This calls for a SPECIAL SHOUT OUT !! To Geedubya, my brother from another mother!
Eight months ago he sent me a new brake caliper decal to be part of my bike. All the way from Queensland Australia , a distance of nearly 8,000 miles! And I just wanted to say thanks GW ( Gary ). You rock!
View attachment 133177 View attachment 133178
A little bit from The Land Down Under on my bike!
View attachment 133179
That pretty much concludes today’s mis adventures. A few parting shots.....
View attachment 133180 View attachment 133181 View attachment 133182 View attachment 133183
Later,
Bob

G'day Bob,
Greetings from the Antipodes.
As I said previously I got three of these in a box of XS650 spares I bought and noticed you needed one.
Somebody from XS650.com once sent me a seat lock, no charge, no freight cost so, it was my turn to do the same.
Looks like you have a red theme going on there

The little RS100 I'm working on has a similar setup for the rear as the XS2 front. The sprocket carrier is mounted to the swing arm in the same manner as the disc on the XS2. Then you lift the wheel up to it and slid it into the rubber cushions.
Things are looking good. Now you can take it off the lift and lock the center stand in place.
‘‘Twas I. I think because the caliper is double acting, any difference between the two pistons friction will load up on one side of the disc before the pressure bring into contact the other piston, to the detriment of the bearings.Crazy disc set-up for sure. Yamaha's first attempt, lol. Didn't someone mention wearing out 3 sets of bearings in their '72 disc? No wonder Yamaha only used that set-up for one year.
As my bike was new in 73, and I knew F all in those days, I only realised why it did this a few years ago.
My XS had another quirk as I recall, when riding along on a steady throttle sometimes the power would drop off a cliff, and then imidiately come back. Never figured that one out to this day.
So looking forward to the final reveal on this one though.
Strangest disc brake and wheel design I've ever seen, but it was an early one.
Scott
Many times the early versions of anything seem to be way more complicated than the mature versions. I would love to hear the reasoning the person or persons who designed that set-up would have for that design! I'm sure they had what seemed like at the time good reasons for every little part!
Mailman
Looking very good. It will be interesting when you get the old girl running if you notice any difference in the front brakes between your bikes.
Looking very good. It will be interesting when you get the old girl running if you notice any difference in the front brakes between your bikes.
Out-freaking-standing, MM!!! It's starting to look like a motorcycle again! (well, half a one  )
)
And geedubya's generosity is a testament to the community here! I'm proud and privileged to be here!
It's starting to look like a motorcycle again! (well, half a one )And geedubya's generosity is a testament to the community here! I'm proud and privileged to be here!
REAR WHEEL DAY. NEW SPROCKET INSTALLATION AND REAR BRAKE ASSEMBLY.
Today’s musings..........
Today I busted out my new rear sprocket and brake shoes and my bags of cleaned hardware to tackle the rear wheel.
First up, the new 34 tooth sprocket. All bolts going into that aluminum rear hub got generously coated with anti seize.


Locking tabs bent up and the sprocket is done.

Now on to the rear brake assembly. Everything I will be doing here I learned from 5Twins when I rebuilt my ‘77.
Thank You 5Twins for helping me so much over the years.

The first thing I did was to coat the felt ring and springs with oil to prevent rust. I pretty much soaked the felt ring, but wiped any excess off of the springs.


It’s funny, on my ‘77 I didn’t even realize there was a felt ring in there. It was so black and hard. Just gently pry it out with a small screwdriver and clean it in kerosene first.

Then I lightly greased the insides of the axle and brake arm shaft passageways in the hub, and all the pivot and friction points. Don’t overdo it. You don’t want to grease your brakes!


Next up, the brake shoes. This has to be one of the best tricks I learned on this forum. Hook up the springs in the shoes, like this....

Then putting the heels of your hands on each brake shoe, just push down like you’re opening up a trap and they just snap into place. ( Note I cant have both hands on and take photos at the same time! )

Next I’m going to put my special stay arm bolt in, just so I don’t misplace it.

Wipe off any excess grease that squeezed out during assembly and the rear wheel is ready for installing in the bike.


I’m getting VERY CLOSE to having a rolling chassis!
Today’s musings..........
Today I busted out my new rear sprocket and brake shoes and my bags of cleaned hardware to tackle the rear wheel.
First up, the new 34 tooth sprocket. All bolts going into that aluminum rear hub got generously coated with anti seize.
Locking tabs bent up and the sprocket is done.
Now on to the rear brake assembly. Everything I will be doing here I learned from 5Twins when I rebuilt my ‘77.
Thank You 5Twins for helping me so much over the years.
The first thing I did was to coat the felt ring and springs with oil to prevent rust. I pretty much soaked the felt ring, but wiped any excess off of the springs.
It’s funny, on my ‘77 I didn’t even realize there was a felt ring in there. It was so black and hard. Just gently pry it out with a small screwdriver and clean it in kerosene first.
Then I lightly greased the insides of the axle and brake arm shaft passageways in the hub, and all the pivot and friction points. Don’t overdo it. You don’t want to grease your brakes!
Next up, the brake shoes. This has to be one of the best tricks I learned on this forum. Hook up the springs in the shoes, like this....
Then putting the heels of your hands on each brake shoe, just push down like you’re opening up a trap and they just snap into place. ( Note I cant have both hands on and take photos at the same time! )
Next I’m going to put my special stay arm bolt in, just so I don’t misplace it.
Wipe off any excess grease that squeezed out during assembly and the rear wheel is ready for installing in the bike.
I’m getting VERY CLOSE to having a rolling chassis!
Where is your torque wrench?
Very nicely done. I see you got the good grease too. That's the stuff 3M recommends for brake parts. Not easy to find in a tub but HF has grease gun tubes of it. The only thing I do differently is grease that felt ring too, instead of oiling it. I just knead and work grease into it until it's kinda saturated with the stuff. That's your seal against water and dirt ingress into the brake shoe pivot shaft.
Last edited:
Where is your torque wrench?
Bottom drawer....
I wondered if anyone would comment on that.

Very nicely done. I see you got the good grease too. That's the stuff 3M recommends for brake parts. Not easy to find in a tub but HF has grease gun tubes of it. The only thing I do differently is grease that felt ring too, instead of oiling it. I just knead and work grease into it until it's kinda saturated with the stuff. That's your seal against water and dirt ingress to the brake shoe pivot shaft.
Thanks 5T! I learned from the master!
Good golly! Did the sun go behind a cloud and the temp drop below 80 while you were working on it. You started out with short sleeves and ended up in a sweat shirt.
Looking good. Jealous of your bike and weather.
Looking good. Jealous of your bike and weather.
Good golly! Did the sun go behind a cloud and the temp drop below 80 while you were working on it. You started out with short sleeves and ended up in a sweat shirt.
Looking good. Jealous of your bike and weather.
Haha! Yeah crazy weather right now. Thanks!
You'll know when the brake pivot shaft is in need of a re-grease. The brakes will start howling and squawking when applied. That's how they were on the $200 Special. A good cleaning and lubing fixed it right up. I had this start happening on one of my other bikes too. I knew I greased that thing but checking my notes, I found it was like a dozen years ago, lol. Re-lubing fixed that one right up too. I found remnants of the grease I had applied years earlier. It was all hard and dried up, lol.

Beautiful work Mailman, So fun to watch your progress while at work.
I can't decide which is prettier ?
Haha! I had that poster as an impressionable young man! ( It still holds up )