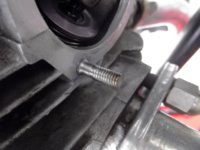
"madness" had a stripped valve cover stud hole. Changing heads wasn't a option and I couldn't bring myself to just JB weld the old stud, I did this repair. I did not find any "reducing studs" that would work in a quick web search so here's how to make your own.
I used what I had on hand.
Tools
Taps and dies
these were all in my Craftsman Metric T&D set my wife got me as Christmas present a few years ago.
7mm X1.00 tap
optional; a 7mm bottoming tap or grind the 7mm tap to MAKE a bottoming tap.
6.3mm x 1.00 Die
6mm x 1.00 Die
I have a lathe so used it but an electric drill would work too.
Dremel tool with cut off wheel.
angle grinder.
7mm x 1.00 bolt x 25mm long If I went and got one, I'd probably get a longer bolt. allen head would be fine also.
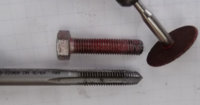
Stuff a rag in the head before making chips!
I tapped the head with the 7mm regular tap, The old stripped threads were the right size to start tapping. Use care, check the tap several times that it is starting perpendicular to the head. I used my caliper to check the hole depth, you DO NOT want to "over bottom" the tap and strip out your new threads!
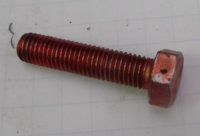
Next up would be a bottoming tap. or you could grind the taper tap off to create a bottoming tap. But as a get it done, I used the dremel cut off to cut three slots in the end of the bolt making an "ad hoc" bottoming tap and used the bolt to finish the threads in the head to the bottom. since we want a tight one time fit I thought this worked fine. The bolt I had was an 8.8 grade, a tough bolt. I welded the end of a nut shut and used two nuts to hold the bolt in the lathe without marring the threads. Better would be to chuck the head of the bolt with one nut threaded down near the head in the lathe. In a bit this would allow you to unthread the dies off the new threads easily. then cut the head off the bolt after the new threads are cut. I used the angle grinder to reduce the rest of the bolt, about the time the threads were disappearing the diameter was right to start threading. Make a slight taper on the end to help the dies start easily. Yes this could/should be done with a cutter in the tool post but this can be done without a lathe too, chucking the bolt in a drill or hand turning it down against a grinding wheel. (a steady slow hand is a plus here) buy two bolts, one for practice!!! My craftsman set had a 6.3mm die so I ran that first then followed it with the 6mm die, that seemed to make threading of the tough bolt go well. Make the threaded section plenty long. I used the dremel and cut a slot in the end and used a screw driver to tighten the stud (with thread locker applied) into the head. Check that the bigger threaded shank isn't sticking out far enough to keep the valve cover from seating. I then cut the new "reducing stud" to length with the dremel cut off and replaced the cover with a super sealing "gggGary's O-ring" Done and sealed good as new!
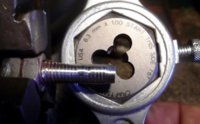
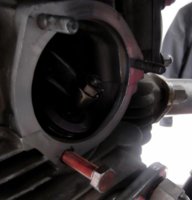
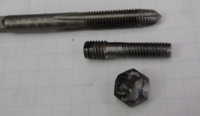
Feel free to comment, correct errors, omissions or try it and report how it works for you.
I used what I had on hand.
Tools
Taps and dies
these were all in my Craftsman Metric T&D set my wife got me as Christmas present a few years ago.
7mm X1.00 tap
optional; a 7mm bottoming tap or grind the 7mm tap to MAKE a bottoming tap.
6.3mm x 1.00 Die
6mm x 1.00 Die
I have a lathe so used it but an electric drill would work too.
Dremel tool with cut off wheel.
angle grinder.
7mm x 1.00 bolt x 25mm long If I went and got one, I'd probably get a longer bolt. allen head would be fine also.

Stuff a rag in the head before making chips!
I tapped the head with the 7mm regular tap, The old stripped threads were the right size to start tapping. Use care, check the tap several times that it is starting perpendicular to the head. I used my caliper to check the hole depth, you DO NOT want to "over bottom" the tap and strip out your new threads!
Next up would be a bottoming tap. or you could grind the taper tap off to create a bottoming tap. But as a get it done, I used the dremel cut off to cut three slots in the end of the bolt making an "ad hoc" bottoming tap and used the bolt to finish the threads in the head to the bottom. since we want a tight one time fit I thought this worked fine. The bolt I had was an 8.8 grade, a tough bolt. I welded the end of a nut shut and used two nuts to hold the bolt in the lathe without marring the threads. Better would be to chuck the head of the bolt with one nut threaded down near the head in the lathe. In a bit this would allow you to unthread the dies off the new threads easily. then cut the head off the bolt after the new threads are cut. I used the angle grinder to reduce the rest of the bolt, about the time the threads were disappearing the diameter was right to start threading. Make a slight taper on the end to help the dies start easily. Yes this could/should be done with a cutter in the tool post but this can be done without a lathe too, chucking the bolt in a drill or hand turning it down against a grinding wheel. (a steady slow hand is a plus here) buy two bolts, one for practice!!! My craftsman set had a 6.3mm die so I ran that first then followed it with the 6mm die, that seemed to make threading of the tough bolt go well. Make the threaded section plenty long. I used the dremel and cut a slot in the end and used a screw driver to tighten the stud (with thread locker applied) into the head. Check that the bigger threaded shank isn't sticking out far enough to keep the valve cover from seating. I then cut the new "reducing stud" to length with the dremel cut off and replaced the cover with a super sealing "gggGary's O-ring"
 Done and sealed good as new!


Feel free to comment, correct errors, omissions or try it and report how it works for you.

 XJWMX Yes this stud is the most likely one to strip out, not much depth there. Kinda kept track and it's the one that guys report having problems with. Maybe why Yamaha didn't change the casting back after the decompression lever disappeared on the other side.