needs brake and clutch levers Jim
-
Enjoy XS650.com? Consider making a donation to help support the site.
XS650.com receives a small share of sales from some links on this page, but direct donations have a much greater impact on keeping this site going.
You are using an out of date browser. It may not display this or other websites correctly.
You should upgrade or use an alternative browser.
You should upgrade or use an alternative browser.
"Milwaukee Iron" an 81 hulk, clawing back from the brink.
- Thread starter gggGary
- Start date
Well.... I got a King and Queen seat and a handfull of sissy bars..... Hmmm.
I dare ya. In fact, I double-dog dare ya!

Primitive Pete had been in the carbs, think it was just to bump the mains for the 2 into1 pipe (thank god!) prolly done without removing the carbs....


Couple hammer taps on a #2 bit to set it in the remains of the phillips and they all backed out. Idle screw caps still in place. Floats are stuck. But they'll clean up pretty easy.
Couple hammer taps on a #2 bit to set it in the remains of the phillips and they all backed out. Idle screw caps still in place. Floats are stuck. But they'll clean up pretty easy.
Last edited:
Yes, I've seen and cleaned much worse. The original float bowl gaskets still look good. I'd be re-using those. I think they're the best. I always wet them down with a little WD40 or similar light lube before installing the bowls.
Just got 5" and I'm sending you some.17F, light snow on the ground.
Waiting on throttle shaft seals don't know how I managed to be out of them. 


I agree 5T my needle jets in the set of carbs i got from the US was dirty when I pulled out. Another great tip!
Only one side of the floatbowls needs to be polished? 
Yeah... noticed that too. Polish....failOnly one side of the floatbowls needs to be polished?
Float bowl polish, Yup, just the side that shows when assembled. No polishing the bodies. That alloy does not stay polished long. Prepping a low mile engine to run good, look decent not a show bike or hot rod. Anyone that "can't stand it" and want to polish for me? PM your address!


Fully stripped, all passages solvent cleaned, accessible passages, sliding surfaces, bushings scrubbed with Q-tips,solvent, bodies ultrasonic cleaned, brass dipped in chem dip. sliding surfaces, bushings, rubber seals lightly polished, rubbed with TDS. all jet orifices copper wire cleaned. I also lightly file the casting ridge marks and sharp edges off the front and rear sealing surfaces on the bodies to ease assembly into manifolds reduce chance of air leaks. Will be assembled, test run, idle adjusted, gauge synched. Engine has a 2 into one pipe the 137.5 mains found in carbs stay (stock 132.5). Will get the needle washer mod. You guys made me think, may bump the pilots up one size.

Fully stripped, all passages solvent cleaned, accessible passages, sliding surfaces, bushings scrubbed with Q-tips,solvent, bodies ultrasonic cleaned, brass dipped in chem dip. sliding surfaces, bushings, rubber seals lightly polished, rubbed with TDS. all jet orifices copper wire cleaned. I also lightly file the casting ridge marks and sharp edges off the front and rear sealing surfaces on the bodies to ease assembly into manifolds reduce chance of air leaks. Will be assembled, test run, idle adjusted, gauge synched. Engine has a 2 into one pipe the 137.5 mains found in carbs stay (stock 132.5). Will get the needle washer mod. You guys made me think, may bump the pilots up one size.
Last edited:
Floats were seriously bound (varnish) to the pivot shafts.


Next time I will use a heat gun to loosen the varnish before driving out a set that is this stuck. Got a bit smarter on the second pin used some solvent and DUH, went back and forth a bit, that really eased the extraction. Note; the shaft and shaft towers are handed, the head always goes to the right as viewed from back, bottom of carb. I use a close fit # drill bit and solvent to clean the inside of the float bushes, assemble with TDS.
Next time I will use a heat gun to loosen the varnish before driving out a set that is this stuck. Got a bit smarter on the second pin used some solvent and DUH, went back and forth a bit, that really eased the extraction. Note; the shaft and shaft towers are handed, the head always goes to the right as viewed from back, bottom of carb. I use a close fit # drill bit and solvent to clean the inside of the float bushes, assemble with TDS.
Laquer thinner works for me.Floats were seriously bound (varnish) to the pivot shafts.
View attachment 129877 View attachment 129878
Next time I will use a heat gun to loosen the varnish before driving out a set that is this stuck. Got a bit smarter on the second pin used some solvent and DUH, went back and forth a bit, that really eased the extraction. Note; the shaft and shaft towers are handed, the head always goes to the right as viewed from back, bottom of carb. I use a close fit # drill bit and solvent to clean the inside of the float bushes, assemble with TDS.
 been thinking on that 5T, I did look and it appears the needle metering occurs at the top of the needle jet, the needle does not get near the main even when the slide is seated so the main should not affect operation of the needle but the pilots do/will. Sound about right? Just kind of thumbnailing jetting, the odds of this exact config hitting the street for more than a few test miles are slim and none. Ignoring the EPA, I think a bit rich is more tractable than a bit lean...
What you have to keep in mind is the strength of the air/fuel mix the needle is metering. Larger mains will result in a stronger mix (more fuel mixed with the unchanged amount of air). But this stronger mix really doesn't come into play until you start lifting the slide and needle. Until then, and for the first small portion of butterfly plate opening (uncovering those 3 pilot circuit holes), you are relying mostly on the pilot circuit. So yes, I think you would benefit from increasing the pilot jet size or reducing the air jet size.
This pilot air jet is something I'm going to be tinkering with on my '83. It's pretty much all stock save for some extra holes the P.O. drilled in the ends of the mufflers. But just that small change to the mufflers seems to have leaned the thing out. It carburates OK with no flat spots or stumbles, but it seems to run a bit hot compared to my '78. Just standing next to it after a ride, it seems to throw more heat off than the other bike. I've also noticed the headpipes turning a bit yellow up near the head. Being the original double wall pipes, they shouldn't be doing that. So, my planned first step is going to be reducing the air jets 2 sizes to a 130. Next change will be a 135 main. And maybe I'll try your needle shim washer trick too.
This pilot air jet is something I'm going to be tinkering with on my '83. It's pretty much all stock save for some extra holes the P.O. drilled in the ends of the mufflers. But just that small change to the mufflers seems to have leaned the thing out. It carburates OK with no flat spots or stumbles, but it seems to run a bit hot compared to my '78. Just standing next to it after a ride, it seems to throw more heat off than the other bike. I've also noticed the headpipes turning a bit yellow up near the head. Being the original double wall pipes, they shouldn't be doing that. So, my planned first step is going to be reducing the air jets 2 sizes to a 130. Next change will be a 135 main. And maybe I'll try your needle shim washer trick too.
So I did the needle washer trick, a couple notes;
With the needle removed from the slide, no need to remove the e-clip, use a hair dryer, NOT heat gun, on the needle and pill, when the needle gets HOT in your fingers holding the far end, the pill will slide right down, install washer replace pill . Don't forget to align the little tit on the pill with the hole in the slide. Check that the needle can still wiggle a bit when you are done. Don't use two washers, the spring becomes coil bound and binds the needle. Yeah, previous experience speaking.

It's mighty futsy removing/installing the two small screws, spring, plate etc. deep down in the slide they can be really tight too.

With the needle removed from the slide, no need to remove the e-clip, use a hair dryer, NOT heat gun, on the needle and pill, when the needle gets HOT in your fingers holding the far end, the pill will slide right down, install washer replace pill . Don't forget to align the little tit on the pill with the hole in the slide. Check that the needle can still wiggle a bit when you are done. Don't use two washers, the spring becomes coil bound and binds the needle. Yeah, previous experience speaking.
It's mighty futsy removing/installing the two small screws, spring, plate etc. deep down in the slide they can be really tight too.
Last edited:
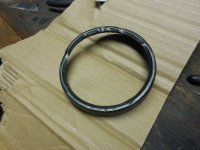
did a speedo R&R maybe a bit different method than I've seen used.
Wrapped bezel with electric tape then used a big hose clamp. Ground a pair of pliers to let me grip that edge. By working slowly it let me unbend and rebend the lip and leave little evidence I had been in. painted out the badly faded 55mph "red" band. Used a couple beat up speedos for a selection of "best" parts. Looks much better and works good, test spinning wheel with a drill. These late model needles are REALLY hard to get off the thin shaft. Can't really apply much heat with the plastic.
Hint" if your face screws are missing check the magnet by the drive input, found several screws stuck to magnets while scrounging.
Attachments
Last edited: