Muffler collar nut nuts joint Early Late, stuck Dang it!

gggGary

If not now, When?
Top Contributor
XS650.com Supporter
Messages
30,983
Reaction score
61,164
Points
813
Location
Baraboo, WI, USA
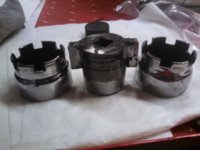
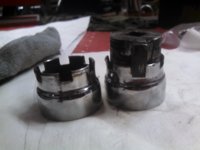
There are two different muffler nuts

Early
Yamaha 256-14713-01-00 Nut, Muffler Joint is used in the following models and assemblies:

1970 XS1 - Exhaust
1971 XS1B - Exhaust
1972 XS2 - Exhaust
1973 TX650 - Exhaust
this is a bit smaller in diameter than the late

Yamaha 371-14713-00-00 NUT,MUFFLER JOINT is used on these models and components:

1973 TX500 EXHAUST
1974 TX500A EXHAUST
1975 XS500B EXHAUST
1976 XS500C EXHAUST
1976 XS650C EXHAUST XS650C
1977 XS500D EXHAUST
1977 XS650D EXHAUST XS650D - E - E006501- - F
1978 XS500E EXHAUST


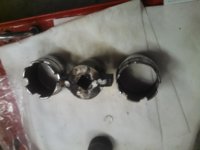
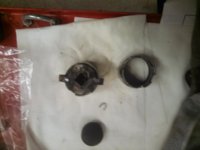
Either one can be REALLY stuck on the muffler

I tried the "custom socket" on the rattle gun switching directions between on and off frequently, along with rust buster, heat gun, quenching, heat gun, repeat, and some pretty serious hammer blows around it using wood blocks to protect the chrome on that early nut, no joy yet..

If anyone has a better way to remove them please dish...

77 xs650 terry 038.JPG 77 xs650 terry 043.JPG

77 xs650 terry 044.JPG 77 xs650 terry 036.JPG

77 xs650 terry 035.JPG
 
+1 on the need to know a trick.
Soaking in diesel/oil for a month now.
I heat till the oil bubbles(best done outside) but still refuses to release.
I hate to resort to a pipe wrench or cutting them off just yet.
The cost of two NOS nuts are a third of the way to Mikes Commando system with new headers.
************************************************************************
Sometimes bein cheap is costly
 
You've already covered the big 3. Chemicals, heat, violence.
But, that's a lotta threads to penetrate. Gotta get that penetrating, rust-busting oil in there.

Pressure differentials.
Heat it up, quench with penetrant, repeat. Hope the penetrant gets sucked-in.

Temperature/thermal expansion differentials.
Heat the outer, quench the inner.
Rapidly evaporating carb cleaners (the kind that freezes your fingers) can chill/shrink the inner.

Vibration. Not just the hammer-whack, but the jackhammer kind.
Do you have a pneumatic chizel with a mushroom/riviting tip? Buzz that lightly around the outside, saving the chrome.

Language. Don't go there yet.

(Meticulously tapped from a stoopidphone)...
 
No idea whether or not it would be efficacious but, have you considered electrolysis? Could make for an interesting experiment.:shrug:

roy

Where? Inside my ears would be good.... Damned old age anyways.
 
Might try heating the parts then apply a stick of parrafin allowing it to melt in the stuck joint. Creeps/runs in to some pretty tight spots. Engine machine shop friend has used this technique with good success..................Wesley
 
Hi Gary,
you could try making a better class of impact wrench adapter?
A disk of 1/4" plate with six lugs that fit the six notches and a 1/2" square hole in the middle for the impact wrench.
Grab the muffler body with two strap wrenches held in a vise, torch the joint just hot enough it don't blue the chrome, daub the joint with parawax, shove the adapter into the nut and apply the impact wrench.
And yeah, if that don't work, check the catalogs.
 
Sometimes the best tool in the box is more patience.
I've been soaking mine for. . . . a month and a half(?) or a little longer.
Yesterday I decided to do something more so made a trip to town where I acquired a
1 5/8 socket from pawn shop for a dollar. That and some 3/8's square stock with the heat wrench to stick them together and I had success without buggering them up.
The socket was slightly to small for the ID so an impact socket with thicker walls and 5/16 square stock (I had to grind down the 3/8's to fit) may work better.
I'll let the pictures tell the rest of the story.
I WILL use a liberal amount of anti-seize putting them back together.

*************************************************************************

I don't think electrolysis will work. Not sure how you would line of sight the anode with these fine threads. Vinegar would help knock the rust off the exposed areas but again the threads are so fine I don't see how the rust would get out. And I wanted the advantage of the oil slickin'um up.
 

Attachments

  • IMG_20150920_155103_206.jpg
    IMG_20150920_155103_206.jpg
    118.6 KB · Views: 344
  • IMG_20150920_155056_410.jpg
    IMG_20150920_155056_410.jpg
    111.9 KB · Views: 320
  • IMG_20150920_155236_267.jpg
    IMG_20150920_155236_267.jpg
    106.2 KB · Views: 321
  • IMG_20150920_155223_584.jpg
    IMG_20150920_155223_584.jpg
    105.5 KB · Views: 329
  • IMG_20150920_155250_845.jpg
    IMG_20150920_155250_845.jpg
    112.2 KB · Views: 353
I put that stuck one of mine in the 40 ton press with hardwood blocks and slightly deformed it back and forth to try to break the rust bond, no joy. Did you dig the packing out of there before you started soaking?
 
Yes and it unwillingly came piece by piece. I had to drive a pick between it and the nut to get it started.
 
Hey gggGary! What would it hurt for a (electrolysis) test run with a extra nut that is too far gone to be used on a bike? Small scale, one piece. No plastic screen (more line of sight). Set in the middle of container, or as close to the anode as possible, with a warning sign for the uninitiated!:wink2: 
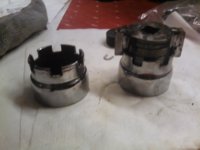
The process will work untill ALL the rust is gone, it just takes some fiddling, moving it around to draw from different areas, removing and cleaning the magnetite off and exposing the surface, for better conductivity. And again more amperage. An older charger with a selectable output is ideal......

Just a test though :thumbsup:
 
Sure I'll give it a shot. Just for test purposes, kids don't try this at home.

I'll peel out the packing, use an anode that fits inside the nut/muffler joint, muffler standing on end in the bath, nothing to lose. I have one early muffler with it's threads completely MIA.
 
Ha! like the joke sez, "don't go! It's a trap! there's two of them!"
WER's muffler nuts came apart with patience, penetrating fluid and a customized socket on his impact wrench.
Gary's nuts are still stuck.
Well Gary, I'd say eff the patience and electrolysis, decide to kiss the chrome goodbye, torch the thing cherry-red and reef on it.
 
Too late fred it's cooking in the bath right now.

dug the packing out.

electro 003.JPG

electro 004.JPG

electro 005.JPG

My theory is that line of sight is really line of electromagnetic field and the rag will be transparent to that, so a rag as an insulator/spacer should work fine.
 
I'm watching. Thinking you will have a really clean inside where it is exposed. Not so sure about the ridges and valleys of the threads. Seems the seams won't give it up that easy but please "show me" different.
 
VICTORY! who needs patience? I have bigger hammers!

Did the electrolysis and made a mark 2 muffler nut impact tool. Honestly? I'll give the new impact tool the edge here. As always, as SOON as I saw movement, I stopped, sprayed inside and out with rust buster, reversed and applied the impact several times back and forth, till the nut was turning freely THEN ran it all the way off. Threads are saved. With a bit of hammer and dolly work the nut now looks good. The threads are 1.50, used the thread file on the muffler and a 10/1.50 tap as a thread chase inside the nut. Doped it up with copper anti-seize and it's good to go. This was not a pristine muffler/nut, A PO had been on the nut with channel locks muffler has some flaws, but now I have a tool to make stuck nut removal simple(r), still need to make a spanner for on the bike tightening.

muffler nut 002.JPG

parts separated, and the welded, angle grinderized tool.

20150921_111624.jpg

Out of the bath, the rag between the the part and anode worked great. actually kind of works to keep the bath water cleaner, the generated anode rust stays in the rag.
 
Back
Top