My 20+ year project

Meddy

XS650 Addict
Messages
204
Reaction score
834
Points
93
Location
South West Victoria, Australia.
Hello forum members.

Well, after lurking on this site for some time now I thought I should share my build with the xs650 community.

Bit of a story behind my 79 special but bear with me I have lots of pics.

I bought this bike back in 1997 off a friend of a friend, and it was sort of my comeback bike after going through the usual things like bringing up kids, mortgage etc.

Anyway, I rode it for 12 or 18 months until one day there was bang, lots of smoke and only running on one cylinder.

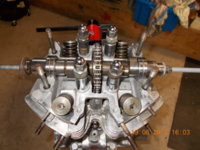
So full of enthusiasm, to get it going again I pulled the motor out took the head off, and found this;

DSCN0177.JPG


Well, at the time it was still attached to the conrod but you know what I mean :)

This was pre internet days, well it was for me living in a tiny town of 1200 people at the bottom of Victoria, Australia, and our local dealer wasn't very helpful with spare parts etc, so I decided to strip the bike totally label and bag everything and pack it all away in the shed as a future project.

So about 18 years later, and after getting sick of moving bits and pieces of bike around various sheds over the years I decide its time to start the rebuild. :unsure:

So this is what I had to start with;

IMGP2737.JPG


And after almost 20 years of my pretty ordinary storage, this was what I had to deal with.

20161027_130816.jpg


20161027_130832.jpg


DSCN0090.JPG


So, earlier this year the frame, swingarm, battery box and lower for legs went off to be sandblasted and painted in 2 pack gloss black.
In the mean time I made a start on cleaning up the engine, at first I was hoping to get away with just giving the outside a clean up but it soon became apparent that my very ordinary storage meant I would have to completely strip the bottom end to clean out all the years of built up crap, now it was really getting serious.
IMGP3664.jpg


DSCN0064.JPG


DSCN0068.JPG


Next, the clean up.

Cheers,
Mick.
 
I see you lurked long enough to know we like pictures;)
Keep em' coming... and welcome to the site!
 
excellent start to your project Mick . I have subscribed and shall follow this with interest as my first build was a 79 too.
Ooooh I do like your platform scissor lift :love:
 
Thanks for the warm welcome all, much appreciated.
Now I was really getting serious, and since I had never been this far into a motorcycle engine before I was trying to be extra careful and spent many an hour poring through manuals and reading just about everything about the bottom end hear on the forum,but I took it slowly, took plenty of pics and eventually after 15 minutes with the rubber mallet the crankcase halves were separated. Luckily, all the internals looked to be in good condition, all the bearings still had oil on them and everything was moving freely.

DSCN0077.JPG


Then it was just a matter of degreasing everything and rinsing out with water and applying a liberal dose of wd40.

Whilst I was waiting for the frame etc to be painted I made a start on cleaning up the cases, this involved the purchase of a multitude of wire brushes mainly brass plus all sorts of doodads that I could lay my hands on that looked like they might fit in the nooks and crannys around the engine.
Some of the results;

DSCN0080.JPG


DSCN0081.JPG


DSCN0082.JPG


DSCN0084.JPG


Also during this time I had been scouring the internet for XS parts and I was building up quite a collection of bits that I thought I would need, of course I always seemed to be needing something else no matter how much I had purchased. About this time I was also starting to rethink the budget on this project, which seems to be the case no matter what I am building or renovating. Never mind, I had new parts winging their way towards me from far flung regions of the world and I was excited.
To be continued.
 
Welcome and great pictures Mick - thanks for sharing!

Looks like you’ve got yourself a ballgame!

Pete
 
Thanks fellas.

Time to start the rebuild.

This is a first for me, most I have done before engine wise is replace the piston and rings in 2 stroke dirt bikes years ago, but I was up for the challenge and after reading almost every engine rebuild post on this forum I was feeling confident.
I had taken plenty of pics of the gears and shifter mechanism so they slotted in nicely and all gears engaged as they should.
I had also purchased a new timing chain and guides, so the chain was slipped around the crank as I wanted to assemble it without having to break the chain.
The crank was then placed in position and the bearings rotated till they gave that nice satisfying "thunk" as the pins positioned themselves into the locating holes.
I then only had to fit what seemed like a never ending supply of gears and shafts for the starter mechanism and place new seals on the crankshaft, driveshaft and clutch pushrod.
About this time I also received a copy of Hans Pahls book which helped immensely especially as I was not sure about the half circle retaing ring for the drive shaft and he shows a great picture of it protruding enough to engage both crankcase halves.
I then used hylomar jointing compound sparingly on the sealing surfaces of the crankcases and placed the lower case onto the top half and bolted it back together and torqued up from the centre out, after all my time spent cleaning the crankcases I could read just about all the numbered bolt positions.
I already had a 3/8th drive torque wrench but I have also bought a 1/4" drive one that reads in inch pounds for some of the smaller bolts.
Unfortunately I seem to have misplaced the pics of this part of the build.:(

Ok, now with the bottom end assembled again I could now bolt the engine back onto my engine stand and start the top end assembly.
I was originally hoping to give the bores a light hone and reassemble the engine with a set of original pistons and rings that I had acquired some years ago from a Yamaha dealership that was closing down.

IMGP2731.JPG


However, it turned out that after getting the bores and new pistons measured It would have been at the maximum wear limit so I opted to buy a set of 2nd oversize pistons from Ebay member Cruzinimage_co and sent them off with the barrels to our local machine shop to be bored.
I took my time to make sure all the ring gaps were the correct measurements when inserted into the bore, and then eased the rings onto the pistons , positioned the rings as per the manual and eased the pistons into the bores with the help of a wooden skewer.
I also drilled out one of the rivets on the camchain guide to allow me to slip the chain in place and bolted the chain guide into place whilst I was working on the barrels
And here they are looking magnificent if I do say so myself.:D

DSCN0104.JPG
DSCN0105.JPG
DSCN0106.JPG
DSCN0107.JPG
DSCN0108.JPG


Next up Cylinder head, valves and camshaft.
 
I wanted to have a crack at grinding the valves, so with my newly purchased valve lapping and a tin of grinding paste I attempted to reseat them, well all I managed to do was spin the tool off the valve every time I tried to apply a little pressure, I even tried the hot glue method that I had seen on Youtube but no luck there either the glue just would not adhere to the valve. I persisted though, but in the end after spinning those valves I don't know how many times I could not get them to seal. I weakened and sent the head off to the machine shop and they had it done in a day for less than $100.00.
Here it is just prior to final assembly with a thin smear of hylomar.


DSCN0109.JPG


Next couple of pics show the threaded rod and assorted sockets, washers and nuts I used to temporarily clamp the head and cam bearings to allow me to slip the cam chain on, this was not as difficult as I imagined and I had the chain on the correct way after only 2 goes.

DSCN0117.JPG


DSCN0116.JPG


And now it was time to fit the valve cover, torque it down in stages, adjust the tappets and fit all the other bits and pieces, oil pipe inspection covers etc.

I had had the frame back from the painters for some time by this stage and I was champing at the bit to get the engine back in the frame, but working by myself and having injured my back in a work accident a number of years ago I had to be a bit smart about it, here's what I came up with.
I had a small wheeled dolly that I picked up for next to nothing at a sale somewhere, using my small block and tackle I lifted the engine off the rolling workstand and lowered it onto the dolly right side down with a couple of wooden blocks underneath to hold it level.
I then wrapped the frame up with tape and packing foam around all the spots I thought may get scratched and then rigged up some lifting slings to allow me lift the frame left side up.
It was then just a matter of lowering the frame over the engine and spinning engine or frame to suit until I could line up a couple of engine mount bolts enough to hold the engine in place whilst I hoisted the the frame upright again and sat it back on it's cradle.

DSCN0123.JPG


DSCN0124.JPG


DSCN0126.JPG


Here it is, engine back in frame after almost 20 years.

DSCN0127.JPG
 

Attachments

  • DSCN0116.JPG
    DSCN0116.JPG
    199.2 KB · Views: 328
...but working by myself and having injured my back in a work accident a number of years ago I had to be a bit smart about it, here's what I came up with....
As they say... work smarter not harder. Excellent work!
 
Now I had the engine back in the frame I was itching to get my project starting to look like a real motorcycle again.
So, whilst I was waiting parts during the engine rebuild I had been busying myself with other tasks.
The fork lowers that had been blasted & painted at the same time as the frame were reassembled, I got around the difficulty of holding the inner cylinder whilst tightening the bottom bolt by using one of the rear shock mounting bolts withe a couple of nuts locked onto it and then placing the lowest nut in a socket and wrapping the whole lot in duct tape, a couple of extensions on the socket and easy as.
The wheels had been giving me some concern as originally I wanted to keep the alloy and black finish on them but they were in a pretty bad way so I decided to send them of to be blasted and painted the same as the frame. There was no way I was going to try and mask them up to get the same finish as the factory.

DSCN0086.JPG


I had already test fitted the swing arm in the frame with a new "All Balls" bearing kit and the original shim and after tensioning it up it felt right, I had also fitted new bearings in the steering head and fitted external grease points to both of these, and with the freshly painted battery box and a set of Renthal streetfighter handlebars, here's what I have.

DSCN0129.JPG


20170903_171845.jpg

Oop's almost forgot, I also had a set of Shinko 240 tyre's fitted. I was originally hoping to fit a set of trials type tyre's, but could not find anything suitable in a 16" size in Australia and overseas shipping costs were exorbitant.
Next step was to see if my rebuilt starter motor and starter spring mod ( squeezed in the vice) were sucessful, so with jumper leads connected directly to the starter I had the engine cranking for the first time in a long time and the starter gear meshing perfectly.
I should mention here that I am going to build a complete new wiring loom from scratch so my next task was to start working out where to put some of the components I was replacing and clean up the ones Iwas keeping.
 
Meddy,

Very nice work and great ideas. I have my own way of putting the engine in but must admit yours is better. I plan to repaint my frame within 2 years so will be copying your technique to avoid scratches.

Thank you for sharing with everyone.
 
Very nice work and great ideas. I have my own way of putting the engine in but must admit yours is better. I plan to repaint my frame within 2 years so will be copying your technique to avoid scratches.

Yes Paul, having the engine on the trolley was a big help to me I was able to maneuver it to exactly the right position and then lower the frame a millimeter at a time if needed. The foam around parts of the frame was probably a bit of overkill, I think the 2 or 3 layers of masking tape is probably sufficient.
 
Forgot to mention in the engine build post, I was ready to install the clutch with a new set of friction plates from cruziimage when I noticed one of the cush drive springs was broken, I must have looked at that clutch basket a dozen times and had not noticed it, Oh well better to find it now I guess. Although that put me back another month whilst I waited for the replacement parts to arrive.
I bought the spring kit from Heiden tuning along with a couple of new brake disc calipers, I find Jerry one of the cheaper options when buying parts from overseas as he offers free shipping if your order is over 150 euros, and I can always find a way to do that.;)
Anyway while I was waiting for those parts I thought I would see if I could do something with the engine sidecovers, they had originally been chromed but they hadn't weathered the years too good and were in a pretty sorry condition, sort of part chrome part corroded alloy.
I discovered that Geoff at Geoff'sXS in Sydney offered a change over service so I sent off the old ones and a week or so later 2 beautifully polished covers arrived in the mail.
IMGP3951.JPG


IMGP3943.JPG


The replacement cush springs duly arrived with a well written set of installation instructions, and along with Hans' book and numerous visits to this site I had the clutch installed. Now I could fill the motor with oil, and after a dozen or so kicks on the starter I had oil up on the tappets, a very satisfying feeling for an amateur. Then, as stated above I could try the electric starter.
Since the start of this build I had put a lot of thought into the electrics, trying to decide the best way to go about it. I had read through the electrical threads in the Tech section a number of times and had copied just about every wiring diagram I could find that showed the original charging system. I also wanted to replace the original loom as it was not the best and I wanted to simplify the wiring as much as i could.
The rotor and stator both checked out ok, but I decided to replace the rectifier with an Ebay special and replace the regulator with a Bosch RE55. I also decided to keep the starter safety relay, but do away with the reserve lighting unit and the light checker. I also changed out the old points ignition system for a Boyer Bransden unit and turfed the original fuse box and replaced it with a 6 socket mini blade fuse holder, which fits nicely where the reserve lighting unit was.
IMGP3946.JPG


The rectifier fitted well where the original was under the battery box.
IMGP3950.JPG


And I disassembled the original regulator and mounted the RE55 regulator onto the originals mounting plate to keep it in the original position.

IMGP3949.JPG


The ignition system and coil fitted nicely where the original coils were.
IMGP3948.JPG


And as you can see I have just started running some of the wires for the main power and ignition system.
So at this stage the motor spins over on the electric starter and the ignition has big fat sparks when I earth out the plugs.
Next up is to rebuild the carbys so I can start the engine before going any further.
 
Wow - beautiful work there Meddy!

I may have to look into the costs of those exchanged cases -mine are a mess too.

Pete
 
Nice progress! I am not sure if anyone has mentioned this, but it would be a good idea to incorporate a voltmeter into your design so you can constantly monitor your charging system while riding.
 
Back
Top