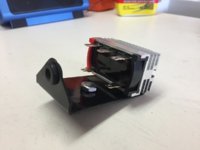
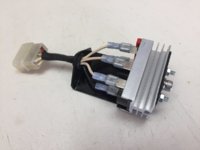
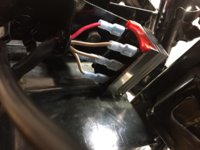
What an amazing world we live in. Ten days ago and from a distance of 7,654 miles away ( I really looked it up )
I ordered my rectifier from an EBay seller with the product coming from China. Today it was delivered to my mailbox for the princely sum of $4.70. If a certain man in the White House gets his way it'll probably be $34.70
soon.
image.jpeg
It's a sleek little unit, I really should've ordered two of them at that price, just for the sake of redundancy.
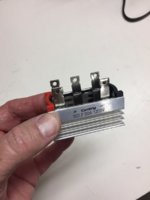
image.jpeg
Mr. 5Twins sir, you wouldn't happen to have any detailed photos of this unit all mounted up would you? I think I've seen a photo of a bracket you made once, but I don't think I've seen it actually installed. Just curious, you do some tidy engineering, always happy to poach your ideas! Haha
So I have next weekends project all lined up now.

On another note, I ordered my Pamco H.O. unit , that will also be here before the weekend. Quite frankly I may have gotten a little ahead of myself here, I'm so excited about having that particular upgrade, but I need to get things in order first.
1. Make sure it's charging properly
2. Run through all the tuning rituals, I should get it running decent before installing the Pamco.
3. The last time I had it running it had an intake air leak somewhere. To try and remedy that I pulled the carbs off and checked to make sure that all the screws were tightened and had a good look at my carb mounts, which happily look pretty good. I also made sure they were securely tightened. I followed Retired Gentlemans advice and smeared dielectric grease on the inside of the carb mounts and I have to say they went back in so much nicer. I also replaced the worn Philips head screws that were on the carb mount clamps with stainless steel Allen head screws so I can really torque them down. This is all minor stuff, but I hope it makes a difference.
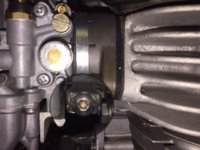
image.jpeg

So hopefully if life doesn't get in the way, I will know by the end of the weekend if I am on the right track getting my charging system going.
We shall see
 
Wow - that is a nice looking little unit Bob. I'll bet that will be pretty easy to slip into a number of different places out of sight.

As I have said before, I bought the much more costly combo unit from MikesXS and while it works fine, it is kind of bulky. It wouldn't fit in either the spot for the rectifier (under the battery box), or the spot for the voltage regulator (left hand side cover).

On the matter of carb leaks....you might recall the notion of getting the bike running and spraying a little bit of WD40 here and there. If the idle speeds up when the spray hits a certain spot - you have found the leak.

Cheers,

Pete
 
That looks different from the rectifier I was looking at - can you post a link for that one?

I'm a little more primal, I use spit to ease the installation of the carbs :geek:
 
I do happen to have some pics. I used some light gauge angle for the mounting bracket, probably 16 ga. or so. The rec mounts to one leg and the other holds the mounting bolt. The unit goes on the bottom of the battery box just like the original. I made the side that the rec mounts to longer so I could bend a "finger" up to run the wiring through. I didn't want the wires just hanging off the unit by their spade connectors .....

G2Q32t7.jpg


THOpKcA.jpg


TmfxvBI.jpg


jkEhT9W.jpg


You'll notice an M6 hole tapped into the bottom of the heat sink. There is also a track for bolt heads. I utilized both. I didn't trust just having the one M6 bolt.
 
Last edited:
The original flat sided mounting bolt was pretty easy to copy. I just used a cut-off wheel in a Dremel .....

G3N3jH0.jpg


M9hjXs0.jpg
 
Last edited:
Mailman, I do like those smart units that 5twins has put together! I found that the modern rectifiers resulted in less voltage drop so that my battery is charging at 14.2Volts at 1500 rpm, so there must be less load on the rotor winding also. Will be interesting to hear if you also see an improvement.

If you ever want to add a small voltmeter so you can monitor your battery then small LED units can be had from China for as little as £1 including postage - of course they take 2 - 3 weeks to arrive. I ordered one yesterday on Ebay to go with my DIY rectifier/regulator - Just search "car voltmeter". I also used a China bridge rectifier to repair my MIG welder and it is working fine 1 - 2 years later.
 
5Twins , thanks for posting those photos, I really appreciate it. Hopefully I will have time this weekend to take a swing at that.

Paul, I plan to do a little looking around online this weekend to see if I can find a voltmeter.

Pete, I haven't forgotten the WD-40 trick. Soon as I get her up and running , I'll do a little investigating.
 
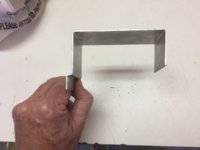
Today I fabricated the mounting bracket for my new rectifier. I used 5twins excellent bit of engineering as inspiration. I did not directly copy his work. I enjoy re purposing material and using things that I have on hand. So I started with an aluminum bracket that I already had.
IMG_4299.JPG
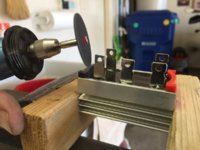
The rectifier terminals are 3/8" instead of the standard 1/4", so I trimmed them with a Dremel cut off wheel to fit.
IMG_4300.JPG
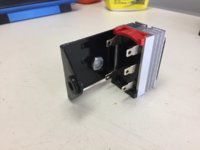
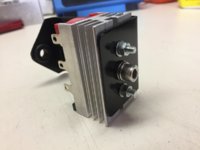
I wound up with this
IMG_4305.JPG

IMG_4306.JPG
IMG_4307.JPG
IMG_4313.JPG
And here is a photo of it installed in the factory location , mounted to the bottom of the battery box.
IMG_4316.JPG
Tomorrow I will re install the battery and gas tank and fire this pig up and see if all this modern whiz bang electronics fixes my charging problem.
Keeping my fingers crossed
Bob
 
Last edited:
That looks like a really nice installation Bob - good for you!

I would suggest just keeping a screwdriver handy in case something goes wrong with the wiring and you need to disconnect the battery when you turn on the key and push the little black button.

Best of luck!

Pete
 
Mailman, 5twins, thanks for those pictures, I bought that same rectifier and a Fiat regulator. I thought I'd be drilling holes in the rectifier to mount it until I saw you guys' mounts. Nice job, thanks a lot. Maybe I have too much confidence in this setup, I just gave away a good OEM reg/rec.:eek:

Scott
 
Success! The charging system is working beautifully! Here is the battery at rest prior to starting.
IMG_4320.JPG


And here it is at idle.
IMG_4323.JPG


When I turn the lights on it kicks up a little more. It's fun to watch, even when I turn the blinkers on , every time they flash the charging system immediately goes up half a volt.
The bike seems to idle a little steadier too.
After running the bike for about ten minutes I touched both the regulator and rectifier and was pleased to see they were both cool to the touch. So I am calling the charging system fix a complete success.
VR-115 regulator .....$34
3 phase 30 amp rectifier.....$4
Maybe $3 more dollars for the rubber grommet and wire terminals, so about $41 all in.

Assorted stuff,
Battery boot was shot, so I got a new one.
IMG_4319.JPG


I found the location of my intake leak. When it was running I put my ear right down next to it and I could really hear it. Then I shot a little WD-40 at that exact spot and the rpm went up.
Not sure just yet what I'm going to do about it. It appears to be the right side carb mount , right here where I am pointing the screwdriver.
IMG_4327.JPG


I have to say, I would like to be done removing the air box and pulling the carbs off.

Couple other random things, here's a fun one. When I was going through my electrical system cleaning connections, I noticed the rear turn signal wires were crossed, brown to green and green to brown. I thought it was a mistake so I put them back. When I was testing my turn signals while the bike was running I saw that the rear turn signals were reversed. When the right turn was on the rear left was flashing and visa versa. So for now I switched the wires back. But somewhere the wires got reversed.

Also my rebuilt right side petcock drips. Grrr!
When I got my bike it had two right side petcocks and I rebuilt them both, so I will try swapping them.

So now I'm going to get after setting my cam chain tension, adjusting the valves, and timing.

I think I'm making progress. It kinda feels like progress, every win just seems to reveal the next set of challenges. I'm beginning to feel like Ahab and this is my white whale. Maybe I'll name it Moby!
IMG_4328.JPG


Till next time
Bob
 
You'll want to rev the bike up to about 2500 or 3K and check the charging output. That's the true test. You actually seem a bit high at idle. Usually you don't see much output there. It usually increases to about the mid 14's when you rev it up. But, what's your idle speed? I'm saying you don't see much output at 1100 or 1200 RPMs. If you're idling higher then you probably would. Also, output will be higher immediately after electric starting because the charging system is working to replenish the battery. After 10 or 15 minutes riding, output will most likely drop off a little (battery now replenished).
 
I was playing with idle speed up and down between 1200 and 1500. That reading was taken just after starting. It really didn't seem to matter what rpm the bike was running. It was charging pretty consistently.

And thanks Pete!
 
About time there was some good news! I'm really interested in that rectifier mod. That bracket is a good idea.
 
Well, you're charging alright but maybe too good, lol. Normally, these systems put out less voltage at idle, more when revved, by as much as a couple of volts. I've never seen one put out constant mid 14's and not change (increase) when revved.
 
I'll take readings again if I can ever have this thing running for for more than a few minutes.
My rebuilt petcocks drool so bad I can't un it very long.:doh:
 
A couple more things, I swapped out that leaking petcock for my OTHER rebuilt petcock and it leaked WORSE! WTH?
So I'm thinking about trying to make some new gaskets for the petcocks. If that doesn't work I'll see how far I can throw them while calling them a colorful name!
Also I fixed something I mangled early on in this project. The neautral switch wire. I didn't realize how they connected and I manhandled it and ruined the terminal end.
So I went to the hardware store and bought a bunch of possible replacements ( heck they were cheap)
IMG_4318.JPG


I had to remove my left side case cover to expose the wiring down lower on the harness, then I soldered the replacement terminal on and soldered the new wire in place. And finished it off with a new replacement rubber cover from Mikes.
IMG_4331.JPG
 
Back
Top