 nice custom ride !
-
Enjoy XS650.com? Consider making a donation to help support the site.
XS650.com receives a small share of sales from some links on this page, but direct donations have a much greater impact on keeping this site going.
You are using an out of date browser. It may not display this or other websites correctly.
You should upgrade or use an alternative browser.
You should upgrade or use an alternative browser.
My XS650 project, Deep South XS
- Thread starter ippytattoo
- Start date
-
- Tags
- build
ippytattoo
Just another grumpy old hack.
Thank you kindly! It's a labor of love and a continual work in progress full of experiments and adaptations.
itschrisb
XS650 Addict
Just finished cross drilling,resurfacing and painting my brake rotors. Went with an unconventional pattern and made sure the 2 front rotors are mirror images. I think they turned out pretty well.
Thanks machine for rotors for confidence building. Went much easier after being able to practice on 1.
View attachment 177727
Did the holes help knock off a noticeable amount of weight?
ippytattoo
Just another grumpy old hack.
I'm not really sure. I didn't weigh them before drilling but have some undrilled rotors I can try to weigh for a comparison to the drilled ones if my scale is adequate. I will post weights when I get back home.
ippytattoo
Just another grumpy old hack.
Just because I like tinkering and I liked my 750 kitted motor better than my current 666cc configuration I am starting a new motor build and wanted to bounce some things off y'all.
My current plan is the xs performance 750 big fin kit (from yamahaxs650.com) w/ shell #1 cam (from hoos racing) and performance valve springs (from 650 central). Gotta spread the love around lol. I was looking to try and get the cr up to ~10:1 (no good reason, just cuz). I don't ride "long distances" but love to run her hard. I ride mostly with 1300cc and 1500cc bikes and love the look when they can't just "walk out of my life".
If my math is correct (assuming proper info from mfg) with the 750 kit using supplied gaskets (base .020 head .060) the advertised cr is 9:1. By using an online cr calculator and some rough volumes etc I come up with a cr of 9.93:1 using copper gaskets (base .010 head .032) totalling .042 vs .080 in the kit. For a reduction of .038 in total stack height. I have read a post by Two many that for each .015 of reduction the cam will be retarded by 1° for a total of 2.5° retarded.
First question. Is that 2.5° going to be beneficial or detrimental with the shell #1 cam?
Second, is it worth re-indexing the cam for 2.5°?
Third (purely cosmetic) what is the best way to prep case and head halves for long term paint adhesion? I know cleanliness is next to godliness, I just haven't had much luck with paint sticking to cast aluminum.
Boy... that's a mouthful to chew on.If my math is correct (assuming proper info from mfg) with the 750 kit using supplied gaskets (base .020 head .060) the advertised cr is 9:1. By using an online cr calculator and some rough volumes etc I come up with a cr of 9.93:1 using copper gaskets (base .010 head .032) totalling .042 vs .080 in the kit. For a reduction of .038 in total stack height. I have read a post by Two many that for each .015 of reduction the cam will be retarded by 1° for a total of 2.5° retarded.
First question. Is that 2.5° going to be beneficial or detrimental with the shell #1 cam?
Second, is it worth re-indexing the cam for 2.5°?

Got a suggestion, lowering the head that much is gonna fess up a little slop in the cam chain to play with... hence your question in the first place. Instead of accepting the cam retard, try getting it back. I think that something like washers on the cam chain guide would get some of that retard back. Maybe take two 1mm washers (one for each hole) and use JB Weld to attach 'em to the back side of the chain guide.... maybe even 1.5-2mm thickness. That's gonna pull on the front of the chain and advance the cam... possibly even enough to get you back to zero.
All that aside.... have you considered you might have an interference problem with the piston dome and the valves? Not sayin' you will, but it might be good to look into it.
Best luck I've ever had was with a bead blasted finish. Thoroughly clean after with soap and water, then treat with AlumiPrep. Link.Third (purely cosmetic) what is the best way to prep case and head halves for long term paint adhesion? I know cleanliness is next to godliness, I just haven't had much luck with paint sticking to cast aluminum.
It's what we used in the airplane world. It's good stuff.
ippytattoo
Just another grumpy old hack.
Boy... that's a mouthful to chew on.
Got a suggestion, lowering the head that much is gonna fess up a little slop in the cam chain to play with... hence your question in the first place. Instead of accepting the cam retard, try getting it back. I think that something like washers on the cam chain guide would get some of that retard back. Maybe take two 1mm washers (one for each hole) and use JB Weld to attach 'em to the back side of the chain guide.... maybe even 1.5-2mm thickness. That's gonna pull on the front of the chain and advance the cam... possibly even enough to get you back to zero.
All that aside.... have you considered you might have an interference problem with the piston dome and the valves? Not sayin' you will, but it might be good to look into it.
Best luck I've ever had was with a bead blasted finish. Thoroughly clean after with soap and water, then treat with AlumiPrep. Link.
It's what we used in the airplane world. It's good stuff.
I plan on doing my due diligence and checking clearances to look for interference with squish and valves.
Thanks for the link. I am gonna have to do some reading. I will have to out source the blasting
ippytattoo
Just another grumpy old hack.
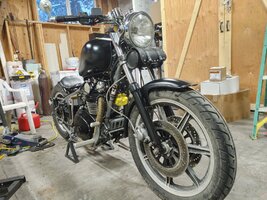
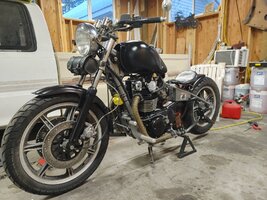
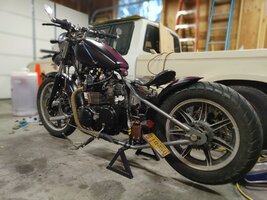
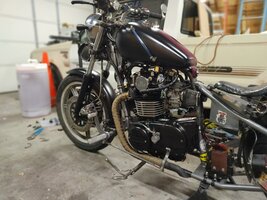
Over the last couple months I was able to do a quick refresh on my labor of love. Rebuilt the motor, corrected a couple things that needed addressed and gave the girl a new look
Motor started this rebuild as a 666cc 360° motor with stock 447 cam, valves springs, yada yada yada. Basically the only difference from a bone stock motor was increased displacement. The rebuild went much faster and easier than originally planned thanks to great suppliers. Current specs are:
*750cc big fin kit from yamahaxs650.com
*277 crank rephase by HHB
*Shell #1 cam from Hoos Racing, rephase by mrriggs
*1mm oversized Manley stainless int/exh valves from Hoos Racing
*Bronze valve guides from Hoos Racing
*RD valve springs from Hoos Racing
*Copper .026" head gasket and Copper .015 base gasket from 650central
*5th overdrive from mikesxs
*Pandemonium 277° ignition
*Spin on filter kit from 650central
*Cylinder head shaved to ensure a perfectly flat surface and valve seats cut by Stipes Engine Specialty in Redmond OR
*Case halves, head/rocker box cover, and various other parts powdercoated by Commercial Powdercoating in Bend OR.
I was aiming for about 10.5:1 compression. I tested compression on the fresh build prior to first start and got 210psi(right)/208(left). This was with a slight oil film from assembly. Being kick only I was a little tired by the time I was checking the left cylinder compression. When it was time for the first start I was a little nervous to say the least but after a few priming kicks (ignition off and fuel/choke on) she lit up on the 2nd kick. High idle with the choke on was steady and smooth. Carbs were already adjusted on the 666cc 360° setup. Checked timing and it was just a tad retarded from normal which I left as is. Even with my existing elephant foot adjusters the valves are considerably louder than before but I attribute this to the larger valve lash for the Shell #1 cam (set at .006int/.009exh) vs stock 447 (set at .003int/.006exh). Let the motor idle for about 10min while slowly turning off the choke to get up to operating temp and the motor settled in at a respectable lopey 1100rpm idle. Outside temp was 19° so I was very pleased with the first start.
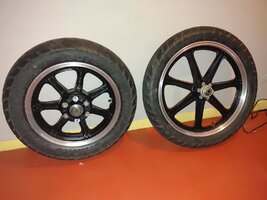
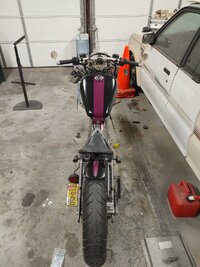
Replaced my rear fender which had several cracks and broken areas because it was a very thin fender meant for a kikker 5150 bike. Took a flat trailer fender and some angle steel and made a ribbed rear fender. Repaired some damage to the front fender from hitting a large pothole and the fender hitting the bottom of the lower triple tree. Added a fuel sight gauge to the left side of my gas tank, built a new battery box and gave her a quick paint job using Spraymax 2k rattle cans. Then I refurbished the cast wheels and gave them a bit of paint as well. All in all I am very pleased with the final outcome of the rebuild/refresh.
Motor started this rebuild as a 666cc 360° motor with stock 447 cam, valves springs, yada yada yada. Basically the only difference from a bone stock motor was increased displacement. The rebuild went much faster and easier than originally planned thanks to great suppliers. Current specs are:
*750cc big fin kit from yamahaxs650.com
*277 crank rephase by HHB
*Shell #1 cam from Hoos Racing, rephase by mrriggs
*1mm oversized Manley stainless int/exh valves from Hoos Racing
*Bronze valve guides from Hoos Racing
*RD valve springs from Hoos Racing
*Copper .026" head gasket and Copper .015 base gasket from 650central
*5th overdrive from mikesxs
*Pandemonium 277° ignition
*Spin on filter kit from 650central
*Cylinder head shaved to ensure a perfectly flat surface and valve seats cut by Stipes Engine Specialty in Redmond OR
*Case halves, head/rocker box cover, and various other parts powdercoated by Commercial Powdercoating in Bend OR.
I was aiming for about 10.5:1 compression. I tested compression on the fresh build prior to first start and got 210psi(right)/208(left). This was with a slight oil film from assembly. Being kick only I was a little tired by the time I was checking the left cylinder compression. When it was time for the first start I was a little nervous to say the least but after a few priming kicks (ignition off and fuel/choke on) she lit up on the 2nd kick. High idle with the choke on was steady and smooth. Carbs were already adjusted on the 666cc 360° setup. Checked timing and it was just a tad retarded from normal which I left as is. Even with my existing elephant foot adjusters the valves are considerably louder than before but I attribute this to the larger valve lash for the Shell #1 cam (set at .006int/.009exh) vs stock 447 (set at .003int/.006exh). Let the motor idle for about 10min while slowly turning off the choke to get up to operating temp and the motor settled in at a respectable lopey 1100rpm idle. Outside temp was 19° so I was very pleased with the first start.
Replaced my rear fender which had several cracks and broken areas because it was a very thin fender meant for a kikker 5150 bike. Took a flat trailer fender and some angle steel and made a ribbed rear fender. Repaired some damage to the front fender from hitting a large pothole and the fender hitting the bottom of the lower triple tree. Added a fuel sight gauge to the left side of my gas tank, built a new battery box and gave her a quick paint job using Spraymax 2k rattle cans. Then I refurbished the cast wheels and gave them a bit of paint as well. All in all I am very pleased with the final outcome of the rebuild/refresh.
Attachments
Last edited:
Looking good.Over the last couple months I was able to do a quick refresh on my labor of love. Rebuilt the motor, corrected a couple things that needed addressed and gave the girl a new look
Motor started this rebuild as a 666cc 360° motor with stock 447 cam, valves springs, yada yada yada. Basically the only difference from a bone stock motor was increased displacement. The rebuild went much faster and easier than originally planned thanks to great suppliers. Current specs are:
*750cc big fin kit from yamahaxs650.com
*277 crank rephase by HHB
*Shell #1 cam from Hoos Racing, rephase by mrriggs
*1mm oversized Manley stainless int/exh valves from Hoos Racing
*Bronze valve guides from Hoos Racing
*RD valve springs from Hoos Racing
*Copper .026" head gasket and Copper .015 base gasket from 650central
*5th overdrive from mikesxs
*Pandemonium 277° ignition
*Spin on filter kit from 650central
*Cylinder head shaved to ensure a perfectly flat surface and valve seats cut by Stipes Engine Specialty in Redmond OR
*Case halves, head/rocker box cover, and various other parts powdercoated by Commercial Powdercoating in Bend OR.
I was aiming for about 10.5:1 compression. I tested compression on the fresh build prior to first start and got 210psi(right)/208(left). This was with a slight oil film from assembly. Being kick only I was a little tired by the time I was checking the left cylinder compression. When it was time for the first start I was a little nervous to say the least but after a few priming kicks (ignition off and fuel/choke on) she lit up on the 2nd kick. High idle with the choke on was steady and smooth. Carbs were already adjusted on the 666cc 360° setup. Checked timing and it was just a tad retarded from normal which I left as is. Even with my existing elephant foot adjusters the valves are considerably louder than before but I attribute this to the larger valve lash for the Shell #1 cam (set at .006int/.009exh) vs stock 447 (set at .003int/.006exh). Let the motor idle for about 10min while slowly turning off the choke to get up to operating temp and the motor settled in at a respectable lopey 1100rpm idle. Outside temp was 19° so I was very pleased with the first start.
Replaced my rear fender which had several cracks and broken areas because it was a very thin fender meant for a kikker 5150 bike. Took a flat trailer fender and some angle steel and made a ribbed rear fender. Repaired some damage to the front fender from hitting a large pothole and the fender hitting the bottom of the lower triple tree. Added a fuel sight gauge to the left side of my gas tank, built a new battery box and gave her a quick paint job using Spraymax 2k rattle cans. Then I refurbished the cast wheels and gave them a bit of paint as well. All in all I am very pleased with the final outcome of the rebuild/refresh.
I'd love to hear a video of it loping along. Your motor's ingredients are very similar to those i have planned for my build. Good job!
Very nice! It has brakes!
ippytattoo
Just another grumpy old hack.
Very nice! It has brakes!
It has very good brakes!!! Lol
ippytattoo
Just another grumpy old hack.
Looking good.
I'd love to hear a video of it loping along. Your motor's ingredients are very similar to those i have planned for my build. Good job!
Sounds great... nice build.
Thanks for sharing
ippytattoo
Just another grumpy old hack.
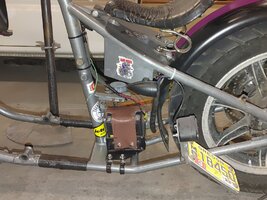
Had a chance to do a little break in (2 heat cycles and a retorque) and go for a fairly short ride (29 miles) yesterday with the new combo. Overall it was a good ride. Motor seems to have plenty of power, I could almost keep up with my buddy on his 2005 yzf r6 and pull away from another buddy on a 96 vt1100. The motor seems happiest between 4k and 6.5k rpms. It almost feels like a 2 stroke coming on the pipe at 4.5k, it has a large increase in power at that point. At 6.5k it feels like it plateaus and shifting to the next gear brings it right back to the "boost" lol. I did notice that if I am at about 3k and give it full throttle it kinda bogs for a second but with a slight roll off it pulls really well and will take full throttle at 4k with no issues. Pulled the plugs after it cooled down and it looks as though I may be a little rich, the porcelain by the electrode had a light tan color and the electrode/threaded base had a little bit of black sooty film. The valves still seem loud to me at idle with lash at .006/.009 but I guess that is how it will be, at speed I can't here them so I guess I just need to ride faster. My neutral switch has developed a nasty oil leak. Going to try and stake the neutral switch but have a new 1 coming. Also developed a drip from the small passage plug on the side of the sump plate. Anyone ever run across this? I am thinking that when I had it powdercoated it may have loosened up enough to cause a drip which is about 1 drop of oil every other day or so.

Last edited:
Looking good, Kawi carbs on there now?
ippytattoo
Just another grumpy old hack.
Oh yeah, still rocking the cvk34 carbs from an ex500 on the girl. I think that's about the only thing I haven't changed in the last few years.Looking good, Kawi carbs on there now?
Lookin' good!!!
I expect you're right. Those passageways had a ball swaged in 'em and epoxy layered over that. It's very possible the heat from the powdercoating softened the epoxy. @Mailman dug out all his factory epoxy and replaced it with (original) J B Weld. That was several yrs ago and, far as I know, has held up just fine.Also developed a drip from the small passage plug on the side of the sump plate. Anyone ever run across this? I am thinking that when I had it powdercoated it may have loosened up
Yes, all the oil passageways seem to have been plugged the same way by the factory after they were drilled. They placed a small bearing in the end of the passageway and smeared some rough epoxy over the top of it. I replaced that epoxy in a bunch of places on my XS2 motor when I built it and they are holding up fine.I expect you're right. Those passageways had a ball swaged in 'em and epoxy layered over that. It's very possible the heat from the powdercoating softened the epoxy. @Mailman dug out all his factory epoxy and replaced it with (original) J B Weld. That was several yrs ago and, far as I know, has held up just fine.


My neutral switch has developed a nasty oil leak. Going to try and stake the neutral switch but have a new 1 coming.
I had the same problem with my neutral switch, it was leaking like crazy. I staked it and it has been oil tight ever since. If you try this be careful not to hit your punch too hard on that soft aluminum, you don’t want to crack the plastic.
