Neglected XS motor, what would you do?

AtoXS

XS650 Addict
Messages
173
Reaction score
3
Points
18
Location
Plattsburgh, NY
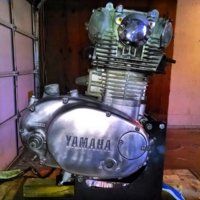
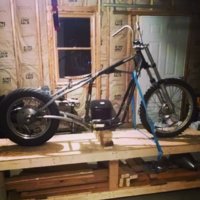
Hey guys I'm looks for a few opinions from the guys who really know the XS motor and what the regular weak points are to focus on. I really don't know much about it, when it last ran, the mileage, or general condition. This is a ground up build that some of you might have already seen on the Greasy Dozen thread or on IG. For now the goal is just to get this pig running well enough to get it through the summer and rip it apart if need be next winter. With so many things to do and buy for this build, a motor rebuild isn't really one of them. So here is the question, what is the minimum you would do before dropping this motor back in the frame? I plan to call and order what I need today or tomorrow form 650central, but I need a shopping list. Here is what I have or plan to buy for sure.
HHB PMA
PAMCO ignition
Tack drive plug
Side cover gaskets
Starter gear cover gasket and freeze plug (going kick only)
Oil filter with gasket and oil sump filter with gasket
Cylinder head gasket (looks like this was leaking right in front of the oil tube)
Valve tappet cover seals and valve guide seals?
1 piece pushrod and seal
Oil line copper washers?
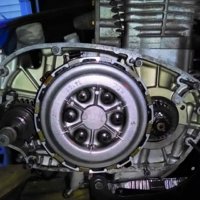
Cam chain?
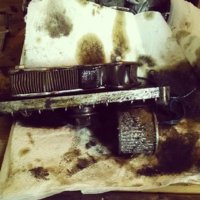
Cam chain guide(Definitely fucked as they all are, evident in the photos below)

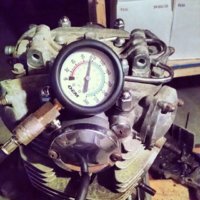
I'm sure I'm missing some shit, what are some other problem seals and gaskets that should be remedied. I guess I should also say that I did a compression test on the motor in the stand and got some low numbers, around 90. Then I took some PB buster, hit the intake and exhaust ports and put a little oil in each cylinder and turned the engine a bit to cycle it. I let it sit for a few days then hit the valves and openings with a brass brush from a gun cleaning kit then took another test and got 117 on each side. With the oil filters out I saw the usually plastic shit and metal shavings in the filter, but they don't seem to be magnetic and look aluminum, but I understand that to be all cam chain guide issues that are very common and easily fixable.
Check out the gayed up photos I pulled from IG, I can also take better ones when I get home if that helps anyone, let me know, thanks.
 

Attachments

  • 1f25361c8abd11e3873c0e9928917b41_8.jpg
    1f25361c8abd11e3873c0e9928917b41_8.jpg
    134.3 KB · Views: 212
  • 8d9ea194a57c11e3b8d31266326ae0f4_8.jpg
    8d9ea194a57c11e3b8d31266326ae0f4_8.jpg
    119.4 KB · Views: 199
  • 813fa13ea0c011e39556121b50e7087a_8.jpg
    813fa13ea0c011e39556121b50e7087a_8.jpg
    137.1 KB · Views: 210
  • e00fe9caa58011e38dff0a7d714f88f5_8.jpg
    e00fe9caa58011e38dff0a7d714f88f5_8.jpg
    144.6 KB · Views: 183
  • 0e155f9eabee11e38f3312d04ced33c1_8.jpg
    0e155f9eabee11e38f3312d04ced33c1_8.jpg
    120.4 KB · Views: 184
Last edited:
A pic of the LH side under the alternator cover would be helpful, but 1 thing to consider is the pushrod seal and bushing. If you are wanting to do a tear down and rebuild later you can leave the starter and seal in for the time being and do the freeze plug when you do the rebuild so you don't have to get into the bottom end. You can probably just clean the screen that came out of the RH cover and just replace the gasket there. What year is the donor motor? What ignition is in it now? If it is a later motor (tci) you may need the bushings for the advance rod for the Pamco.
 
A pic of the LH side under the alternator cover would be helpful, but 1 thing to consider is the pushrod seal and bushing. If you are wanting to do a tear down and rebuild later you can leave the starter and seal in for the time being and do the freeze plug when you do the rebuild so you don't have to get into the bottom end. You can probably just clean the screen that came out of the RH cover and just replace the gasket there. What year is the donor motor? What ignition is in it now? If it is a later motor (tci) you may need the bushings for the advance rod for the Pamco.

It looks like what I was referring to a shifter seal is actually the pushrod seal.
I'll get a picture with the left side off, just not near the motor atm so that's what I could pull from my instagram feed.
The starter is already off. I'm not planning on yanking all the gears out for it, only the ones I can get to with that cover off and cap it off w/ the freeze plug I already have. The motor is an 80 so TCI. When I order the Pamco it's going to probably be the big kit from Mikesx that comes with everything.
 
Bugrit, man,
slap it an a frame and see if it runs.
117 psi after being parked outside for Gawd knows how long is a good sign, they usually get better numbers than that once they've run for a while.
And what camchain guide photo? I don't see one in your post.
 
You may want to consider the e-advance if that is not what you were looking at. I can't personally say but Mikes ATU has had some reports of poor quality and weak springs. Also when you go to install the bushings in the cam make sure that they go in fairly easily, several people on here have had issues with either the bushings outer diameter being oversized or the holes in the ends of the cams not being finished to the correct inner diameter and splitting the threaded end of the cam. Another thing to consider, when installing the PMA even though it is not absolutely necessary to install a key in the flywheel it is a good idea to put one in there to keep your timing marks from moving on you and causing confusion as to why the ignition is out of time.
 
Bugrit, man,
slap it an a frame and see if it runs.
117 psi after being parked outside for Gawd knows how long is a good sign, they usually get better numbers than that once they've run for a while.
And what camchain guide photo? I don't see one in your post.

I haven't pulled the head off yet so I don't have a photo of that, I figured I would hold off and ask this question first before I start digging in too deep. The nastiness of the guide is shown on the filter photo.
 
The motor appears to have little or no maintenance. The cam chain and front guide need replaced to start with. Best to buy a gasket set it will have what you will need. No way to tell what shape the rest of the motor is in without taking it apart. If the cylinders and pistons are not worn out and meet specs. You can just hone and new rings. Crankshaft and rods should also checked. Valves should be lapped in and seals in stalled and valve guide clearance checked. Best to fix it right to start with. A cheap fix is a no fix.
 
+1 with scabber.

This seems to come up quite often. Guys want to place an order for a ton of parts, without first opening up the engine. I have no idea how anyone could do that. Very short sighted.

Yamaha has something called a Service Manual. Take the top end apart and measure the components for wear, compare to the specs in the manual, and then order the needed parts. Seems logical to me.
 
I get where some of you guys are coming from, I really do and I'm sure I'm probably the 101st dummy to ask this type of question. I'm not one for the easy or cheap way out and really that's not what this is about because in the long run I have plans for a rebuild and rephrase and likely a 750 bore, just not right now. I realize that pulling the top end apart isn't the same as splitting the cases, but it's still more than I can or want to get into right now.
The goal currently is to fix the most common problems that are usually associated with this engine, nothing more. If it fires and runs, great, if not then it will be a 2 season build, with some of the shopping done. If it leaves me on the side of the road, so be it, I've got a cell phone, access to a truck and another bike.
Anyway here's what I came up with. I just made a quick shopping list at Mikesxs, although I'll order from 650central and I think I've got pretty much everything covered.
Stock Bore Cylinder Head Gasket
Oil Filter Screen (in RH engine side cvr)
Gasket - Filter element base
Gasket - oil filter strainer (sump) plate
OEM type Oil Filter Strainer (Sump)
Gasket -Starter, gear train cover
Gasket - LH case cover (Alternator)
Gasket - RH crankcase cover (Clutch)
Clutch Pushrod - Long one piece type
Ball Bearing - for Clutch Pushrod Assy.
Bushing-clutch pushrod
Clutch pushrod oil seal
OEM type Oil Filter Strainer (Sump)
Oil Filter Screen (in RH engine side cvr)
Front Cam Chain Guide
Cam Chain- DID 219FTssx106
 
Last edited:
Since you are planning a no fix save your money. Replace the filters adjust the cam chain change oil and run the mother fucker. Fix next winter.
 
Back
Top