Newbies and Top End

Rlauchard

XS650 Addict
Messages
295
Reaction score
13
Points
18
Location
Marietta, OH
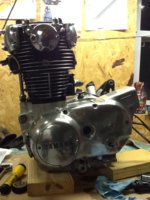
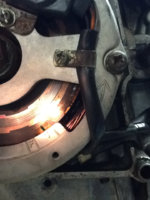
OK...so while getting into my top end to reverse my cam shaft (see thread http://www.xs650.com/forum/showthread.php?t=23472), I decided to switch out my cam chaing guide.

Then I decided that my gaskets/seals should be replaced as the head gasket was leaking a bit of oil as well. Once here, I decided that I should clean my piston heads as they have a lot of carbon on them. I found a thread for piston rings (http://www.xs650.com/forum/showthread.php?t=133) and decided, I should replace those while at it. This is getting crazy!!!!

So, here's the ultimate goal:

1. clean piston heads (from reading, paint stripper will be my choice of removal)
2. replace piston rings (with a set from the thread above)
3. replace the gasket on the lower-top
4. mic the bores on the jugs (just wanted to say that, no clue what it means yet)
5. replacing my cam chain

More to come....*sigh* am I getting smarter or dumber?
 
Visual help/confirmation needed.......

So, I'm much better with pictures than text...could use some good old 650 help.

1. removed the top end and all of the gaskets (kept old cam chain in and tied up)
2. removed the piston heads (just removed the outer pins and I'm planning on reusing them...I've seen various thoughts and the pins have lots of tension)
3. cleaned the carbon off of the piston heads

Since we're open and dissassembled, I'm taking it to a guy tomorrow who is going to 'mic it'. My only knowledge of this is that he is going to tell me whether stock rings/heads will still work (bike has 11K mileage...I'm hoping it's fine).

I'm stopping by advanced auto parts to see if they can order the rings in the thread above, but I have confusion around how the rings go in. I've read the manual, and this is my visual interpretation of the ring placement with regards to aligning the gaps.

Can someone give me a 'hey ho, you got it bro', or a 'whoa, whoa, whoa...you just don't know'?
 

Attachments

  • AligningPistonRingsVisual.jpg
    AligningPistonRingsVisual.jpg
    68.9 KB · Views: 495
I'd wait for the mic inspection to be done before ordering rings just in case you have to oversize or bore. I had my '83 2-over bored 5 years ago and set the rings and pistons meself....it was simple....not sure what I followed, mebbe a stock piston set with the rings still in. Stagger the gaps as shown.
 
You got it. You mentioned cam chain was a front guide and gaskets for the cylinders bottom included in that wish list?
 
Weekendrider....what have I done?!?. HAHA.

Igot the complete set of gaskets for Xmas last year...got the cam chain guide in the mail last week...this was before I decided the jugs were coming off. Heading in now for the mic....
 
On your ring gap positions I might turn the wiper ring around to 30 degrees and the compression around to 330 . This keeps any of the gaps from lining up.
But I agree with nj1639, wait till you have the measurements before ordering the rings. No sense in ordering the rings then find you need a rebore.
Leo
 
UPDATE: This explains a lot. I didn't know how to tell this as I'm not a mechanic and this is my first time for all of this. Found out that the PO did indeed have the engine apart as the cylinders were bored and there are oversize rings in place. I beleive they are running the 2nd oversize rings .50mm.

The shop is honing the cylinders and have ordered some OEM replacement rings (hoping that the pistons are OEM)...they are ART piston heads, so they think this is the case.

Having the valves and the head done by the shop as I'm a bit timid and think by the time I get the parts and such needed, I'll be in over what they are charging me.

This gives me about a week off I guess...probably a good thing.
 
XSLEO....question for you.....from your post:

"On your ring gap positions I might turn the wiper ring around to 30 degrees and the compression around to 330 . This keeps any of the gaps from lining up."

Starting from top and moving to the bottom of the piston:
1. move the compression ring to 330 degrees
2. move the wiper ring to 30 degrees
3. now, according to the clymer manual, 'place the middle ring end gap 120 degrees from the top rail gap of the oil control ring'.
4. this would now put the control ring top rail at 150 degrees
5. this would then put the control ring spacer at 270 degrees
6. this would then put the control ring bottom rail at 30 degrees

That would then line up the wiper ring and the oil control ring bottom rail.

Do you agree with what I've written, and is that what you mean?
Or are you saying that I move the wiper and compression to 30/330, and leave the others the same, thus 'ignoring' the Clymer manual?
 
I've seen several different instruction sets for where to place the end gaps. What most seem to agree on is no gaps over the piston pin and none of the uppers facing forward, and of course, no gaps over other gaps. Here's a Wiseco PDF with some good info but their end gap placement diagram appears to refer to a car engine .....

http://www.wiseco.com/PDFs/Manuals/RingEndGap.pdf

For bike engines, I've always read to not place the gaps over the piston pin. I would do it more like this .....

RingEndGaps.jpg
 
5Twins....thanks for the quick response....I'm not necessarily questioning you here although it will appear that way :).

I've been trying to go by the book with the exceptions re: torquing and such.

So, the way that you have laid it out:

1. my top oil ring rail would be at the 300 degree mark
2. my 2nd compression or wiper ring would then be at the 240 degree mark
3. my top compression ring would be at the 120 degree mark

Again...i'm only trying to be absolute here as I don't know an iota about pistons or rings...this goes against the manual that says 2nd compression is 120 degrees from top rail....

I'm sure you've done this some times before...I am clear on your direction right? and that is an affirmative to run with this? :) lot of pressure!

thanks again
 
What you have to realize is that once you start running the engine, the end gaps are going to move. They'll slowly rotate all over the place. If you tear the motor down again sometime in the future, you're not going to find the gaps where you installed them. So, basically, put them anywhere you like, just not over each other, over the piston pin, or the top 2 facing forward. This isn't super critical and shouldn't cause you any problems unless you did something silly like lining all the gaps up.
 
In the drawing I posted, you could flip-flop the top and bottom oil rail gaps or the top and 2nd compression ring gaps if it makes you feel better. Like I said it's not that critical.
 
Hi, I wanted to update this thread with some work that i've done, however, I'm a bit embarrassed at this point in time on how that work went.

As a starter, my wife likes to call me '2 time Ryan' as I have to do everything twice. This probably won't be any different.

So, I have the top back together and at this point am ready to try and get my valve clearances set. Rather...that is what I would like to do.

I know a lot of you on this site have a lot of experience doing this...I don't...that doesn't make what I did right, but I'm really trying to measure whether what I did is close to absolutely horrible...or if it's one of those...not the best, but probably not that bad.

1. Installing the jugs: I had a few issues getting the dang gasket in right, so it wasn't as clean as I wanted it..there were bits of oil and finger grease on it. I tried to wipe it down before putting the jugs on. As I was setting the pistons into the jug, I also noticed that I tore the gasket...it was about halfway to the outside of the gasket starting from the inside. I didn't have another gasket, so I installed it.

How stupid am I? Did I frack this thing up from the start? Is it possible that this won't cause a problem?

2. Cam chain guide...I had it installed upside down...UGH...unreal. I took it out, without removing the jugs, turned it over and reinstalled it. HOWEVER, I installed it the 2nd time with 2 new bolts that I got from Mike's...which were shit, shit, shit...with very little torque, the new bolt broke off AND partially stripped out the guied hole. I cut a bolt a bit longer and was able to get it snug...I added a good amount of threadlock on the end.

How stupid am I? Did I frack this up as well? Is this probably going to come loose pour oil everywhere?

3. I installed the camchain with the left side mark at 12 o'clock and the right side punch at 9 o'clock and the timing mark was right on. Once I got everything together, my timing mark falls 'backwards' from the timing mark by about 3/8 of an inch...trying to 'advance' it to the timing mark it has resistance and then it falls back.

How stupid am I? Did I frack this up as well? Am I going to have to pull the top back off, and move the chain 1 tooth 'forward'?

Here are some pictures...my painted engine, newly polished covers and such (at least it looks pretty)?
 

Attachments

  • photo(1).JPG
    photo(1).JPG
    281.6 KB · Views: 374
  • photo.JPG
    photo.JPG
    279.5 KB · Views: 333
#1, a minor tear won't hurt anything. If the tear was more than 3/4 of the way it may fail a bit sooner than a untorn gasket but it may not. under 1/2 way through, don't worry about it.
#2, I think what you did should be fine. It may seep a bit of oil if it is too loose but I doubt it.
#3, The valves springs put a tremendous amount of pressure on the cam lobes. When the can tunrs so the rocker arms are on the close side of the cam they push the cam and it can be very hard to keep the crank from turning. I use a end wrench to turn the crank by hand to observe timing marks and such.
With the chain tensioner properly adjusted helps a bit. Minimal slack in the chain limits this movement.
On adjusting the valves having the timing marks right at TDC isn't nessasary. The valves once closed stay closed for quite a few degrees of engine rotaion. Much more than the few degrees the engine is off the TDC mark.
Leo
 
Thanks Leo...you kind of lost me on #3....do I need to reposition the chain based on the picture where the timing mark is (i enhanced the mark with photoshop)? Again, I can't get it to 'stay' on the mark...as I could previously. Any time I let go of the nut on the alternator, it falls back to this position.
 
Ok, as the engine turns the cam lobes open the valves, valve spring pressure closes them. The cam lobes has an open ramp and a close ramp. As the cam turns, the open lobe pushes rocker arm to open the valve. As the top of the lobe goes past the rocker arm. The pressure of the valve spring pushes the rocker arm against the close ramp and this turns the cam a bit farther. At the same time the other three valves are being pushed open or are pushing the cam.
At some point the pressure of the springs pushing the valves closed will balance the pressure of the valves being pushed open. This is the place the engine comes to a stop. When you turn the engine by hand to line up TDC you are turning the engine to a point other than this natural stopping point. So when you stop turning the engine it turns to this stopping point.
Leo
 
UPDATE:

After soda blasting my jugs, cylinder head and rocker box, I painted it black and then sanded all my fins down. Reinstalled everything and sweated over whether I had this right. Specifically, I kept questioning my knowledge of the valve adjustments, but I got it sorted out. Last night, I got the engine back in the bike, side covers back on and oil in the girl. I was nervous...nervous...nervous.

I hit the start button and this bitch fired right up, and I mean RIGHT UP (with TCI). The bike has literally never done this. Now, the bike is in pieces and not everything is bolted down, but I have to say that I think this is right.

I know that listening on a video isn't easy, but if you can watch my quick vid and see if there is anything that jumps out. To me, ther might be a bit of noise in the tappet area, but I'm not sure. CLEARLY, I have never heard an XS650 run right so I don't know!

 
HUGE boost for your build and your confidence.
Good on ya!

Is the gold your final color?
 
Back
Top