Oil Leaks for the Newbie

Rooskie25

XS650 Member
Messages
10
Reaction score
11
Points
3
Location
Texas
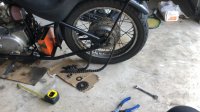
How it going y'all i have recently bought a steal of a deal on a 1972 XS650, but the biggest problem is I have little to no experience with bikes but I like the journey that awaits, and I'm trying to dive in. Of coarse I'm slowly finding more issues that where not mentioned, like two oil leaks I'm trying to figure out with the help of posts from this page of coarse. I have found out my clutch push oil seal is one of the culprits if not the main. I have a couple photos ill post and was hoping if anyone could help me out and see if they noticed anything else i should be worried about while I'm down here. also threw in my recent purchase, hope to hear from some of y'all soon :rolleyes:
some of y'all soon :rolleyes:
IMG_0632.PNG
photo1.jpeg
photo2.jpeg
photo3.jpeg
photo 4.jpeg
 
That's strange that someone would have sealed off the neutral wire like that.

The neutral switch can develop a pretty good leak between the black plastic part and the metal housing. The black part gets loose. This happened on my ‘77, I was able to make it oil tight again by taking a punch and carefully staking the metal around the black plastic part to tighten it back up. Like so,
71445ED8-2C2F-49BD-A754-E8CE15AC2883.jpeg
E31A09CE-B54C-493A-AF68-74D394D8951C.jpeg
B89981D0-037D-4062-87B7-8EA22D0BC0D5.jpeg


This is also a good chart showing some of the most common leaks on these motors. Photo courtesy of gggGary.
D28FD6BF-6601-42A0-971E-CEA06426D60D.jpeg
 
i appreciate the quick response y'all, yeah the neutral switch gushes oil out, I just have a tough time trying to get it out, something ill have to read up on. That crank shaft area along with sprocket are are intimidating to get into in order to tighten/put new seals on. Any tips when moving that way?
 
First of all, sorry I failed to welcome you to the forum earlier! So welcome to the madhouse! I would start with a general cleanup in there so you can see what you’re doing. This can be done pretty easily by sliding a pan under your motor and pouring some kerosene in there and get yourself some bristle brushes, even throw away paint brushes will work.
I can pretty much guarantee you that your clutch push rod seal is shot, they all fail eventually. Here’s a good video on how they are replaced.

That great big nut on your front sprocket has to be really tight or it will leak oil ( a lot! ) many times they have worked loose until they’re just finger tight. So check that.

After that, once you’ve cleaned things up enough to see what’s doin, just start locating your leaks and running them down. It’s a process we all go through.

At the top of the screen , in the black band, click on the word Tech and it will take you to a whole page full of technical articles that cover most of the known problems.

Good luck with your project!
-Bob
 
I wouldn't worry too much about the crank seal. As far as leak spots go on that side, it's at the bottom of the list, and your alternator area looks pretty dry. As you can see from Mailman's pics, your neutral switch has a hex head and just screws right out. But yours has J.B. Weld caked all over it so you'll need to chip that all off first.

That pushrod seal video makes a few good points but is mostly sadly lacking. Some people just like doing things the hard way it seems, lol. First off, take the darned sprocket off to give yourself some room to work, and pull the pushrod right out for the same reason .....

ImIfyVx.jpg


And for install of the new seal, a stubby Phillips screwdriver makes a nice "tool". Slip the new seal on it, apply gasket sealer around the O.D., and push it into place with the screwdriver .....

Vsw1pYE.jpg


On my last one, I guess I could have beveled the hole better in the upper right area because it did roll the rubber out there some .....

a6YXNOr.jpg


..... but 200 miles later it was still bone dry so it appears the install was a success .....

cqZq5IF.jpg


There is also a bushing in there that the pushrod fits through. If it's badly worn (many are), it will allow the pushrod to wiggle side to side too much and even a new seal won't work. Some bushing info is here, post #64 .....

http://www.xs650.com/threads/200-special.51454/page-4
 
The neutral switch can develop a pretty good leak between the black plastic part and the metal housing. The black part gets loose. This happened on my ‘77, I was able to make it oil tight again by taking a punch and carefully staking the metal around the black plastic part to tighten it back up. Like so,
I did the same with a corner of the jaw of a small vice grip tightened just the right amount. Squeeze it down in six places, like you show. The metal is soft

The sensor itself has a torque spec about the same as a spark plug. It's a bad mistake to try to fix the leaking by tightening it down. The leak comes from between the bottom of the plastic and the metal. Staking down the plastic like this fixes it
 
hey what's up guys I've finally got some parts in and was able to take out my old seal along with my pushrod, but when taking out my pushrod I haven't noticed my old bushing or ball bearing...? Nor have i noticed my second pushrod behind the non existent ball bearing..? someone let me know if I'm crazy. Here are a couple of photos along with my cleaned off neutral switch, which seems to need some attention?

cleanedup.jpeg
seal area.jpeg
pushrod.jpeg
neutral switch.jpeg
cleanedup.jpeg
seal area.jpeg
pushrod.jpeg
neutral switch.jpeg
neutral.jpeg
 
when taking out my pushrod I haven't noticed my old bushing or ball bearing...? Nor have i noticed my second pushrod behind the non existent ball bearing.

Hi Rooskie,
Ha! No you’re not crazy. The bushing is this ring right here,
969DCD70-CF3C-4B59-B041-21871FE461BC.jpeg


It’s pressed into the case, there is a method for removing it, it’s a little tricky. If you really want to get into it we can point you in the right direction. I think you will probably be able to address your oil leak by just installing a new seal though.
As for the clutch push rod, there were two types that were produced. One was a long single rod like the one you have. Many think that’s the better design. I know I do. With that long rod setup that you have there is no second push rod and there are two ball bearings , one ball bearing is trapped inside your clutch actuating worm screw. The other ball bearing is all the way at the other end of that push rod inside your clutch pack.
346AEF82-C5DF-47FD-BF9C-6B8E97233397.jpeg
04F77822-CD70-45B8-9586-8F2B20F59CA7.jpeg

AA3DC818-8AA5-400A-BB20-49F127016651.jpeg


There’s no need to worry about removing it, it’s still there.

Your neutral switch can be tightened up, as I showed earlier. If the gasket has been damaged you might need to find or make a new one. You got this! :thumbsup:
 
Last edited:
ahhhh ok solid i purchased a new bushing and ball bearings. I won't worry about the ball bearing, and I watched a video a while back about backing out the old bearing so ill give that a go, should i replace the old neutral switch washer with a new copper one?
 
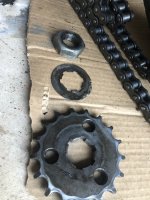
Installing the lock washer on the sprocket keeping the slots lined up on the splines of the output shaft is tricky AND critical. You can NOT tighten the sprocket if the tabs aren't lined up perfectly. Reusing a washer often means hammering flat and filing worn bend edges so the tabs sit where they should.
That front sprocket is bothering me, looks like your rear sprocket (wheel) may not be lined up correctly. Note heavy wear on the side of front sprocket.
Your chain looks pretty tight and maybe stretched.
this a good chain check.
chain issues..jpg
 
I think I’ll try throwing a new washer on my neutral switch, I have a photo I took the other day of my sprocket. Tell me what y’all think, it did look rough as I was taking it off. Appreciate the info!
 

Attachments

  • 37711857-C103-4EE8-B180-0A3C6AC17D1D.jpeg
    37711857-C103-4EE8-B180-0A3C6AC17D1D.jpeg
    207.9 KB · Views: 169
  • B27B9F6F-CB0E-4FB6-AEA1-56F5A378F977.jpeg
    B27B9F6F-CB0E-4FB6-AEA1-56F5A378F977.jpeg
    137.6 KB · Views: 162
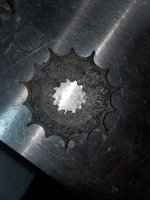
Carefully examine the sprocket teeth from the side. The spaces between them should be symmetrical and "U" shaped. If they're fish hook shaped like so, the sprocket is worn out .....

full


But what Gary was alluding to was the wear on the side of the sprocket. It looks like your rear wheel sprocket may not be correctly aligned with the front sprocket. Being someone's homebuilt custom hardtail, that's very possible.
 
Hey 5twins you mean something like this? One I just removed from a 1973 DT3 250 I recently traded for and am slowly getting back into good/safe running condition....20200508_001749.jpg . Bet it was the original.
 
What’s up y’all I had a question regarding replacing the bushings! The is my second time destroying a replacement bushing as I’m trying to get it into the seal opening! Is there just one specific size of bushing, because the old one I got out is to chewed up for me to tell!
 
Also going back to the topic of proper alignment with my hard tail, what’s the beat way I can go about that?
 
Welcome.

Wheel alignment can be fixed with spacers, either added or remove/resize on either side. Will need to move the rear wheel to the left.

Seems there is some mixed and matched going on on the bike/motor. Check the Frame and motor Vin no or post it up and we can verify what you have. Doesn't make any difference with seals or gaskets but does on the carbs, (yours are BS4's of an 80 and later model), and could on the motor internals, if the motor is 74 or later.........Looks like the cam chain adjuster cap is not for that motors year cam chain adjuster either....
 
Back
Top