Okay, where did I go wrong? (11mm master cylinder)

1974jh5

Curmudgeon.
Messages
711
Reaction score
28
Points
16
Location
Columbia, SC
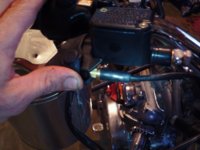
I want a better front brake but at this point don't want to get into hanging a 4 piston caliper and different rotor on my bike(although that could happen in the future). I decided to use an 11mm master cylinder on my 1980 XS650 with a single 38mm caliper, which seems to be a common swap. Got one from Mike's, it bled out perfectly (I've bled plenty of bike brakes before, this was no different) but the front brakes were nearly nonexistent. I realize there will be an increase in lever travel but it goes all the way to the bars and it's unpossible to lock the front wheel. I thought it was the lack of a slack adjuster, so I drilled and tapped for an adjuster screw, still the same problem. The caliper piston moves normally, the caliper and pad slides are clean, the hoses are stock but are in good shape.

A 11mm master cylinder is a 3mm drop in bore size and that's a HUGE drop, like 21.4%. A 12.9mm bore cylinder is a difference of 1.1mm, which is a 7.8% drop in bore size. I'm thinking that's where the problem is, but before blowing another $80 on a 12.9mm master cylinder I wanted to pick the collective brain here.

Others on this board have done this swap with good results. So where did I screw up?
 
Well I have been waiting til I got a few more miles on but here's what i have done up front;
Mikes XS cartridge emulators and fork seals. Good thing much better feel, a bit harsher and you can hear the washers blow loose but I'm thinking it's a better machine for that.
Overhauled both stock master cylinder and caliper, new piston in the caliper all new parts in the master cylinder. No change in braking, a bit "stiffer lever" because the caliper piston isn't binding from the gunk on the bore and behind the seal.

Put on a new MikesXS rotor, meh no change in feel but it is a LOT lighter. AND better looking.
Then changed to Vesrah sintered pads from 650 Central. this made a difference, about 10% better stopping. Couple of notes; follow his break in instructions. The mikes rotor should be sanded or better yet wet stoned before use. The one I had is from several years ago but the drilled holes had "raised edges" that should have been ground back to flat.
Next up was a one piece teflon (braided stainless in the common vernacular) brake line. Reduced lever "sponge" further, lever is rock hard, less than 3/4 total travel I had to thread the adjuster screw back to get the handle closer to the bar for leverage. But yeah, it still needed lots of leverage and 4 fingers to haul it down.

Finally

I went to a 10mm front master, I was also worried about travel. the travel increased from 3/4" to about 1 1/4" still plenty of room between the lever and the grip, But baby, she now STOPS, not stops (whimper). 2 fingers no problem. New Shinko tire will howl when I want it to. Huge improvement. But I think you HAVE to have the teflon line, the old rubber line will just swell too much under the pressure.

So yeah you need to find where the problem is yet.
Finally I have an easy to use controllable brake, I really love it. But I think you should keep in mind it AIN"T a sport bike system, it stops well but might be prone to over heating under hard repeated use. (overheating can = goes away, lever to the bar, no stop!)
Hope that helps!
 
Yeah, I know it's not a sportbike brake but there's GOT to be a way to make it better. With the stock M/C the front brakes would squeal sometimes until getting a little more squeeze, that tells me there's not enough pressure being applied.

If yours works with a 10mm then mine should work with an 11mm. I wondered if the stock rubber lines might have something to do with it. Braided stainless is on the short list, guess it got moved up.
 
Here is one trick worth trying while you wait for a new line.
This works, really.
Put the bike on the side stand turn the bars hard left, wait a bit squeeze the lever, release. Wait a bit, do it again, if that doesn't do walk away come back later repeat. The important thing is the brake line has to be uphill ALL the way from the caliper to the master and the master has to also angle up hill so the last little bubbles clear the line and master cylinder piston area and can bubble up into the reservoir, if you watch you'll see them come out. I had to do this with the master I just put on. And it's all I had to do, I changed masters and did not have to crack the caliper bleeder. Just gravity to get a hard lever.
 
Gary's method for bleeding micro bubles in the line is correct but needs more time. I bought a mastercylinder from 650 Central and MMM rang me in NZ to discuss my email order (hows that for service). During our conversation he advised me to be careful bleeding the system. He told me to loosen the Master cylinder (MC) cover and turn the bars so the MC was on the high side then pull the lever in and use a rubber band around the bar to hold tension on the lever. Leave it over night. I followed his advise and the brake is fine. I have a braided line feeding a R1 caliper.
 
Yup eliminates the wonderful junction. ;^(
I need to fab a support bracket down at the caliper, I just cant bring myself to put enough bend in it to use the stock bracket. I'll post a pic or two in a bit.
 
When you drop the MC size, you will get a greater increase in applied pressure, but you will increase the stroke length as well. So it may feel as if you do not have a good brake, because you are having to move the brake lever farther.
 
Pics as promised.

brakeupgrades%20005.JPG


brakeupgrades.JPG
 
Update put 140 miles on the "new brakes" yesterday and I as am happy as I can be with the 10mm master Vesrah pads and Teflon line. Had two deer encounters and was squawking the new Shinko tire using two fingers with excellent control. With a GOOD front brake the drum rear was all that was needed to run the rear tire to the limit of adhesion also and the foot lever actually has a good, easily modulated feel. I am happy with the Shinko tires too. I am currently exploring the corning limits on them (and me) but so far so good.
 
Already mentioned that your system most likely has a little air still in it. I position my bikes as mentioned and rap the lines and MC reservoir with a screw driver handle. I also just use my hand to bat the lever and watch the final bubbles come out of the littlest hole in the bottom of the reservoir.
 
Already mentioned that your system most likely has a little air still in it. I position my bikes as mentioned and rap the lines and MC reservoir with a screw driver handle. I also just use my hand to bat the lever and watch the final bubbles come out of the littlest hole in the bottom of the reservoir.

I'm glad i came across this post.. MMM at 650 Central told me the same thing.. I just installed a new M.C anda stainless braided line myself, and this was a good reminder.. i think i have a few bubbles left in my system.. MMM said to leave the M.C. cap on after initial bleed , then tap on lines.
Is this correct?

I wanted to share a little bit with anyone who purchases the Brembo MC. yz lever style from 650 central.. The brake light switch did not come with any female wire couplers or boot ..Here is something i posted about it earlier..

I got the 11 MM bore and also put on stainless lines. Problem though with the light switch. It did not come with any connectors or a boot. The OEM connectors wont fit up nor the oem dust boot.. I found some stuff at autozone. I used some gold plated female disconnects .110"... (part number 84541) I took a torch and melted off the color coded ends , as they were too thick to mate up with the brembo switch. cleaned them up with a small drill bit, put shrick wrap over the main switch leads and casing , made connections, slid the wrap over the switch leads . I also picked up some bypass caps(extra large barb caps)in the help section (part # 02253) i took a cheap 3/16 round phillips head screw driver heated with torch untill red hot and melted a clean hole through the round end of the rubber cap.. i slid the rubber cap over the wire casing first and before i made any connections .. then the shrick wrap of switch leads.. the rubber bypass cap fits happily over the brass switch stem. ( nice water proof seal). it seats snuggly over the casing of wires too.. looks very clean and way better than the factory melted crimp on the casing... around the base of the oem switch boot... I will be posting pics of the finished look later on.. I just bled the brakes and they already feel way much better than stock.. MMM at 650 central said to high side the left /mc side of hadlebars to get the fine bubbles to rise out into the MC.. and to keep the reservoir shut and to tap on the brake line occasionally to help out the micro bubbles.. i should have a rock solid pull by morning.
 

Attachments

  • brembomc SAM_0197.jpg
    brembomc SAM_0197.jpg
    144 KB · Views: 456
Well I have been waiting til I got a few more miles on but here's what i have done up front;
Mikes XS cartridge emulators and fork seals. Good thing much better feel, a bit harsher and you can hear the washers blow loose but I'm thinking it's a better machine for that.
Overhauled both stock master cylinder and caliper, new piston in the caliper all new parts in the master cylinder. No change in braking, a bit "stiffer lever" because the caliper piston isn't binding from the gunk on the bore and behind the seal.

Put on a new MikesXS rotor, meh no change in feel but it is a LOT lighter. AND better looking.
Then changed to Vesrah sintered pads from 650 Central. this made a difference, about 10% better stopping. Couple of notes; follow his break in instructions. The mikes rotor should be sanded or better yet wet stoned before use. The one I had is from several years ago but the drilled holes had "raised edges" that should have been ground back to flat.
Next up was a one piece teflon (braided stainless in the common vernacular) brake line. Reduced lever "sponge" further, lever is rock hard, less than 3/4 total travel I had to thread the adjuster screw back to get the handle closer to the bar for leverage. But yeah, it still needed lots of leverage and 4 fingers to haul it down.

Finally

I went to a 10mm front master, I was also worried about travel. the travel increased from 3/4" to about 1 1/4" still plenty of room between the lever and the grip, But baby, she now STOPS, not stops (whimper). 2 fingers no problem. New Shinko tire will howl when I want it to. Huge improvement. But I think you HAVE to have the teflon line, the old rubber line will just swell too much under the pressure.

So yeah you need to find where the problem is yet.
Finally I have an easy to use controllable brake, I really love it. But I think you should keep in mind it AIN"T a sport bike system, it stops well but might be prone to over heating under hard repeated use. (overheating can = goes away, lever to the bar, no stop!)
Hope that helps!
 
Hi Gary. What bike and year is the 10mm master cylinder from. Does the stock Yamaha mirror screw in and is brake light switch the same hookup? Thanks.
 
Thanks Gary. New ones at pz about $89, but the 1/2 bar clamp mount is $20 extra. Looks like previous owner put an older OEM round MC on my bike. Fits nice, but doesn't brake well. Think I'll rebuild the caliper, get a new MC, new SS line, and possibly a new rotor. Any thoughts on that EBC drilled rotor that is a bolt-on fit (no spacers, etc)?
 
Back
Top