Ok, somebody stop me. I can't help myself. I thought I had sworn off polishing for awhile. Well, maybe this falls more in the cleaning category but there was some polishing involved. :yikes:

When I was going to put the exhausts away after getting them out to take a picture for peanut a week ago I couldn’t help but notice how rusty the backs and bottoms were.

Unfortunately new exhausts just aren’t in the budget right now but the least I could do for this newly rebuilt engine in the spring is to put clean exhausts on right? Ah........they gotta get done sometime.

I must say if it weren’t for cosmetic reasons, I wouldn’t replace these.
First of all they’re the originals and that stock design I think have the nicest flair detail at the end of the muffler.
Secondly I love sound and the fact that they are louder with that blow out at the rear of the right muffler. Not too loud, but they just have a real nice throaty growl. People always say they hear me coming so maybe other vehicles hear me better as well.


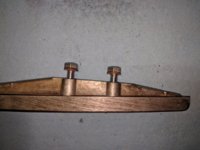
Left side original......40 years of rust......

IMG_20180126_155009.jpg IMG_20180126_155025.jpg IMG_20180126_155050.jpg IMG_20180126_155058.jpg

IMG_20180126_155208.jpg IMG_20180126_155256.jpg IMG_20180127_113947.jpg

Most of the rust on these was just light surface rust and cleaned up easily with 0000 steel wool lubricated with Mothers Chrome Polish. No reason to use the Mothers other than I have a couple of bottles of it that I don't use otherwise so I'm using it up for a lubricant when polishing chrome.

The toughest job was cleaning the huge rust build up at the crossover tube and inside the top bend on the headers. I tried Nylox wheels, and wire wheels and as you would expect barely touched it. I remember trying Naval Jelly years ago but don't recall having much luck with it. In any event I don't think it's available in Canada anymore. Went to Canaglian Tire and picked up a bottle of this……
download.png


It works fairly well. Takes several applications and requires aggressive scrubbing with a wire brush. Also used a brass wire wheel in a cordless drill around the crossover tube weld areas after the bulk of the rust was removed.

IMG_20180127_160851.jpg


IMG_20180127_160449.jpg IMG_20180127_160456.jpg IMG_20180127_160502.jpg IMG_20180127_161317.jpg

IMG_20180127_161345.jpg IMG_20180127_161442.jpg

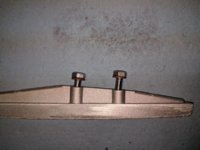
Couldn't get every last spec of rust but they're sure a bunch better.

Finished up with a little Autosol polish. I’d like to try the Blue Magic you guys use but like so many other things it’s not available in Canada.
I’ll have to order some on Amazon or eBay sometime.

Lot of work for a rusted out old set but they're all I've got.
Ya I know they'll rust again but maybe she'll know I tried and now I don’t have to feel guilty putting dirty pipes back on her.

Now I really just gotta go paint something!
 
Robin,
That’s an amazing transformation! I know the exhaust on my bike was so crusted with burned on oil from various leaks, I worked on them three separate times. I used kerosene with steel wool , and on the really tough stuff, a brass wire wheel in a drill. Then I finished up with chrome polish and wax.
I wonder if there is any way to repair that muffler? Well, any way beautiful results you got there! Well done!
 
Thanks Bob!

I guess it could be fixed but the cost to do it right and then re chrome would likely exceed the cost of a replacement set.

It's interesting how the same rust out had occurred on both of my bikes. Here is a patch repair that one of the PO's tried to do on my 78.

screenshot_20180127_232551.jpg


Frankly, I wish they had just left the rusted out hole. It would have looked and sounded better!
 
Ya, well at least these are cleaned up. I'll run both sets on both bikes for now until my ship comes in!
Maybe I'll come across a parts bike (or two) that have decent exhausts. Slim chance probably but ya never know.
 
That's one hell of a transformation there Robin. Wish I had the option to see if I could match ya ;).... but my originals were MIA when I got the bike :(
Nice!!!
 
Thanks Jim!

Match me?, ha. I'd be getting schooled by you buddy!

So you have no choice but to bite the bullet and go with new and shiny! Lucky man!
 
...bite the bullet and go with new and shiny! Lucky man!
Lucky is relative. You.... will have big arms and a big wallet. My wallet will be skinnier and my arms will atrophy from lack of polishin'
Who's the lucky one again? ;)
 
wow thats impressive Robin good job .

I reckon you can get far more satisfaction out of restoring something than tossing it in the trash and then buying some sparkly new replacement jobbies that don't last 5 minutes .

Plus you have saved another original part of your bike for posterity and the next custodian ;)

. I bought a load of new stainless fixings and fittings when I first bought my 79'er but in the end I didn't have the heart to fit them to such an original bike and they still sit in a box in my shed.
Someone in Idaho had really looked after the bike for many years and I figure I owe them and the bike every chance to keep it as original as much as is practicable.
 
Picked up my new OEM front cam chain guide today.

Boats.net had these available for quite awhile for $115.99 USD plus shipping. You can pretty much double that to get one up here. Happened to look it up one night then went back the next morning to get a price before going to my OEM parts guy and they were Obsolete. (I'm beginning to hate that word)

Fortunately my OEM parts guru Sage at Wolfeworx pulled another one out of his hat and tracked one down for me in the mid western States. Had it shipped to their Port Huron post box and it finally made it to me today.

I really wanted to use this OEM part on my rebuild after reading several threads here about the problems associated with the Mike's/XS650Direct part.
I did however add one of those to a XSD order for comparative purposes, and just in case I couldn't get an OEM part I’d deal with what I would have to do to make it work.

Thought I'd do some comparisons and post up the results here.

First off, I think I can recall a post by 2M that the Mike's guide was a bit shorter. Looks like they saw his Post and have addressed that.

IMG_20180323_163437.jpg IMG_20180323_163448.jpg

The rubber is quite a bit softer on the Mike's part versus the new OEM part. You can see my fingernail marks left in the firmer, denser OEM part on the bottom. :doh:

IMG_20180323_164013.jpg


I think bolt hole spacing has been one of the concerns with these Mike's parts so I put some 6mm bolts in hand tightened until they bottomed out to try and measure things.
I immediately noticed that the angle of the bolt holes was off by a fair bit. New OEM guide in front, Mikes in back.

IMG_20180323_164923.jpg


IMG_20180323_165016.jpg


Was going to put my digital bevel gauge on and see how much it was out but didn't know if that would be important. If you guys think it is let me know and I'll measure that. Whatever the difference is it is certainly going to effect the guide angle when installed. I don't know if this would matter or nor not but I would think it would cause increased wear to the top of the guide?

Then did some measurements of bolt hole spacings. My technique may not be very accurate but I figured measuring the outside of 2 bolts would likely be closer than trying to measure the inside of 2 inline holes. Looks pretty close. Maybe they got the memo on that too.

IMG_20180323_170842.jpg


IMG_20180323_170943.jpg


Couple of other things apparent in the pics below. The casting for the bolt holes is at the same angle as the bolts in the bottom new OEM guide while the bolt hole castings on the Mikes part are closer to perpendicular to the guide and then must be drilled out on a angle. Perhaps this is why they aren't as accurate?

IMG_20180323_170055.jpg


The other thing you likely noticed was that the top bolt hole on the Mikes part wouldn't allow the bolt to seat as far.
Here's the original guide with the original mounting bolts.

IMG_20180323_174427.jpg


And the new Mikes part with the original mounting bolts.

IMG_20180323_174154.jpg


I did not try to test fit this so I can't say definitively whether or not there are enough threads to install the Mikes guide.
It appears that the hole is threaded all the way to the bottom but I'm guessing if one were to try and use this part they'd probably have to clean up those threads with a 6mm bottoming tap.

Hard to get but here's pics of the threads. They look pretty ragged to me and look like they could use some dressing. Maybe it's just me but it bugs me to have to start fixing a newly purchased part.

IMG_20180323_174609.jpg


Here's some pics of the original guide compared to the new OEM guide.

IMG_20180323_172046.jpg IMG_20180323_172558.jpg IMG_20180323_172939.jpg

My lack of experience doesn't allow me to make any concrete conclusions about this Mikes part but my impression is that is is still sub standard. Perhaps it would work. Someday on another project I may just have to find out.
Don't know if all this info is of any help but thought I'd post it up and see.

Interested to hear what you guys who would know think of all this.

I contacted Boats.net and they said there is no information as to whether or not Yamaha will ever make this part available again. Bummer.
 

Attachments

  • IMG_20180323_174427.jpg
    IMG_20180323_174427.jpg
    187 KB · Views: 270
  • IMG_20180323_174154.jpg
    IMG_20180323_174154.jpg
    204.3 KB · Views: 238
Good info Robin. And timely... my guide from Mikes is supposed to be here tomorrow. Looks like I got some work to do to it...
 
Well Robin, looks like you may have just bought the last good factory cam chain guide! Very interesting comparison. It looks like the dimensions are pretty good, but those bolt holes are pretty sloppy. I seem to remember some guys having problems with the rubber separating from the Mikes unit.
Nice comparo!
 
Thanks Jim. Hopefully yours will be closer to spec than this one. You've got the chops to make it right but we shouldn't have to do that.

Let me know if you need any other measurements or pics and let us know how what you find.
 
Thanks Bob. I hope there are still more out there or that MamaYama will produce some more.
 
We need to figure out a way to make our own, or repair originals, or adapt a still available one from another bike. I've thought about this SR/XT/TT500 one. The 500 uses the same cam chain as the 650. It's still available, only $25, and I've never heard of one failing. If we could make up a simple mounting block for it, something for it to bolt to and then mount in the engine, I think it would work.

http://www.boats.net/parts/detail/yamaha/Y-583-12231-00-00.html
 
I seem to recall you mentioning this previously 5twins. This would be an excellent solution.
Hopefully someone will pioneer and run with this idea. There would certainly be a market for that mounting block.
 
Back
Top