Be sure and refresh your browser from time to time. I'm still making minor tweaks to it......I'm following along on the shop computer.
-
Enjoy XS650.com? Consider making a donation to help support the site.
XS650.com receives a small share of sales from some links on this page, but direct donations have a much greater impact on keeping this site going.
You are using an out of date browser. It may not display this or other websites correctly.
You should upgrade or use an alternative browser.
You should upgrade or use an alternative browser.
On the road again at 40.............the bike that is
Ok, will do Jim, thanks. Man, another thing to remember.......lol. Hope I haven't gone past your tweaks. 
Wow, an engine build with an online manual updated in real time. Who'd have ever thunk it!
Thanks again buddy!
Wow, an engine build with an online manual updated in real time. Who'd have ever thunk it!
Thanks again buddy!
I'm sure you'll do fine. Your work is very meticulous and the parts are nice and clean. The importance of having everything really clean can't be stressed enough. Some of the rebuilds I see going on here actually make me cringe, lol. The parts are still absolutely filthy in my opinion and the work area is many times just as bad. The one that took the cake, and hasn't been bested yet, was some totally inept English guy from several years back. He did his topend rebuild in his gravel driveway. He had parts laying all over that driveway too, and not on drop cloths, paper, or cardboard, they were LAYING RIGHT IN THE DIRT !!!!! Needless to say, that job didn't turn out too well, lol. He had to re-do it like 3 times before it was OK. He's been gone from the forum for several years now, hopefully getting out of the biking hobby and taking up another more suited to his work practices, knitting maybe, lol.
All right Robin! The assembly phase, how exciting to see this go back together. We’re rooting for you! Well done!
Thank you 5twins, and thank you for all your help and support getting me to this point. When it was diagnosed that I had to do this job you said “I think you will actually enjoy the process”. You were right, I really am. It did seem overwhelming at first, but as you keep moving forward it seems less so.
Aways to go yet, but so far so good.
Aways to go yet, but so far so good.
Thanks Bob. Yes you're right it's pretty exciting. Taking my time, going slow, double, triple checking everything.
The next one will go faster!
The next one will go faster!

Ok, not quite sure on how you guys do this so this is a bit of a convoluted, jury rigged, get up, but I think it did the trick. I guess what we're trying to do here is find the absolute TDC, top of piston travel.
Some pieces of pex and some washers just snugged up held the cylinders down.

The only way I could attach my magnetic base and be sure it wouldn't interfere with the pistons was to anchor it to the studs. Then I realized afterwards I could have also used some steel shims between the magnetic base and the cylinder liners to raise it a bit. The magnet very likely would have been strong enough to hold there as well. Oh well.


Worked the crank nut by hand back and forth very slowly, lightly, minutely until I found the extent of vertical piston travel.

Here's where my timing mark is at.

Huh, looks like we're good to go! Guess we'll carry on tomorrow.Thanks for all your help guys!
Some pieces of pex and some washers just snugged up held the cylinders down.
The only way I could attach my magnetic base and be sure it wouldn't interfere with the pistons was to anchor it to the studs. Then I realized afterwards I could have also used some steel shims between the magnetic base and the cylinder liners to raise it a bit. The magnet very likely would have been strong enough to hold there as well. Oh well.

Worked the crank nut by hand back and forth very slowly, lightly, minutely until I found the extent of vertical piston travel.
Here's where my timing mark is at.
Huh, looks like we're good to go! Guess we'll carry on tomorrow.Thanks for all your help guys!
Well played Robin!!
Just curious.... I initially installed my chain with the side I polished facing in.... AWAY from the guides. Can't really tell from your pics, but it almost looks backwards.... just like I did.
Just curious.... I initially installed my chain with the side I polished facing in.... AWAY from the guides. Can't really tell from your pics, but it almost looks backwards.... just like I did.
Thanks Jim. 
LOL. Jeesh you know me only too well Jim. I never really thought about this until just now when you mentioned it. Without even thinking any different, I polished both sides with a wet stone/WD40 and then finished with some 220 W/D paper with WD40.
Just like the Lord of the Rings director Peter Jackson said, "Just because you can't see it, doesn't mean you shouldn't finish it". Ya I know. OCD.
One side.....

T'other.....


I initially installed my chain with the side I polished facing in
LOL. Jeesh you know me only too well Jim. I never really thought about this until just now when you mentioned it. Without even thinking any different, I polished both sides with a wet stone/WD40 and then finished with some 220 W/D paper with WD40.
Just like the Lord of the Rings director Peter Jackson said, "Just because you can't see it, doesn't mean you shouldn't finish it". Ya I know. OCD.
One side.....
T'other.....
Nicely done Robin! I like your solution for finding TDC. Keep er coming! 
Thanks Bob. I'll try.
Cruizinimage wouldn’t ship these pistons to Canada. Danielblack added them to his order, Maxpete picked them up from Daniel while on a post Christmas family holiday to Phoenix, brought them to Canada in his carry on bag, and his daughter brought them to me in London.
I wondered if Pete might have any problems ‘smuggling’; those pistons into Canada. Well, IIRC as Pete recounted the story to me, the Security check officer questioned Pete as to the content of those boxes as he was boarding the plane.
Officer, “What’s in these boxes sir?”
Pete, “Those are pistons for a 1977 Yamaha XS650 motorcycle”.
Officer, “Ya, that’s what I was going to say. I guess you can’t hurt anyone with a piston, have a nice flight”.
Pete can correct me if I’m foggy in my recollections.
Ah, A Tale of Two Pistons.
Yup - that is exactly what he said. He was one of very few airport security folks I've ever met who displayed a sense of humour on the job.
So glad this is coming together so nicely Robin.
Pete
Thanks Pete, me too, fingers crossed.
Mentioned to Jim that he must have arms like Superman to wrestle that cam chain on there. I knew this was going to be the toughest part of the job.
Wasn't wrong.
Put some more pex spacers on the studs, tightened the head down somewhat. That helped a bit, still a little ways away.
Buddy then said why don't we do it the way we took it off? Good idea buddy!
We had removed the cam with the chain intact by pulling a pair of bearings off.
Did that again. Pulled the left side bearings, which dropped the cam enough to get the master link on the chain.
Slid both bearings over a #3 JIS screwdriver. Insert into cam, lift and very lightly tap bearings into place until the inner bearing was seated.
Then added a large socket to seat the outer bearing. Whew!

In hindsight could have done a couple of things better. Should have used sockets instead of the Pex, less squish.
And should have added a little more preload on the studs which would have allowed us to get the chain on without pulling the bearings.
Ah well, in the heat of a high anxiety moment we did figure a way to get it done.
Jim’s link riveter has a nice rounded pin end. On these cheapies, the end of the pin is flat so it tends to slip off the rivet. I filed the tip so it inserted into the link better.

The first one had been bent while trying to remove the old master link. It bent here again beyond serviceability.
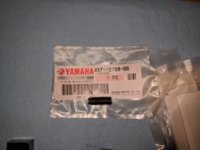
I had added that replacement pin to a XS650Direct order for this job.
So filed the second, it bent, then broke. I probably rounded it too much so that it seated too far.
Ended up finishing it as per Hans Pahl, with buddy holding a big back up hammer while I used a big centre punch and hammer.

Just one example of how having 4 hands makes this whole job easier. I don’t know how you guys do it solo.
I guess with time and experience you must develop your bag of tricks.
Wanted to run this next one by you guys.
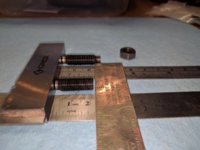
I had read a post awhile back by Aldo5468 that he had used these valve adjusters.


He did say that they were shorter but that there was enough thread.
Here’s how they look installed.


Not much extra exposed thread there.
Would you guys be comfortable with these?
Gotta say it sure is easier adjusting the valves with a ‘T’ handle allen key.
We're getting closer!
Wasn't wrong.
Put some more pex spacers on the studs, tightened the head down somewhat. That helped a bit, still a little ways away.
Buddy then said why don't we do it the way we took it off? Good idea buddy!
We had removed the cam with the chain intact by pulling a pair of bearings off.
Did that again. Pulled the left side bearings, which dropped the cam enough to get the master link on the chain.
Slid both bearings over a #3 JIS screwdriver. Insert into cam, lift and very lightly tap bearings into place until the inner bearing was seated.
Then added a large socket to seat the outer bearing. Whew!
In hindsight could have done a couple of things better. Should have used sockets instead of the Pex, less squish.
And should have added a little more preload on the studs which would have allowed us to get the chain on without pulling the bearings.
Ah well, in the heat of a high anxiety moment we did figure a way to get it done.
Jim’s link riveter has a nice rounded pin end. On these cheapies, the end of the pin is flat so it tends to slip off the rivet. I filed the tip so it inserted into the link better.

The first one had been bent while trying to remove the old master link. It bent here again beyond serviceability.
I had added that replacement pin to a XS650Direct order for this job.
So filed the second, it bent, then broke. I probably rounded it too much so that it seated too far.
Ended up finishing it as per Hans Pahl, with buddy holding a big back up hammer while I used a big centre punch and hammer.
Just one example of how having 4 hands makes this whole job easier. I don’t know how you guys do it solo.
I guess with time and experience you must develop your bag of tricks.
Wanted to run this next one by you guys.
I had read a post awhile back by Aldo5468 that he had used these valve adjusters.


He did say that they were shorter but that there was enough thread.
Here’s how they look installed.
Not much extra exposed thread there.
Would you guys be comfortable with these?
Gotta say it sure is easier adjusting the valves with a ‘T’ handle allen key.
We're getting closer!
Very nice Robin! I’m no Guru, but those adjusters wouldn’t give me any pause. They are fully threaded in the nut and as you said the Allen head feature is nice.
Good job
Good job
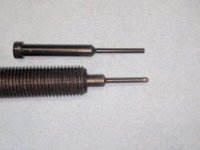
I don't think those pins you used/modded were the riveting pins, they look like the chain breaking ones. The riveting pin will have a distinctly rounded end. You can get a very nice replacement from Motion Pro .....
https://www.motionpro.com/product/08-0062
Even using the right pin, I still had issues with it slipping off the chain pin end. I solved that by tapping a slight "X" cut into the chain pin end with a small chisel .....

I made the mistake of loaning my riveting tool to the ham-fisted, hammer mechanic kid down the street so he could rivet his new drive chain. It came back to me with the rivet pin head all fucked up. But, this turned out to be a good thing because then I discovered these Motion Pro replacements and bought a couple. They are so much better made than the original was and the head is shaped better. It stays on the chain pin better but I still do the little "X" cut first.
https://www.motionpro.com/product/08-0062
Even using the right pin, I still had issues with it slipping off the chain pin end. I solved that by tapping a slight "X" cut into the chain pin end with a small chisel .....
I made the mistake of loaning my riveting tool to the ham-fisted, hammer mechanic kid down the street so he could rivet his new drive chain. It came back to me with the rivet pin head all fucked up. But, this turned out to be a good thing because then I discovered these Motion Pro replacements and bought a couple. They are so much better made than the original was and the head is shaped better. It stays on the chain pin better but I still do the little "X" cut first.
I don't think those pins you used/modded were the riveting pins, they look like the chain breaking ones.
Yup!, just looked in the kit, sure enough!
 Ah well, I'll know for the next one.
Thanks 5twins.
The riveting pin, as you can see, quite different than the one you used/modded .....

I don't use this tool much for chain breaking because, as you discovered, the small diameter pins for use on small chains are very prone to bending. I use it pretty much exclusively for riveting. I have larger, more heavy duty chain braking tools. But even so, I still grind the heads of the chain pins off flush and try prying the plate off 1st (or tapping the link out with a punch) before I resort to the breaker.
I don't use this tool much for chain breaking because, as you discovered, the small diameter pins for use on small chains are very prone to bending. I use it pretty much exclusively for riveting. I have larger, more heavy duty chain braking tools. But even so, I still grind the heads of the chain pins off flush and try prying the plate off 1st (or tapping the link out with a punch) before I resort to the breaker.
Keep on keepin' on Robin! 

I'm lovin' it !


Similar threads
- Replies
- 15
- Views
- 2K
