Painters; I need advice, blending a "panel repair"

gggGary

If not now, When?
Top Contributor
XS650.com Supporter
Messages
30,947
Reaction score
60,866
Points
813
Location
Baraboo, WI, USA
THe Honda batwing had some scratch marks on the RH end, got them filled with spot compound, black lacquer primer and sanded. Any "best way"plans to get this gloss black and blended to the rest of the fairing? I have a spray can of gloss black lacquer, thought that might blend well. Not positive what the black is on the fairing but suspect it's gelcoat. I do have an airbrush so could spray black rattle can enamel with that. Ideas, techniques welcome.
fairing.jpg
 

Attachments

  • fairing.jpg
    fairing.jpg
    120.1 KB · Views: 83
Last edited:
Lacquer blends ok with LOTS of wet sanding, I've had pretty good luck with very light coats and wet sand with 1200 between each coat. After buildup is sufficient wet sand the whole fairing with 1200 and then hit it with 3M micro finesse then glazing compound.
 
IF that is gelcoat, your biggest problem is gonna be getting rid of the halo if you spray a lacquer. gelcoat and lacquer are gonna polish at different rates.

I’ve had the best luck doing spot repairs on gelcoat with an acrylic clear if i am spraying them. (I do a TON of them). And use an airbrush.

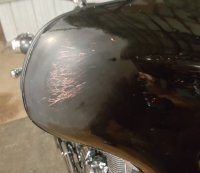
also, if you can get that filler out and redo with the same filler but adding a black pigment to the base (making the filler black) you will probably have a better end product as you can use less paint when blending.

also, if that’s a gelcoat - black is pretty much black with gelcoat unless it’s a custom mix which I highly doubt, you could use gelcoat and pigment to fix it and get a hardly noticeable end product. Skim it with a black pigmented gelcoat, sand and polish

you can also reduce gelcoat and spray it out of an air brush after you fill. Then sand and polish.

as I’m sure you know, two people can do the same thing with wildly different outcomes when it comes to artistic repairs. Their tends to be general guidelines but no ABC hard fast rules and much about a good end is very nuanced. More about the Indian than the arrow.
 
Last edited:
Good advice in comments above Gary. You'll need to sand further back to be able to feather the black in (red). The further you go, the better the blend you'll get. By feather, I mean full cover at the repair and gradually reduce spray to a slight dusting as you move away from it. . That'll help prevent (hide... camouflage?) the halo effect mentioned above.
What's goin' on here (white arrow)? Almost looks like a previous repair? Mebbe a sag? If it's a sag, it's doubtful you're lookin' at gelcoat.

Untitled.png
 
Actually that fairing is ABS all through I believe. If its painted then you will have to blend, otherwise you sould be able to sand those scratches out and finish with progressively finer grits and then with a plastic polish. We had bat wing fairings on both of our Victory Kingpins. My girlfriend had a black 8 ball and we did not paint the fairing. Of course she dropped it and it looked similar to your scratching. I was able to do the repair as mentioned above and you could not tell where they were. The scratches were on the right side.
Love the lines on that bike
I guess I should have added its a MempisShade batwing. If your brand is MemphisShade try the above.

F0AB3C1D-9794-4D38-872F-F29D71D7D8BB.jpeg
 
Thanks all so far, hmm hadn't considered black gelcoat as a repair option. Suspect finding that would get pricey fast. Yes fairing is very glossy,zero orange peal why I suspect gelcoat.
Jim I had masked sprayed and 400 grit sanded flat black lacquer primer, that's a remnant of the tape line so it will sand flush yet.
Will spray and sand 1-2 more coats of the primer.
I have several rattle can clears that I could top coat the black lacquer with.....
Also have a rattle can of blend pack basically solvent in a spray can just for "halo" hiding.
but not sure what paint that was intended for.
'bout anything I do will be better than the flat black in the scrapes that was there when I got it.

Cross post, Cra-z1 very likely! It's aftermarket, has a hide away door audio head n big ass speakers.
 
If it’s abs it will sand and polish out.

as Jim said feathering is key to reduce halo.

if I had to spray that I would get a full sheet of paper towel tear a curve into it and use it as a block/fade feathering tool. Slowly moving it further and further out from the repair to keep your feathering contained with out a hard line edge. (If that makes any sense I don’t know)

hard to explain, could visually show in about 5 seconds haha.
 
'bout anything I do will be better than the flat black in the scrapes that was there when I got it.
Was that really flat black? Or was it maybe the dull finish of a scratch in ABS? Cra-z1 might be onto something. You could pick a minor scratch and start sanding. See if the scratch disappears and the color stays black? If it's paint, you'll eventually hit a layer that's not the same black. If it's ABS, the color will stay constant as you sand. If that's the case, I'd follow Cra-z1's recommendation and just sand the scratches out and get to buffin'.
 
WideAwake I get exactly what you mean! a soft edge no tape line to remove.
Some those "scratches" pretty deep but yeah sand, polish no paint would be awesome!
Even a few shallow blended marks less noticeable than a paint blend line? hmm!
You'se guys are awesome.
 
Also Id use a foam backing pad since your working on a compound radius.
 
1+ on the foam pad. My rule of thumb for blending scratches; Always start with a finer grit than you think you'll need. If you start with 240 for example, you're committed to 240, 320, 400, 600, 800...... you get my drift. If you start with 600, you can always go down to 400... or further down if that ain't doin' the job. Remember, the higher (finer) you start, the less grits your arms groan about. ;)
 
'Nother trick I learned in the Air Force sanding scratches out of F-4 canopies. Sand in one direction 'till the scratch is gone. Go to the next finer grit and sand 90° to the previous girt. That makes it much easier to see when the sanding scratches from the previous grit are gone.
 
Last edited:
'Nother trick I learned in the Air Force sanding scratches out of F-4 canopies. Sand in one direction 'till the scratch is gone. Go to the next finer grit and sand 90° to the previous girt. That makes it much easier to see when the scratches from the previous grit are gone.
+1 on that, sanding perpendicular to the previous grit makes things way easier to see. It also removes the scratches faster than sanding parallel to them.
 
'Nother trick I learned in the Air Force sanding scratches out of F-4 canopies. Sand in one direction 'till the scratch is gone. Go to the next finer grit and sand 90° to the previous girt. That makes it much easier to see when the scratches from the previous grit are gone.
Did you teach that at the A&P school? I know that's how they taught it at the ATL. I used that technic to remove road rash from my Moto Guzzi windscreen. It was 100% effective.
 
Did you teach that at the A&P school?
Yes I did... then they had to actually do it. I'd scratch a windshield and to pass the project, they had to make it disappear. The 'pain in the ass' students got the deeper scratches... :smoke:

EDIT: Just kiddin'. I always tried to be even handed. Not always easy, but I tried.
 
It's not solid black. the scratches and some 400 grit had me down into a gray.
I wiped out the spot filler and primer with lacquer thinner which seems to have zero effect on the original black.

20201105_113042.jpg

So are we back to it's gelcoat?
seems like there might be two seperate layers of black, so gray dull blackthen gloss black.
the driver's side if anyone can ID it.
20201105_112026.jpg
 
Back
Top